A Garden Path That Actually Stops People in Their Tracks
A mosaic garden path transforms an ordinary outdoor walkway into a decorative surface that adds color, personality, and genuine artistic character to any garden. Whether you use broken ceramic tiles, river pebbles, glass pieces, or natural stone fragments, a mosaic path creates a ground-level display that looks completely handmade and completely intentional at the same time. It is one of those garden features that makes visitors slow down, look closely, and immediately ask how you did it.
I first attempted a small mosaic stepping stone for my garden a few years ago, using broken pieces from a set of old ceramic plates and some basic tile adhesive. The result was so much better than expected that the single stepping stone became a full garden path project over the following two weekends. There is something genuinely satisfying about turning broken, discarded materials into something beautiful enough to become the most admired feature of an entire outdoor space.
The best part about mosaic garden paths is that they suit every garden style and every skill level. A formal garden benefits from geometric tile patterns in classic colors, a cottage garden looks beautiful with floral pebble designs, and a contemporary outdoor space suits bold abstract mosaic work in graphic tones. Whatever your garden looks like right now, there is a mosaic path design that fits it perfectly and makes it look significantly better.
Why Mosaic Garden Paths Are Worth the Effort
A mosaic garden path adds lasting value to an outdoor space in a way that most other garden features simply cannot match. Unlike planted borders that require seasonal maintenance, or painted surfaces that fade and peel, a properly sealed mosaic path holds its color, pattern, and structural integrity for decades with very little ongoing attention. The initial investment of time and creativity pays back generously over many years of daily enjoyment.
Mosaic paths are also among the most budget-friendly garden improvement projects when you source materials creatively. Broken tiles from a bathroom renovation, chipped crockery from a charity shop, river pebbles from a garden center, and sea glass from a beach walk all become valuable mosaic materials at little or no cost. The most beautiful mosaic garden paths often use the most unexpected and affordable materials, which makes the whole project accessible to anyone, regardless of their renovation budget.
There is also a deeply personal quality to a handmade mosaic path that no manufactured paving product can replicate. Every design decision, every tile placement, and every color combination reflects the taste and creativity of the person who made it. That individual quality is exactly what gives a mosaic garden path its power to transform an outdoor space from pleasant to genuinely memorable.
15 Best Mosaic Garden Path Ideas to Try This Season
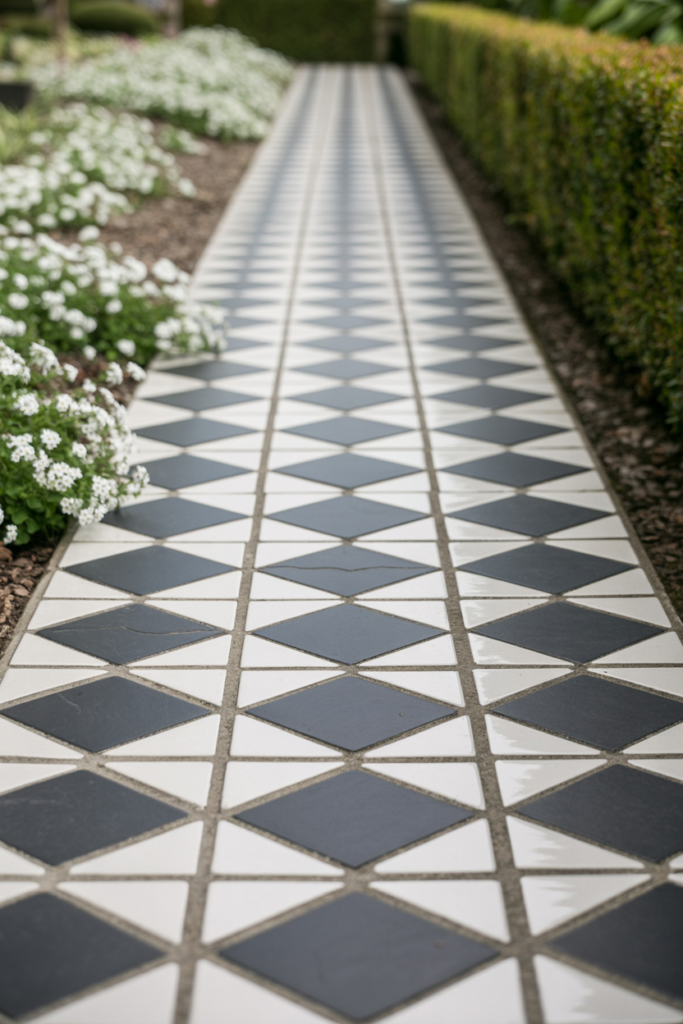
1. Classic Black and White Geometric Mosaic Path
A black-and-white geometric mosaic garden path creates one of the most striking and timeless outdoor walkway designs. Use broken black slate pieces and white ceramic tile fragments arranged in a repeating geometric pattern, such as diamonds, chevrons, or interlocking squares set directly into a sand and cement base. The high contrast between the two tones makes the pattern read clearly from a distance and gives the path a graphic boldness that suits both formal and contemporary garden styles beautifully.
Black and white mosaic paths photograph exceptionally well and look equally good in direct sunlight and overcast conditions because the contrast between the tones remains strong regardless of the light quality. I laid a short section of black and white diamond pattern mosaic between two garden border beds, and the graphic quality of it immediately gave the whole garden a more considered and designed feeling that the space had previously lacked. Sometimes a strong ground-level pattern is all a garden needs to feel complete.
Use consistent piece sizes throughout a geometric mosaic for the cleanest and most professional result. Irregular piece sizes in a geometric pattern create visual noise that undermines the clarity of the design. Take time to cut or break tiles to a consistent size before laying, and the finished pattern will look considerably more polished and intentional.
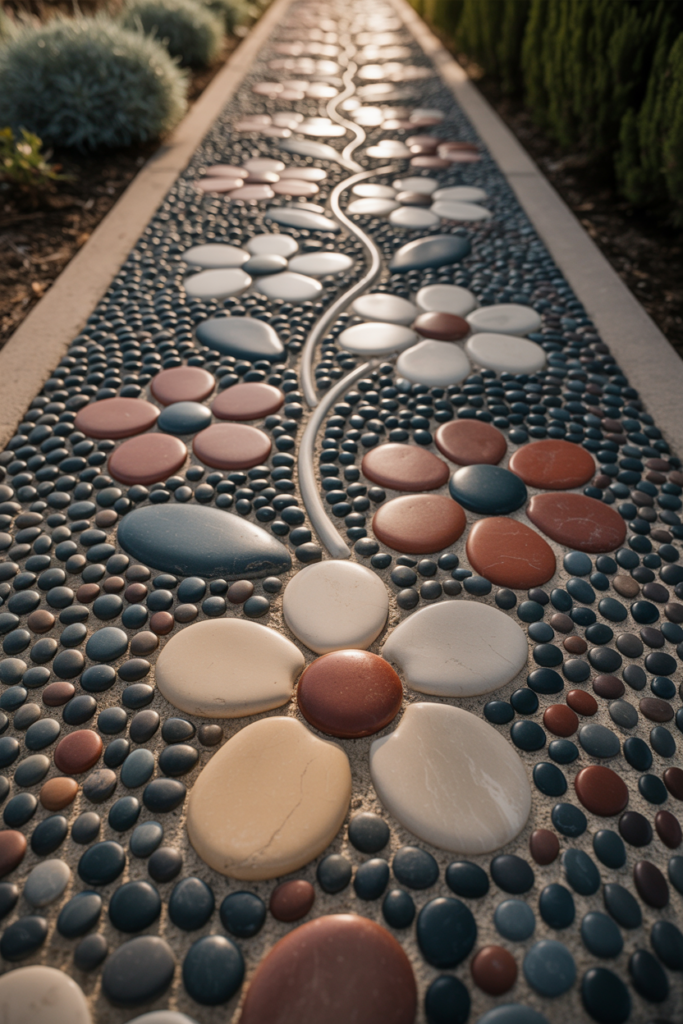
2. Floral Pebble Mosaic Garden Path
A floral pebble mosaic path uses smooth river pebbles in different natural colors to create flower, leaf, and stem designs across a garden walkway surface. Sort pebbles by color into groups of cream, gray, rust, dark brown, and black, and use each color group to build up petal shapes, circular flower centers, curving stem lines, and leaf forms set into a sand and cement mortar base. The natural stone colors create a soft, earthy palette that suits cottage gardens, country gardens, and naturalistic outdoor spaces perfectly.
River pebbles are one of the most satisfying mosaic materials to work with because their smooth, rounded surfaces sit beautifully against each other and create a naturally cohesive surface texture across the finished path. I created a simple five-petal flower design in cream and rust pebbles surrounded by a dark gray pebble background for a small circular stepping area, and the result looked genuinely like something from a professional garden design project. The key is sorting the pebbles carefully by size as well as color before starting, as consistent pebble sizes within each design area produce a much more even and polished surface.
Set pebbles on their edges rather than flat faces for the most durable and visually interesting result. Edge-set pebbles show more of their surface area, grip the mortar bed more effectively, and create a slightly raised texture across the path surface that adds tactile interest underfoot as well as visual interest from above.
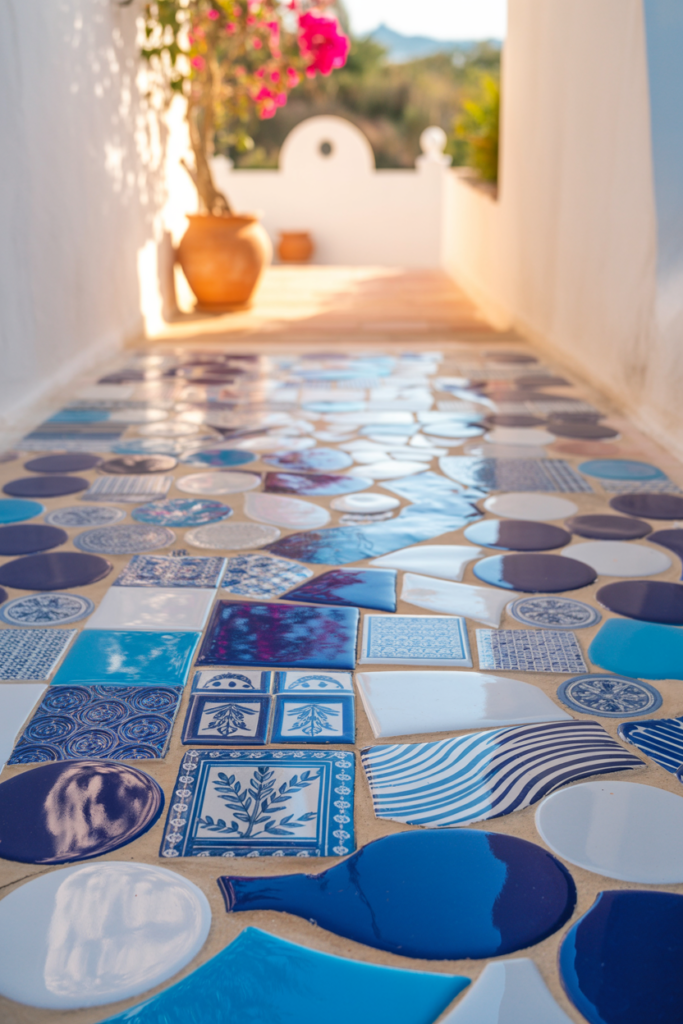
3. Mediterranean Blue and White Tile Mosaic Walkway
A Mediterranean-inspired blue and white tile mosaic walkway brings the warmth and character of southern European garden design to any outdoor space. Use broken pieces of blue and white ceramic tiles, Portuguese azulejo fragments, or hand-painted Moroccan tile pieces set into a concrete base in flowing, organic patterns that suggest sea waves, botanical motifs, or geometric Islamic-inspired designs. The combination of cobalt blue, sky blue, navy, and pure white creates a palette that looks fresh, vibrant, and genuinely beautiful in any garden setting.
Blue and white tile mosaic paths look particularly striking when they lead toward a water feature, a painted blue garden wall, or a Mediterranean-style seating area with terracotta pots and bougainvillea. The path and the destination reinforce each other visually and create a coherent garden atmosphere that feels genuinely transported. I incorporated fragments of old blue and white willow pattern plates into a mosaic path section alongside cobalt blue tile pieces, and the mix of the two blue tones added depth and variation that a single consistent blue tile color would never have achieved.
Source blue and white ceramic pieces from thrift stores, charity shops, and online marketplaces where old crockery and tiles sell for very little. Chipped plates, cracked tiles, and broken decorative pieces that nobody wants for their original purpose become genuinely valuable mosaic materials with exactly the right aged, slightly imperfect quality that makes a handmade mosaic path look authentically crafted rather than commercially produced.
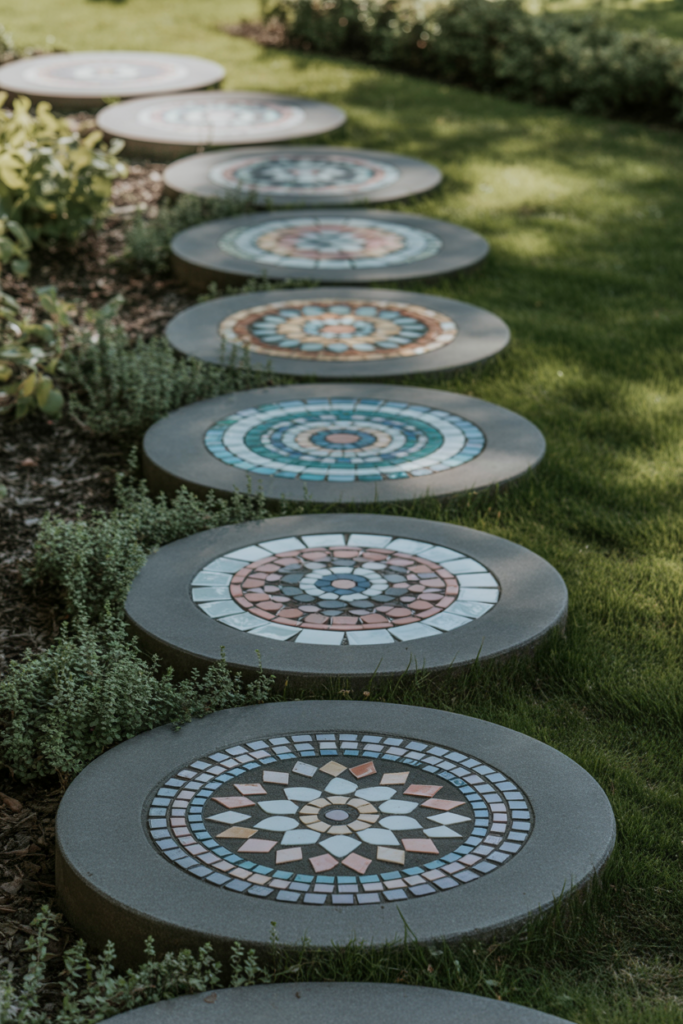
4. Mandala Pattern Mosaic Stepping Stone Path
Individual mosaic stepping stones with mandala patterns create a path that functions as a series of individual artworks set into the garden surface. Cast circular concrete stepping stone bases using a simple circular mold and then tile each one with a different mandala design using small ceramic tile pieces, glass mosaic tesserae, mirror fragments, and colored pebbles. The circular symmetry of a mandala pattern suits a round stepping stone format perfectly, and the repeating circular forms create a visually rhythmic pathway that draws the eye forward along the garden path.
Each mandala stepping stone can use a different color palette while sharing a common geometric structure that ties all the individual stones together into a coherent path design. I made a set of seven mandala stepping stones over the course of a winter using leftover bathroom tile samples, broken mirror pieces, and colored glass gems from a craft store. Set into the garden the following spring, the path became the focal point of the entire outdoor space and generated more genuine excitement from visitors than any planted feature in the garden.
Keep the background color consistent across all the stepping stones in a mandala path, even while varying the accent colors and inner pattern details. A consistent background tone, whether dark charcoal, warm terracotta, or classic white, ties a multi-stone mandala path together visually and makes the individual variations in each stone feel intentional rather than random.
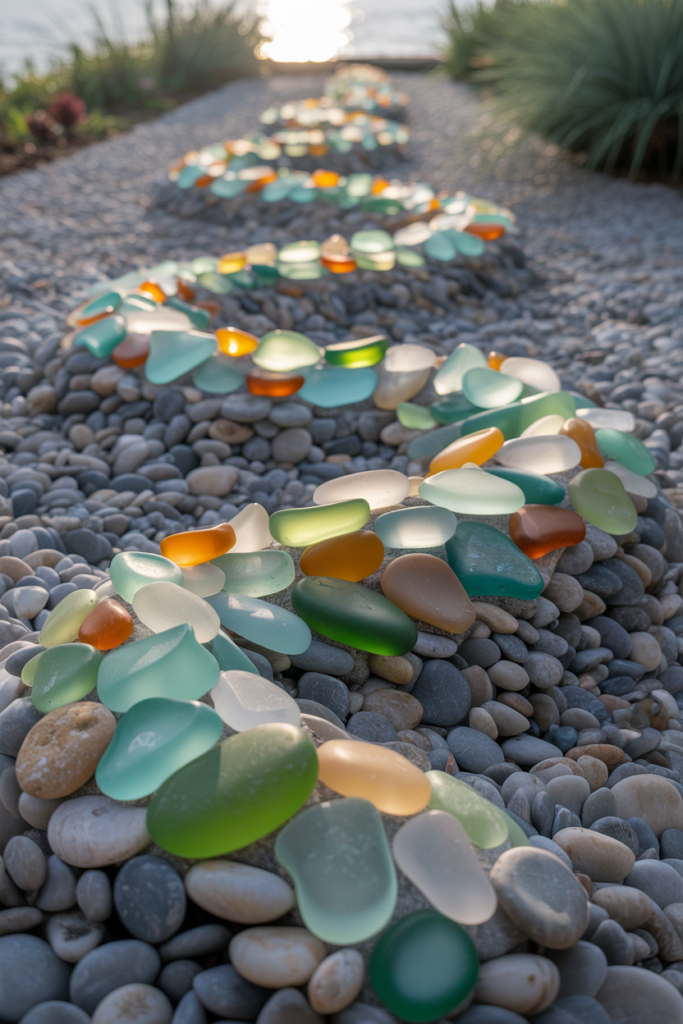
5. Sea Glass and Pebble Coastal Mosaic Path
A sea glass and pebble mosaic path brings the colors and textures of a coastal landscape directly into a garden setting. Collect sea glass in green, aqua, amber, and frosted white from beach walks or source it from craft suppliers and combine it with smooth gray and cream river pebbles to create a path surface that suggests gentle waves, shoreline patterns, or simple abstract compositions in coastal colors. The frosted surface of weathered sea glass catches light differently throughout the day and creates a subtly luminous quality in the finished path that standard tile or stone mosaic does not produce.
Sea glass mosaic paths work beautifully in coastal garden settings but look equally charming in any garden where a relaxed, natural aesthetic suits the overall planting and design style. The combination of frosted glass and smooth stone creates a varied surface texture that is visually interesting at close range and creates a pleasantly soft impression from a wider view. I used a mix of collected sea glass and purchased smooth pebbles to create a wave pattern path section in my garden, and the aqua and green glass tones complement the surrounding plant foliage in a way I had not fully anticipated but immediately loved.
Sort sea glass by size and tone before starting a mosaic path project. Very small sea glass fragments work best as accent details or fill pieces between larger pebble elements. Larger, more complete sea glass pieces with good color intensity work best as the primary design element,s where their color makes the most visual impact in the overall composition.
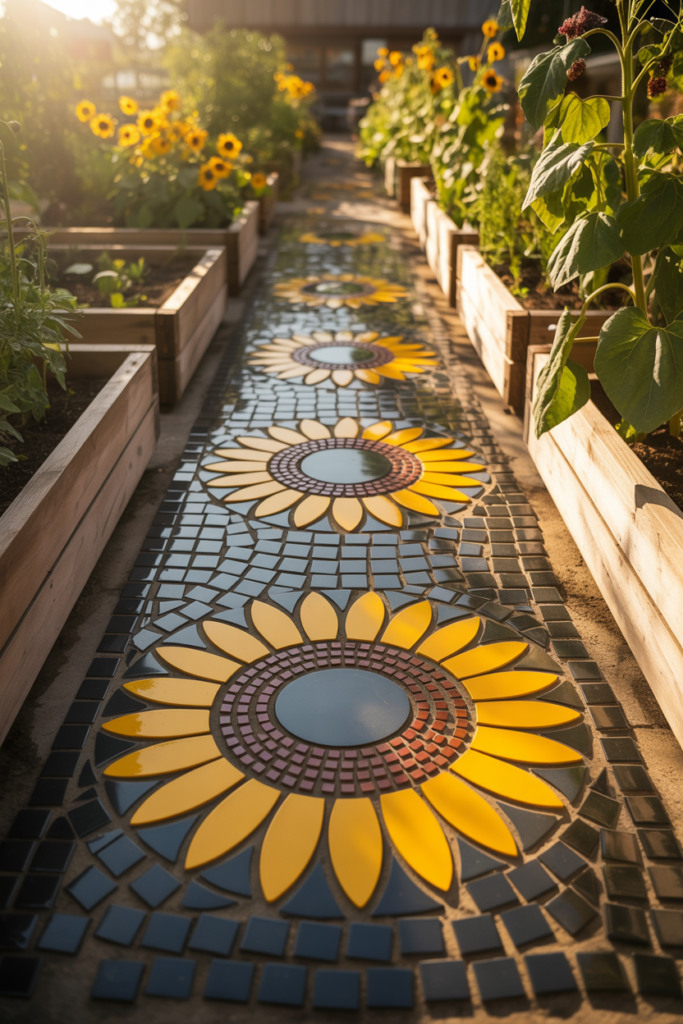
6. Sunflower Mosaic Garden Path With Yellow and Brown Tiles
A sunflower mosaic garden path uses golden yellow, deep amber, and dark brown ceramic tile pieces to create bold sunflower head designs repeated at intervals along a garden walkway. Set each sunflower design into a dark background of charcoal or black tile fragments with long oval petal shapes radiating outward from a central circular brown tile cluster. The result is a cheerful, high-energy path surface that suits cottage gardens, kitchen gardens, and any outdoor space that benefits from a warm and generous visual character.
Sunflower mosaic paths look particularly beautiful when the surrounding garden planting echoes the warm yellow and brown color palette of the path design. Planted borders with rudbeckia, helenium, echinacea, and ornamental grasses in amber and bronze tones create a seamless connection between the ground-level mosaic artwork and the vertical planting above it. I designed a short sunflower mosaic section between two raised vegetable beds, and the warm colors of the path tied the whole kitchen garden area together into a genuinely cohesive and joyful outdoor space.
Use unglazed ceramic tiles for the petal sections of a sunflower mosaic path rather than glazed tiles wherever possible. Unglazed ceramic provides better grip underfoot in wet conditions and weathers more naturally over time than glazed surfaces, which can become slippery after rain and develop an artificially shiny appearance that suits indoor spaces far better than outdoor garden paths.
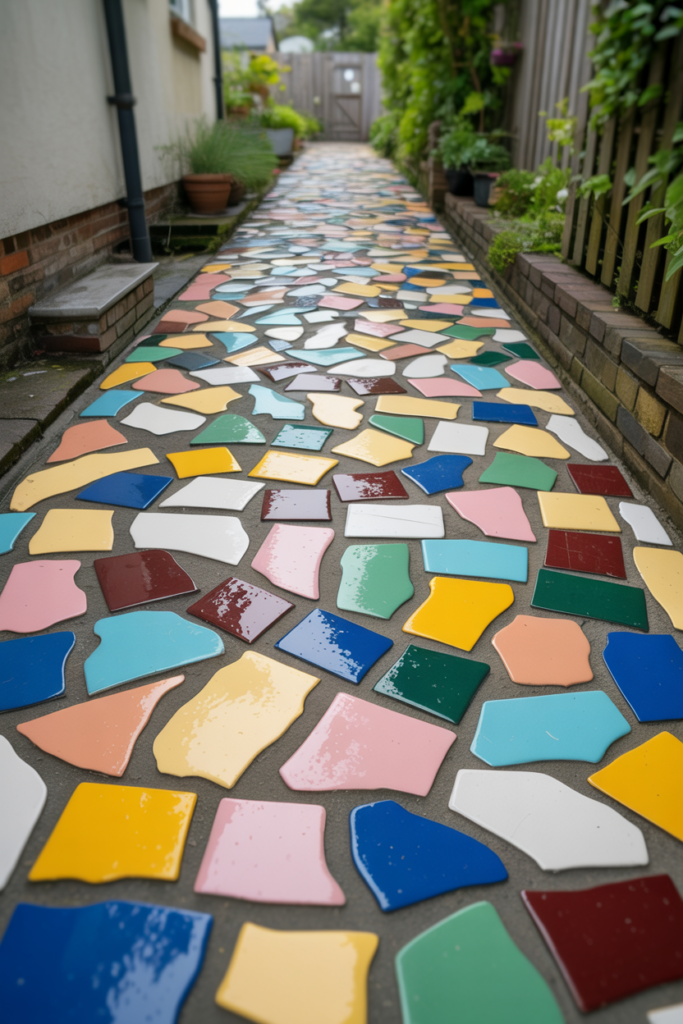
7. Random Crazy Paving Mosaic Path With Mixed Tile Colors
A random, crazy paving mosaic path uses irregularly shaped tile and ceramic fragments in a deliberately mixed and varied color palette to create an energetic, playful walkway surface with genuine folk art character. Collect broken tiles, old crockery pieces, and ceramic fragments in every color available and set them into a mortar base in a random jigsaw arrangement with consistent grout lines between each piece. The more varied the colors and the more irregular the piece shapes, the more vibrant and alive the finished path surface looks.
Crazy paving mosaic paths are the most forgiving mosaic style for complete beginners because the random arrangement means there is no pattern to align, no symmetry to maintain, and no geometric precision to achieve. Every piece goes where it fits, and the natural variation in the finished result is exactly what makes this style work. I used this approach to mosaic a narrow side passage path using nothing but broken crockery collected over several months, and the finished result looks genuinely artistic despite requiring zero formal design planning before starting.
Vary the scale of the tile fragments throughout a crazy paving mosaic rather than using uniformly sized pieces. Mixing very small fragments with larger irregular pieces creates a more interesting and visually dynamic surface than a uniform piece size ever achieves. Use smaller pieces to fill tight gaps between larger fragments and let the natural jigsaw quality of the arrangement develop organically as you work across the path surface.
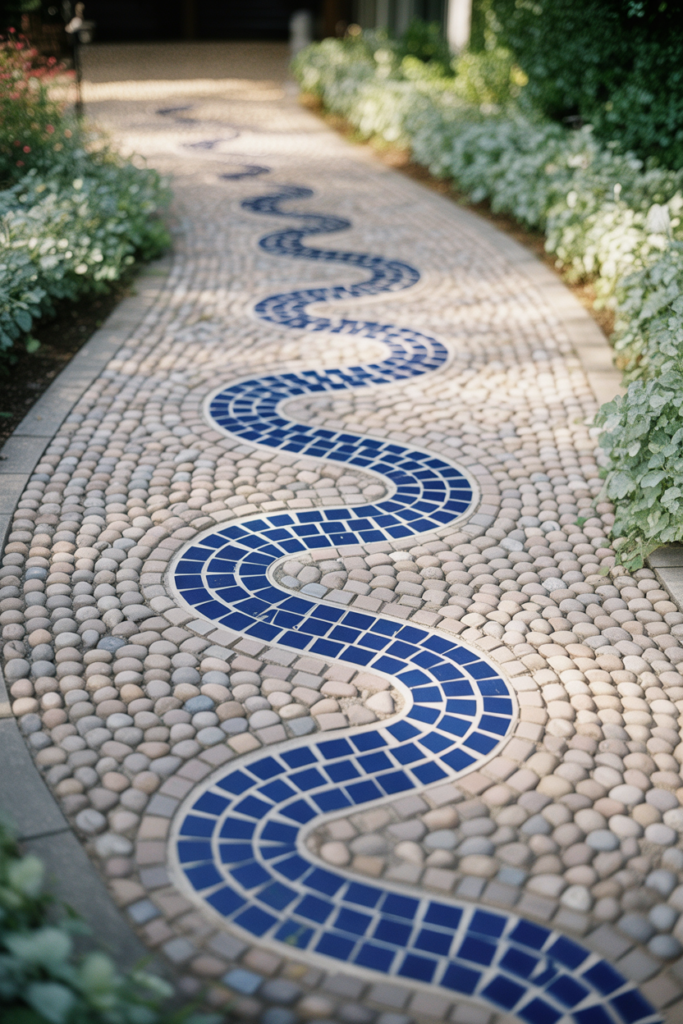
8. Spiral Pattern Mosaic Garden Path
A spiral pattern mosaic garden path uses a continuously curving line of contrasting tile colors to create a dynamic, movement-filled walkway design that draws the eye forward along the path in a genuinely compelling way. Lay a central spine of one tile color, deep blue, terracotta, or forest green, in a gentle S-curve or continuous spiral formation along the full length of the path, and fill the surrounding background area with a contrasting neutral tile color. The spiral line creates movement and energy in a flat paving surface that straight-line geometric patterns never quite achieve.
Spiral mosaic paths work exceptionally well in curved garden settings where the path itself already follows a gentle winding route through the garden. The spiral pattern within the path reinforces the curving direction of the walkway and makes the journey from one garden area to another feel genuinely considered and beautifully designed. I laid a simple single-spiral line in cobalt blue tile pieces through a pale gray pebble background along a curved garden path, and the combination of the curving path direction and the spiral pattern within it created a visual experience that felt significantly more sophisticated than the actual complexity of the design.
Plan the full spiral line on paper before starting any laying work. A spiral that loses its consistent curve partway along the path looks like a mistake rather than a design feature. Transfer the spiral line to the prepared mortar base using a chalk line or string guide before placing any tiles, and follow the guide carefully as you lay each section of the pattern.
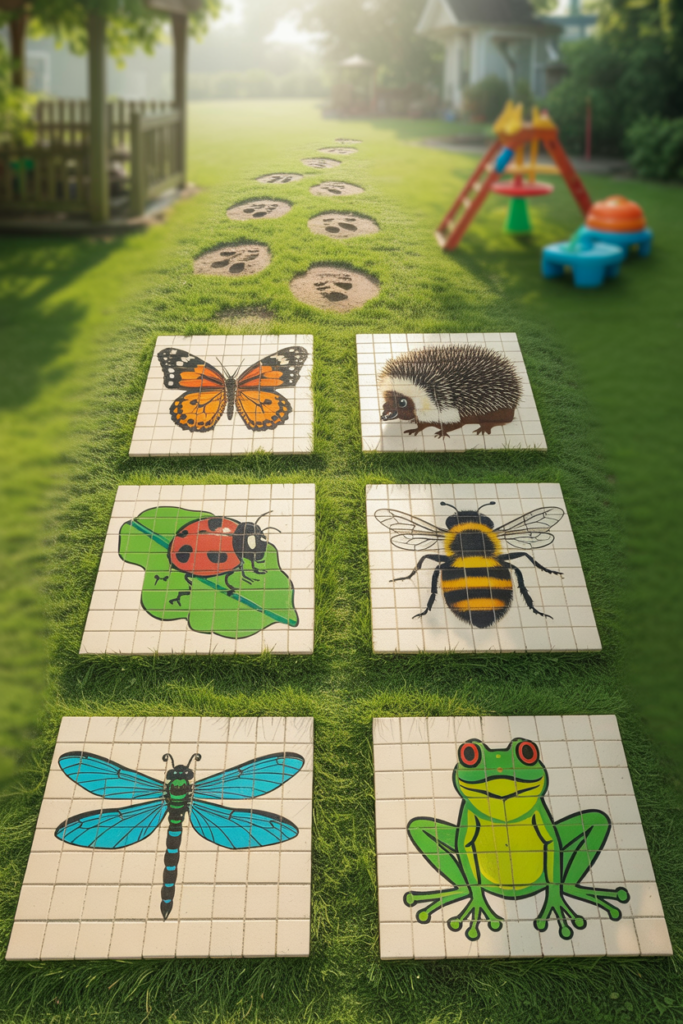
9. Animal and Nature Mosaic Stepping Stone Path
Mosaic stepping stones featuring individual animal and nature designs create a path that tells a story as visitors walk through the garden. Design each stone around a different subject, a dragonfly, a butterfly, a hedgehog, a bird, a frog, or a flower, and use brightly colored ceramic tile pieces and glass mosaic tesserae to bring each creature or natural subject to life on a round or square concrete base. The result is a path that functions as a permanent outdoor gallery of garden-themed miniature artworks.
Animal mosaic stepping stones work beautifully in family gardens where children use the path regularly. The individual creature designs give children something to look for and talk about on every trip through the garden, and create a genuine sense of playfulness and discovery in the outdoor space. I made a set of six wildlife stepping stones for a garden with young children, using simple outlines of a hedgehog, a butterfly, a snail, a ladybird, a bee, and a frog in bright colors, and the stones became the most popular feature of the entire garden within one afternoon of being set in place.
Keep animal mosaic designs bold and simple rather than highly detailed for the best visual impact at garden viewing distance. A mosaic creature seen from standing height needs strong outlines, clear color contrast, and recognizable shapes rather than fine internal detail that only reads well at close range. Bold, simplified designs in high-contrast colors always communicate more effectively at an outdoor scale than intricate, detailed designs that lose clarity when viewed from above.
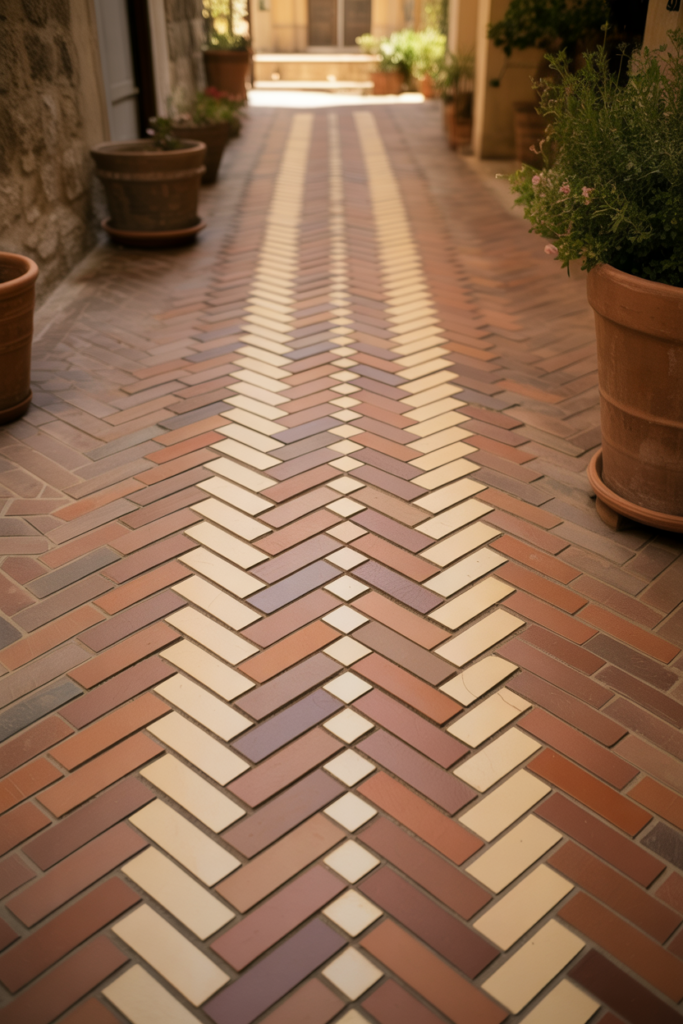
10. Terracotta and Cream Herringbone Mosaic Path
A terracotta and cream herringbone mosaic path combines the warmth of Mediterranean terracotta tones with the classic visual energy of a herringbone laying pattern to create a walkway surface that feels both timeless and genuinely beautiful. Cut terracotta tile pieces and cream or buff ceramic fragments into consistent rectangular shapes and lay them in an alternating angled herringbone arrangement set into a sand and cement base. The diagonal interlocking pattern creates a sense of movement along the path length, while the warm, earthy color palette suits almost every garden planting style imaginable.
Terracotta and cream herringbone paths look particularly at home in walled gardens, courtyard gardens, Mediterranean-style outdoor spaces, and traditional cottage gardens where the warm earthen tones connect naturally with terracotta pot displays, stone walls, and warm-toned flowering plants. The herringbone pattern also visually widens a narrow path by directing the eye diagonally across the path width rather than straight along its length. I used this pattern for a narrow side garden path, and the diagonal laying direction made the path feel significantly wider and more generous than its actual dimensions.
Seal the finished terracotta tile sections of a herringbone mosaic path with a dedicated terracotta sealer before applying the final grout. Unsealed terracotta absorbs grout color readily and develops permanent staining that dulls the warm orange tone of the tiles considerably. A sealer coat applied before grouting protects the tile surface completely and keeps the finished terracotta sections looking clean and vibrant for many years.
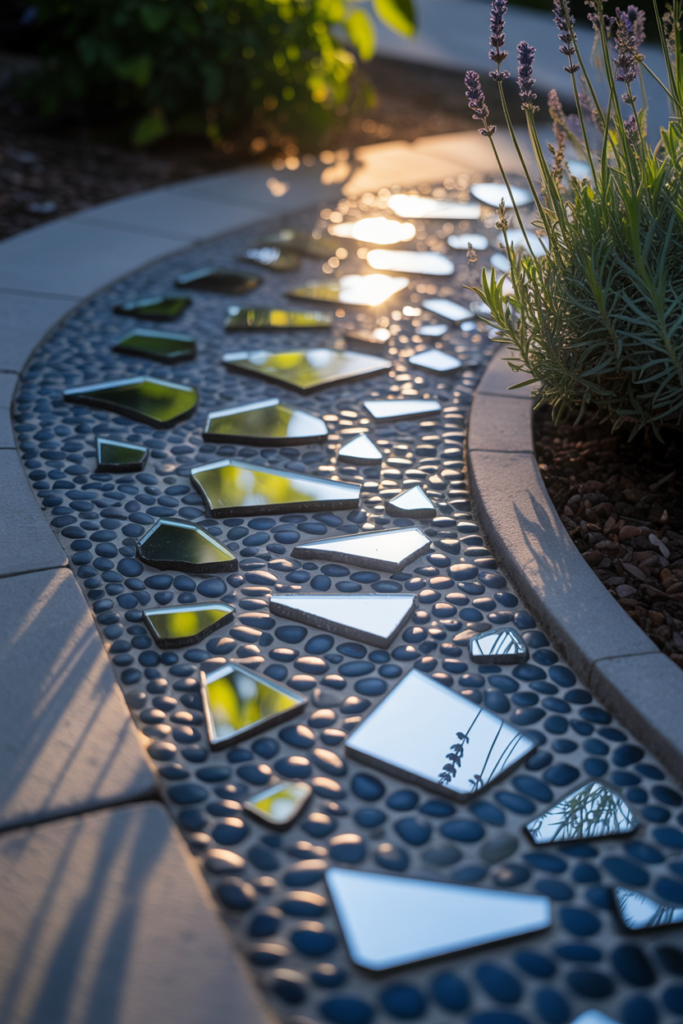
11. Mosaic Garden Path With Embedded Mirror Pieces
Embedding small mirror fragments into a mosaic garden path creates a surface that catches and reflects light in constantly shifting ways throughout the day, giving the path a genuinely magical quality that no other mosaic material produces. Use small irregular mirror pieces cut from old mirrors or purchased as craft mosaic mirror tiles and distribute them throughout a standard tile or pebble mosaic design as accent elements that catch sunlight and create moving light reflections across surrounding plants and garden surfaces.
Mirror mosaic paths look most spectacular in the morning and late afternoon when low-angle sunlight hits the embedded mirror fragments at a shallow angle, and projects reflected light widely across the surrounding garden. In a shaded garden area, even small amounts of embedded mirrors create a welcome sense of brightness and light that opens up what might otherwise feel like a dark and enclosed outdoor space. I added mirror fragment accents to a pebble mosaic path section in a partly shaded area of my garden, and the light-catching quality of the finished surface transformed what was previously the least interesting part of the garden into one of its most captivating features.
Use only purpose-cut craft mirror pieces or safely broken mirror fragments with smooth edges for an outdoor mosaic path. Sharp raw mirror edges present a safety hazard in a garden path setting and also chip and deteriorate more quickly when exposed to freeze-thaw cycles than properly cut pieces with sealed edges. Smooth the edges of any hand-broken mirror pieces with a tile file before incorporating them into the mosaic design.
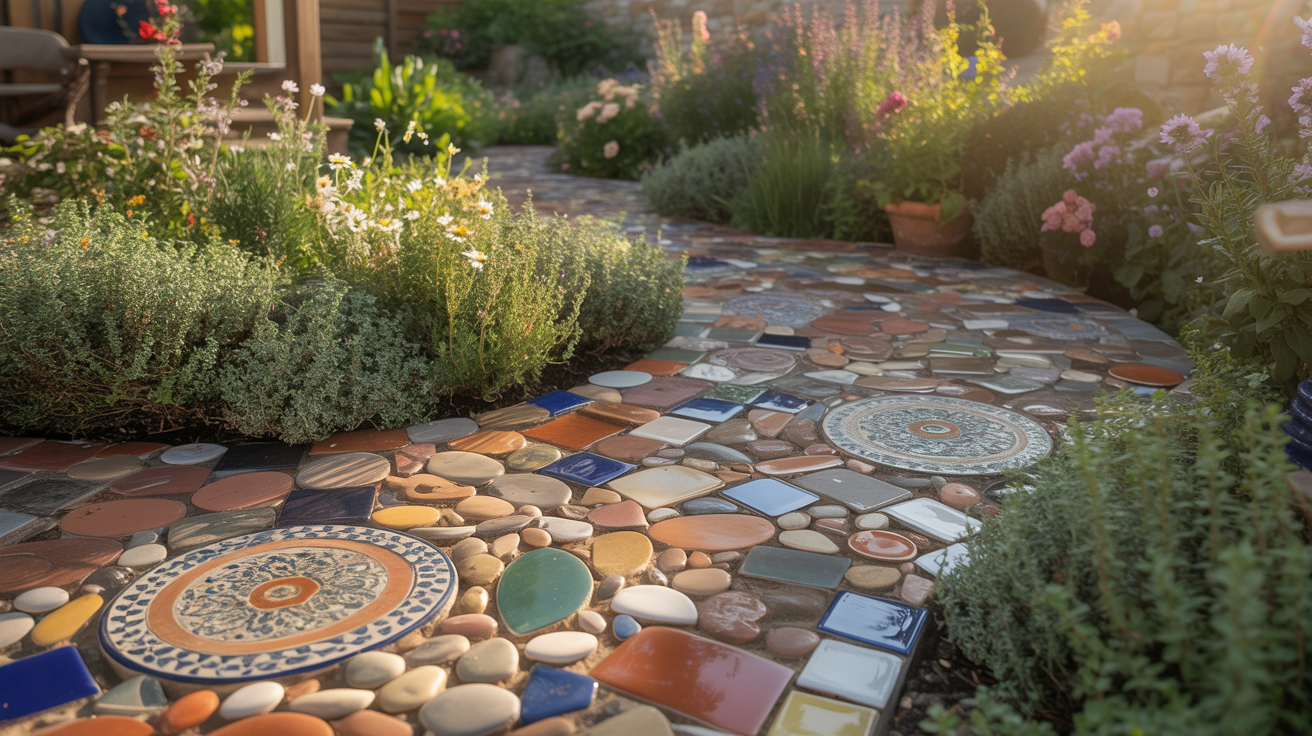
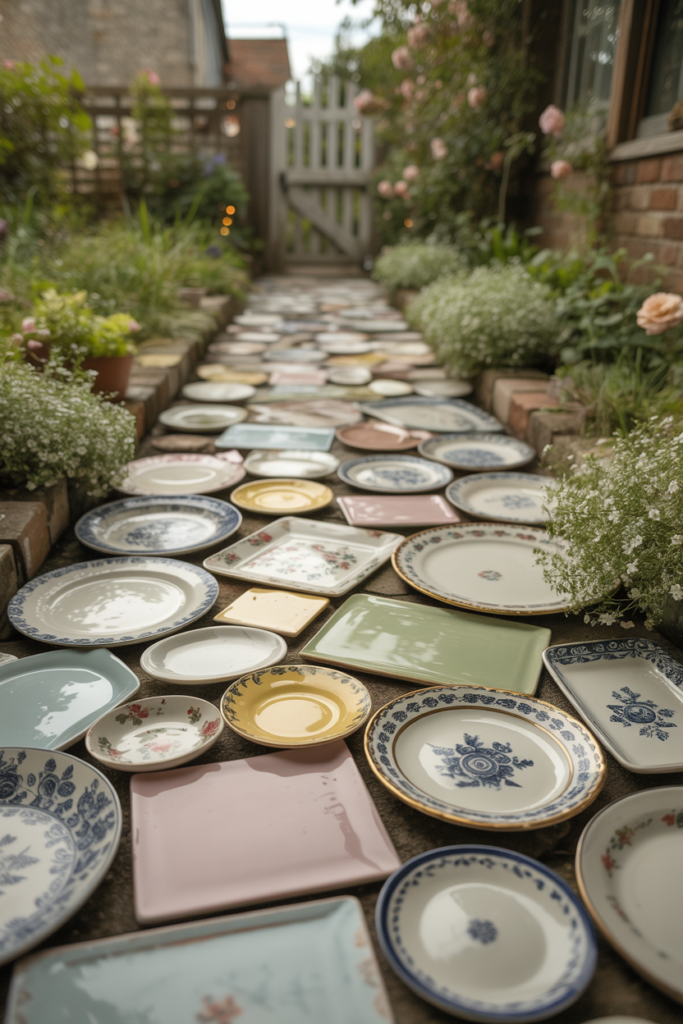
12. Mosaic Path With Reclaimed China and Crockery Pieces
A mosaic garden path built from reclaimed china and crockery pieces carries a storytelling quality that no new tile or purpose-made mosaic material can replicate. Old dinner plates, teacups, serving dishes, and decorative china pieces from thrift stores, charity shops, and family collections provide a mix of patterns, colors, and glazes that combine beautifully in a mosaic path surface and create a display that feels genuinely layered with history and personal meaning.
Reclaimed china mosaic paths suit cottage gardens, bohemian outdoor spaces, and any garden that values personal expression and creative reuse over uniformity and precision. The mix of floral patterns, blue and white transfers, solid colored glazes, and gold rim details from different china pieces creates a richly varied surface that rewards close inspection and looks more beautiful and complex the more carefully you look at it. I built an entire garden path section using nothing but charity shop crockery purchased over three months for almost nothing, and the finished result drew more genuine admiration from garden visitors than any other feature in the entire outdoor space.
Wrap china pieces in a heavy cloth before breaking them with a hammer to contain the fragments safely and control the size of the resulting pieces. Aim for fragments between two and six centimeters across for the most workable mosaic pieces. Very small china fragments are difficult to place precisely, and very large pieces are hard to fit into the natural curves and gaps of a mosaic composition without excessive cutting.
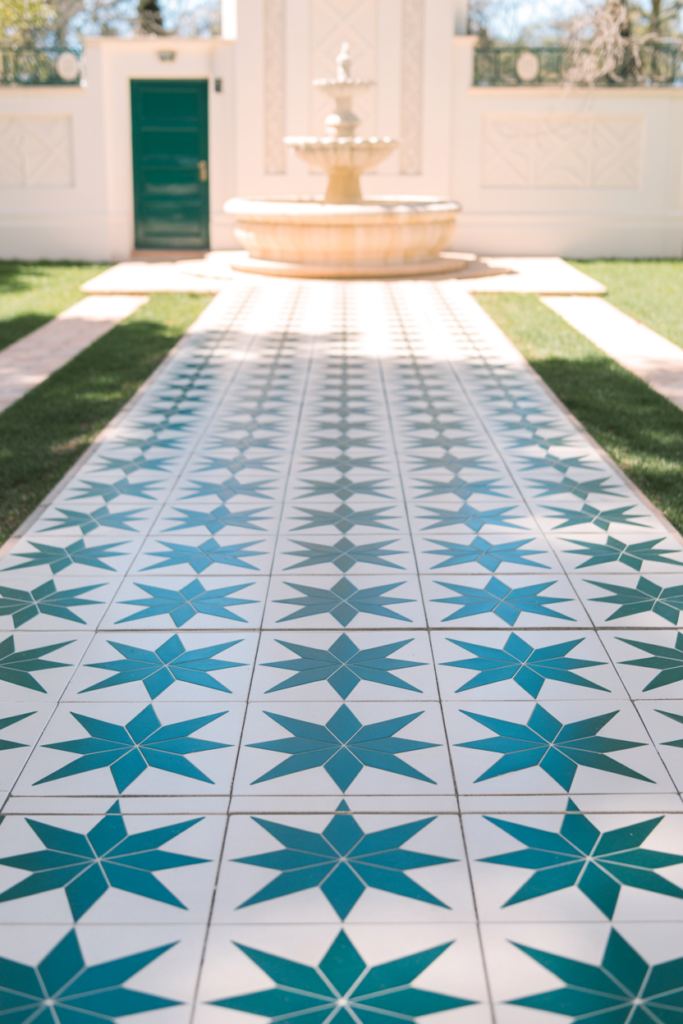
13. Geometric Star Pattern Mosaic Walkway
A geometric star pattern mosaic walkway uses repeating eight-pointed or six-pointed star designs in two or three contrasting tile colors to create a boldly patterned path surface with a strong Islamic or Moroccan garden design influence. Lay each star design in a rich jewel tone, deep teal, cobalt blue, or burnt orange, against a cream or white tile background and repeat the pattern consistently along the full path length for a walkway surface that feels simultaneously ancient and completely contemporary.
Star pattern mosaic paths work beautifully as the connecting walkway between a house door and a garden gate, as a pathway leading to a focal point like a fountain or seating area, or as the main circulation path through a formal garden layout. The strong repeating geometry of the star pattern gives these paths an architectural quality that makes the garden feel more deliberately designed and spatially organized. I laid a teal and cream star pattern mosaic as the main path through a small walled garden, and the pattern immediately gave the space a formal structure and visual coherence that the garden had previously lacked, despite good planting.
Cut star pattern tile pieces using a wet tile saw or angle grinder with a diamond blade for clean, accurate edges that align precisely in the finished pattern. Ragged or uneven tile edges in a geometric star pattern create gaps and misalignments that undermine the precision the design requires. Accurate cutting is more important in a geometric repeating pattern than in any other mosaic style because the repetition magnifies any inconsistency across the full path length.
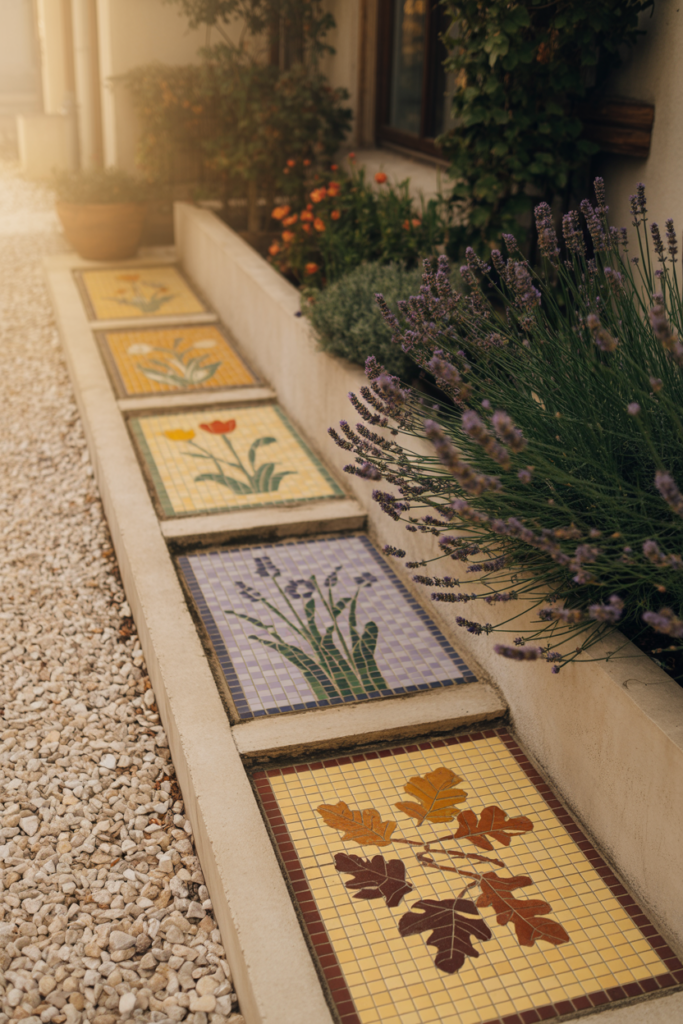
14. Mosaic Path With Seasonal Flower and Leaf Designs
A mosaic path featuring seasonal flower and leaf designs changes its visual relationship with the surrounding garden throughout the year as the planted borders beside it move through their seasonal cycles. Design spring tulip and daffodil motifs at the path entrance, summer rose and lavender designs through the main garden area, and autumn leaf and berry patterns toward the far end of the walkway. The path tells the story of a full garden year in permanent tile and pebble artwork set permanently into the ground.
Seasonal mosaic path designs work particularly well in gardens where the planting is deliberately arranged to peak at different times of year. The mosaic path designs below mirror and celebrate the planted displays above and create a layered seasonal narrative that makes the garden feel genuinely thoughtful and deeply considered. I designed a short path section with a repeating lavender stem motif in purple and gray tile pieces that runs directly beside a lavender border planting, and the connection between the ground-level mosaic and the living plants above it creates a beautiful visual echo that visitors consistently find charming.
Use a consistent background tile color throughout a seasonal mosaic path, even while varying the individual flower and leaf designs in each section. A consistent background color ties all the different seasonal motifs together into a single coherent path design and prevents the path from looking like a series of disconnected individual artworks rather than a unified decorative walkway.
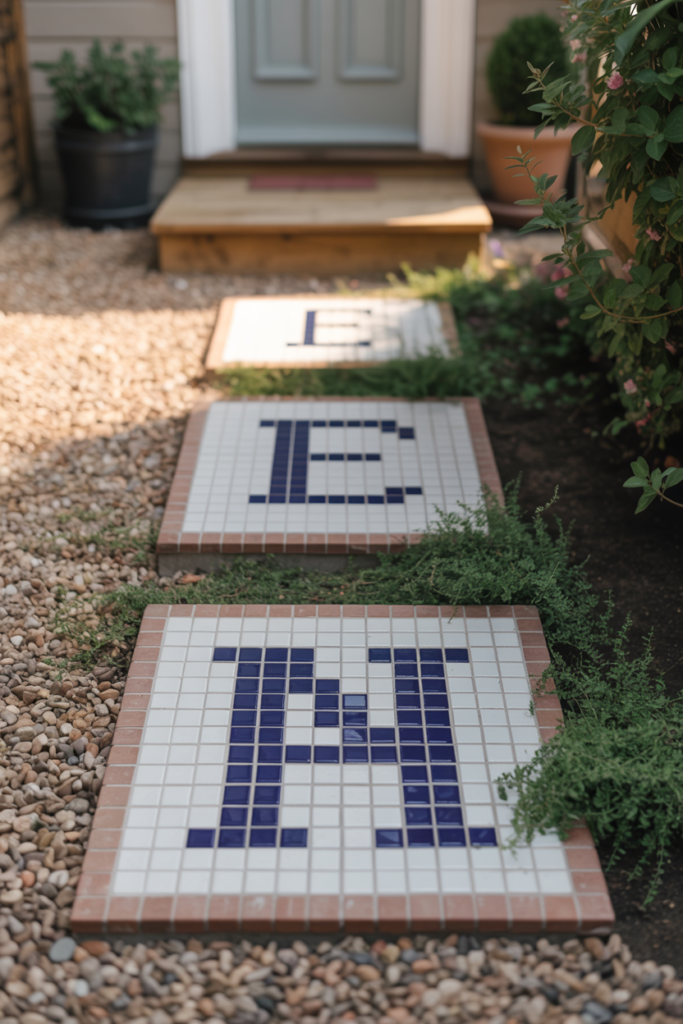
15. Mosaic Garden Path With Personalized Name or Quote
A personalized mosaic garden path incorporating a name, initials, house number, or meaningful short quote creates the most individually significant outdoor feature possible in any garden. Spell out letters using contrasting tile pieces set into a standard mosaic background, or create individual letter stepping stones that spell a word or name along the path length. A personalized mosaic path makes a garden feel completely and unmistakably owned by the specific people who live and garden there.
House number mosaic stepping stones set into a front garden path serve both a decorative and a practical identification purpose while adding genuine artistic character to the garden entrance. Bold numerals in contrasting tile colors set into a round or square concrete stepping stone base look far more distinctive and personal than any standard house number sign and become a permanent feature that improves the kerb appeal of any property. I made a pair of mosaic stepping stones with our house initials for the front garden path, and they are consistently the first thing visitors comment on when arriving at the house for the first time.
Choose a bold, simple font style for any lettering in a mosaic garden path rather than a script or cursive style that becomes difficult to read when translated into tile fragments. Block capital letters with clean, straight edges translate most successfully into mosaic tile work because their simple geometric forms are easier to cut and place accurately than curved script letterforms that require many small curved tile pieces to render legibly.
Best Mosaic Garden Path Ideas at a Glance
| Mosaic Path Idea | Best For | Difficulty Level | Best Materials |
| Black and White Geometric | Formal and contemporary gardens | Medium | Slate and white ceramic tile |
| Floral Pebble Mosaic | Cottage and country gardens | Easy | River pebbles |
| Mediterranean Blue and White | Coastal and Mediterranean gardens | Medium | Ceramic tile and crockery |
| Mandala Stepping Stones | Any garden style | Medium | Ceramic tile and glass gems |
| Sea Glass and Pebble Coastal | Coastal and naturalistic gardens | Easy | Sea glass and river pebbles |
| Sunflower Tile Design | Kitchen and cottage gardens | Medium | Glazed ceramic tiles |
| Crazy Paving Mixed Colors | Any garden, beginner-friendly | Very Easy | Mixed broken crockery |
| Spiral Pattern Path | Curved garden paths | Medium | Ceramic tile |
| Animal Nature Stepping Stones | Family gardens | Medium | Ceramic tile and glass tesserae |
| Terracotta and Cream Herringbone | Mediterranean and walled gardens | Medium | Terracotta and cream tile |
| Mirror Fragment Accents | Shaded garden areas | Medium | Mixed tile and mirror pieces |
| Reclaimed China and Crockery | Cottage and bohemian gardens | Easy | Charity shop crockery |
| Geometric Star Pattern | Formal and Moroccan gardens | Hard | Ceramic tile |
| Seasonal Flower and Leaf Designs | Planted border gardens | Medium | Ceramic tile and pebbles |
| Personalized Name or Quote | Front garden entrances | Medium | Ceramic tile |
Practical Tips for Building a Mosaic Garden Path That Lasts
Proper base preparation is the single most important factor in the long-term durability of any outdoor mosaic path. Lay a solid concrete base of at least eight centimeters depth on a compacted sub-base of well-consolidated hardcore or sharp sand before applying any mosaic tiles or pebbles. A thin or poorly prepared base causes the mosaic surface to crack, shift, and lift over time as ground movement and freeze-thaw cycles work on the material below. Spending adequate time on the base preparation saves significant repair work later and ensures the finished mosaic surface stays flat, stable, and beautiful for decades.
Use an exterior-grade tile adhesive or sand and cement mortar mix rated for outdoor use when setting mosaic pieces into a garden path. Standard interior tile adhesive lacks the flexibility and weather resistance needed to bond mosaic pieces through the temperature extremes, moisture exposure, and freeze-thaw cycles that an outdoor path surface experiences across multiple seasons. Exterior grade adhesives maintain their bond through these conditions and keep individual mosaic pieces firmly in place year after year.
Apply an outdoor mosaic sealer to the completely cured and grouted finished path surface before the path goes into regular use. A penetrating stone and tile sealer fills the microscopic pores in both the mosaic pieces and the grout lines, prevents moisture penetration, reduces algae and moss growth, and makes the finished surface significantly easier to clean. Reapply the sealer every two to three years to maintain full protection and keep the mosaic colors looking vibrant and fresh throughout the life of the path.
A Mosaic Path That Makes Every Step Through Your Garden Feel Different
A mosaic garden path is one of those outdoor projects that rewards every hour you put into it with years of daily pleasure. Every morning when you walk out into the garden and every evening when you come back in, you pass over something genuinely beautiful that you made with your own hands from materials that cost very little. That combination of personal creativity, practical function, and lasting visual impact is genuinely rare in any home improvement project indoors or out.
The 15 ideas in this article cover every garden style, every skill level, and every material budget, from a simple crazy paving crockery path that costs almost nothing to a precise geometric star pattern walkway that showcases real tile-cutting skill. Whether you want a playful family garden path with animal stepping stones or a sophisticated Mediterranean blue and white walkway leading to a courtyard seating area, there is a mosaic path design here that fits your garden and your ambitions for it perfectly.
Start with a single stepping stone or a short path section rather than committing immediately to a full garden walkway project. A single well-made mosaic piece gives you the confidence, the technique, and the genuine enthusiasm to tackle a larger project and produce a beautiful result, even if the larger project never happens. Most full mosaic garden paths begin exactly this way, with one small piece that turns out so well the maker simply cannot stop.
Conclusion
Mosaic garden paths combine artistic creativity, practical outdoor function, and lasting decorative impact in a single ground-level feature that transforms any garden walkway from purely functional to genuinely beautiful. The 15 ideas in this article demonstrate the full range of what mosaic path design can achieve, from simple floral pebble designs and reclaimed crockery crazy paving to precise geometric star patterns and personalized name or quote stepping stones.
The key takeaways are worth keeping in mind as you plan your own mosaic garden path. Always prepare a solid concrete base before laying any mosaic surface because the base determines the long-term durability of everything above it. Use exterior-grade adhesive and grout throughout because indoor products lack the weather resistance that outdoor paths require. Sort and prepare all your mosaic materials before starting the laying process because good preparation makes the actual design work significantly faster and more enjoyable. Always seal the finished path surface with an outdoor penetrating sealer to protect the colors, the grout lines, and the overall surface integrity through multiple seasons of outdoor exposure.
A mosaic garden path also grows more beautiful over time, rather than dating or wearing out. As the grout develops a natural weathered tone and the surrounding plants grow in around the path edges, the whole feature settles into the garden landscape and begins to look like it has always been there. That sense of permanence and belonging is the quality that separates a truly great garden feature from a merely decorative one.
Frequently Asked Questions
What materials work best for an outdoor mosaic garden path?
The best materials for an outdoor mosaic garden path include unglazed ceramic tiles, river pebbles, natural stone pieces, reclaimed crockery, and exterior-grade glass mosaic tesserae. Unglazed ceramic and natural stone provide the best grip underfoot in wet conditions and weather most naturally over time. Avoid using standard interior glass tiles or highly polished glazed tiles as primary path surface materials because they become slippery in rain and deteriorate faster than materials specifically rated for outdoor use.
How do I stop a mosaic garden path from cracking?
Preventing cracks in a mosaic garden path starts with laying a proper concrete base of at least eight centimeters on a well-compacted sub-base. Use a flexible exterior-grade tile adhesive rather than rigid cement mortar to set the mosaic pieces, as flexible adhesive absorbs ground movement without transmitting stress to the mosaic surface above. Leave adequate expansion gaps at the path edges and seal the finished surface thoroughly to prevent moisture penetration that causes freeze-thaw cracking in cold climates.
How long does a mosaic garden path last?
A properly built mosaic garden path on a solid concrete base using exterior-grade adhesive, grout, and sealer lasts for several decades with very little maintenance. The individual mosaic pieces themselves are essentially permanent once properly bonded and sealed. Grout lines may need repointing after ten to fifteen years in high-traffic or heavily weathered sections. Regular resealing every two to three years maintains the surface protection and keeps the finished path looking its best throughout its long lifespan.
Can a complete beginner build a mosaic garden path?
A complete beginner can absolutely build a mosaic garden path starting with the most forgiving styles like crazy paving crockery paths, floral pebble designs, and simple stepping stone projects. These styles require no pattern alignment, no precise cutting, and no formal design planning before starting. Begin with a single stepping stone to learn the basic adhesive, setting, and grouting techniques before attempting a full path project. The skills involved in mosaic path making are genuinely straightforward, and most beginners produce results they are proud of on their very first attempt.
What is the best grout for an outdoor mosaic path?
The best grout for an outdoor mosaic garden path is an exterior-grade sanded tile grout rated for outdoor and frost-resistant use. Sanded grout fills wider joints more effectively than unsanded varieties and produces a more durable finished joint that resists cracking and weathering over time. Choose a grout color that complements rather than competes with the mosaic design. A mid-gray or natural buff tone suits most outdoor mosaic color palettes without drawing attention away from the tile and pebble work above.
How do I clean and maintain a mosaic garden path?
Clean a mosaic garden path regularly with a stiff brush and clean water to remove surface dirt, fallen leaves, and algae growth before they become embedded in the grout lines. Avoid using pressure washers at high settings as they can dislodge grout from between mosaic pieces over time. Apply a fresh coat of outdoor penetrating sealer every two to three years to maintain surface protection and color vibrancy. Remove any moss or algae growth with a diluted outdoor patio cleaner applied with a brush and rinsed thoroughly before resealing.
How do I choose the right mosaic design for my garden style?
Match the mosaic path design to the overall character of your garden rather than simply choosing the design you find most visually appealing in isolation. Formal gardens suit geometric patterns like herringbone, star, and grid designs in classic color combinations. Cottage and country gardens suit floral pebble designs, reclaimed crockery paths, and mandala stepping stones in warm earthy tones. Contemporary gardens suit bold abstract designs, minimalist black and white geometric patterns, and single-color pebble compositions. The path should feel like it belongs to the garden rather than sitting in it as an unrelated decorative element.