A good duck coop keeps your flock safe, dry, and comfortable without making you regret ever getting ducks in the first place. Ducks are messier than chickens, louder than you expected, and somehow always manage to turn their water into a mud pit within minutes. But with the right coop design, managing all of that becomes genuinely easy rather than a daily struggle.
I have spent a lot of time researching duck housing, talking to backyard duck keepers, and learning from communities of people who have built their own coops from scratch. The biggest lesson that comes up again and again is this: build for drainage and ventilation first, and everything else falls into place. A coop that handles moisture well stays cleaner, smells better, and keeps ducks healthier with far less effort.
Whether you have two ducks or twenty, this list covers fifteen builds that real backyard keepers have used successfully. Each one includes smart features that make daily care easier and keep your flock protected from predators. Some cost almost nothing. Others take a weekend to build. All of them work.
What Every Good Duck Coop Needs Before Anything Else
Ducks have different housing needs from chickens, and understanding that upfront saves a lot of frustration. They do not roost on perches, they do not need nesting boxes mounted off the ground, and they produce significantly more moisture than almost any other backyard bird. A coop designed with those three facts in mind will serve you far better than a repurposed chicken coop.
The three features that matter most in any duck coop are drainage, ventilation, and predator-proof latches. Drainage keeps the floor from becoming a swampy mess that breeds bacteria and causes foot problems. Ventilation removes moisture from the air before it causes respiratory issues and mold. Secure latches keep out raccoons, foxes, and opossums, all of which are remarkably good at opening basic hook-and-eye closures.
Size matters too. Each duck needs at least four square feet of indoor floor space, though more is always better. Crowded coops get dirty faster, stress the flock, and make disease spread more likely. Getting the size right from the start is far easier than trying to expand later when your flock has already outgrown its space.
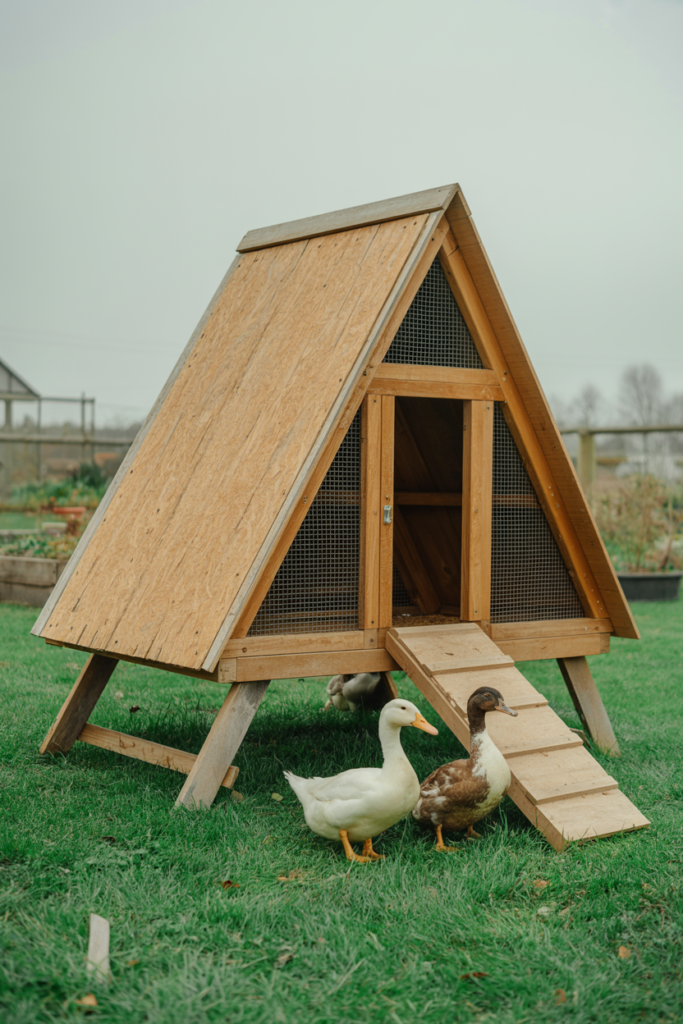
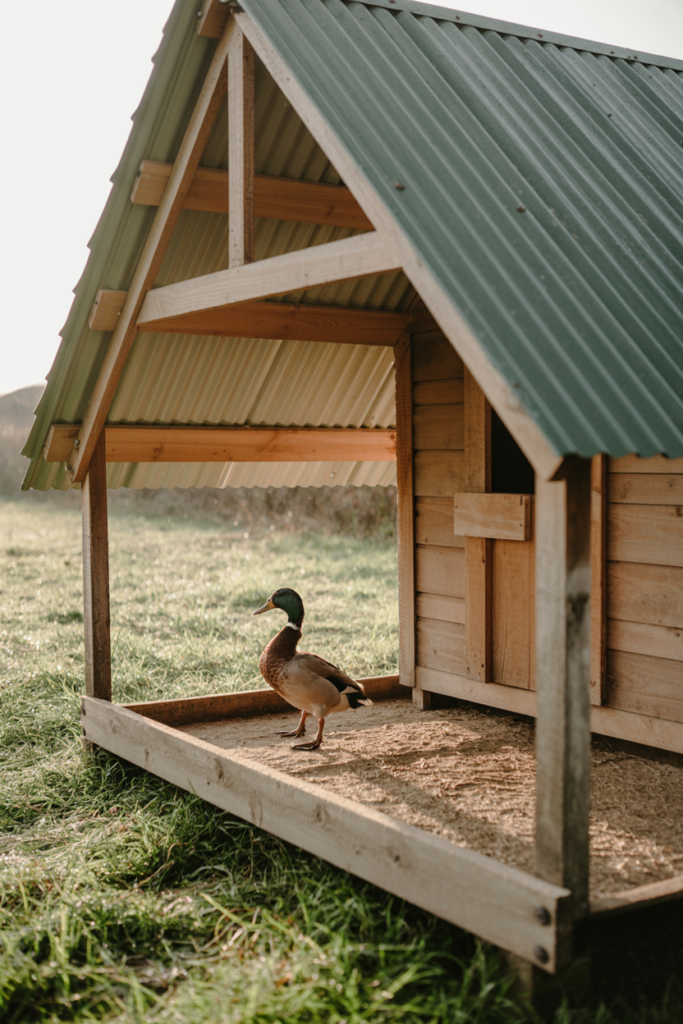
1. Build a Simple Wooden A-Frame Duck Coop With a Raised Mesh Floor
An A-frame coop with a raised mesh floor is one of the most beginner-friendly duck coop builds available. The triangular structure is naturally strong and sheds rain well, and the raised mesh floor allows droppings and water to fall through rather than pooling on a solid surface. This single feature cuts cleaning time dramatically compared to a solid floor coop.
Build the frame from pressure-treated 2×4 lumber for durability, and use half-inch hardware cloth for the floor mesh rather than chicken wire. Hardware cloth has smaller gaps that prevent foot injuries and also stop small predators from reaching up through the floor. Line one end of the A-frame with solid plywood to create a sheltered sleeping area away from drafts.
The A-frame design also makes ventilation very natural. The peaked roof creates an air gap at the top that allows moisture to escape without creating cold drafts at the duct level. I particularly like this design for small flocks of two to four ducks because it is fast to build, costs relatively little, and performs really well in wet climates.
2. Convert a Wooden Garden Shed Into a Spacious and Practical Duck House
A wooden garden shed conversion is one of the easiest duck coop builds because the basic structure already exists. Most standard garden sheds give you enough floor space for a flock of six to ten ducks comfortably, and the existing roof and walls handle the structural work for you. The conversion mostly involves adding proper ventilation, a predator-proof door, and a drainage solution.
Cut ventilation gaps along the upper walls and cover them securely with hardware cloth rather than standard mesh. Upper wall vents allow moist air to escape while keeping the sleeping area at floor level free from drafts. Add a second, smaller vent on the opposite wall to create cross ventilation, which moves air through the space far more effectively than a single opening.
For drainage, slope the shed floor slightly toward a drainage channel at the front, or lay a thick layer of sand on the floor, which absorbs moisture and composts well. Sand floors are genuinely one of the best discoveries in the backyard duck-keeping community. They stay drier than straw, are easy to rake clean, and ducks seem perfectly comfortable walking and resting on them.

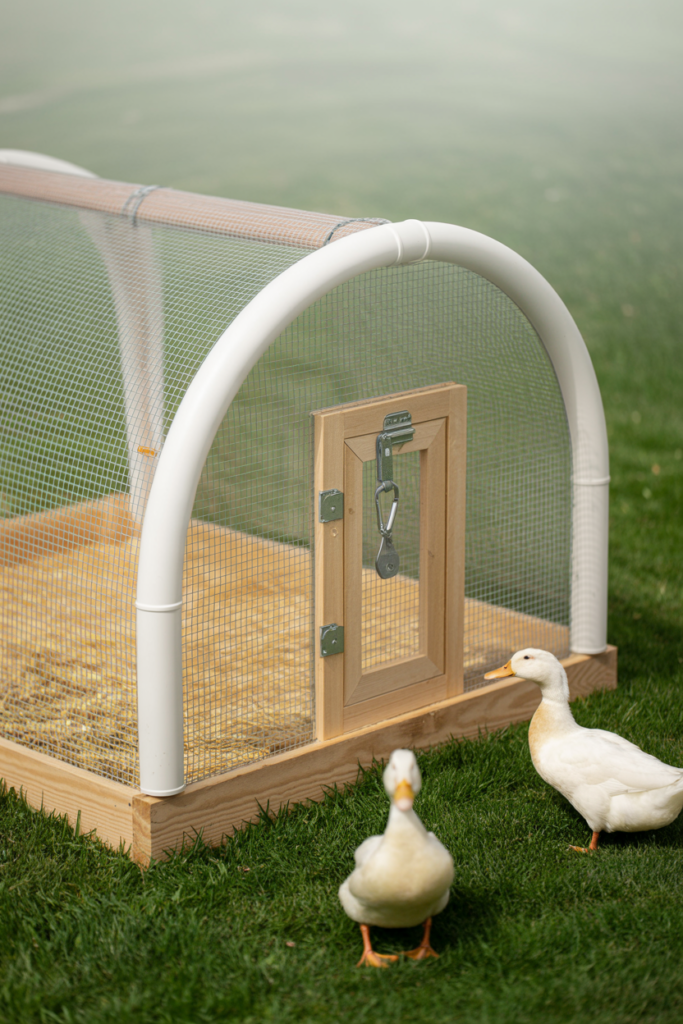
3. Build a Hoop Coop Using PVC Pipe and Hardware Cloth for a Budget-Friendly Option
A hoop coop made from PVC pipe bent into arches and covered with hardware cloth is one of the most affordable duck coop builds you can make. The materials cost very little, the build takes only a few hours, and the finished structure is surprisingly sturdy when built correctly. This design works especially well as a temporary or seasonal coop while you plan a more permanent structure.
Bend lengths of one-inch PVC pipe over a wooden base frame to create the arched shape, spacing each hoop about two feet apart. Cover the entire structure with half-inch hardware cloth and secure it tightly with zip ties and staples. Add a solid tarp or corrugated plastic panel over the top portion to create a weatherproof sleeping area inside the hoop.
The main thing to get right with a hoop coop is the door latch. Because the structure is lightweight, the door needs to work especially hard to resist predator pressure. Use a spring-loaded carabiner clip in addition to a standard latch for double security. This is a trick many experienced duck keepers swear by, and it costs almost nothing to add.
4. Use Pallets to Build a Free or Near-Free Duck Coop With Character
Pallet coops are a favorite in the backyard poultry community because the materials cost nothing or almost nothing. Most hardware stores, garden centers, and warehouses give away pallets freely. Four to six pallets give you enough material to build a solid, small coop that works well for a flock of four to six ducks.
Stand pallets upright and screw them together at the corners to form the walls, then add a simple sloped roof from additional pallet boards or corrugated roofing sheets. Fill the gaps between pallet slats with additional timber offcuts or cover the interior walls with a layer of plywood to reduce drafts. Leave the upper section of at least one wall partially open and cover it with hardware cloth for ventilation.
The one thing pallet coops need more attention on is the floor. Pallet gaps are too large for ducks to walk on safely and can cause bumblefoot injuries. Lay a solid plywood floor over the base pallets and raise the whole structure slightly off the ground on short timber blocks to improve airflow underneath and keep the floor dry. This simple addition makes a pallet coop genuinely functional rather than just free.

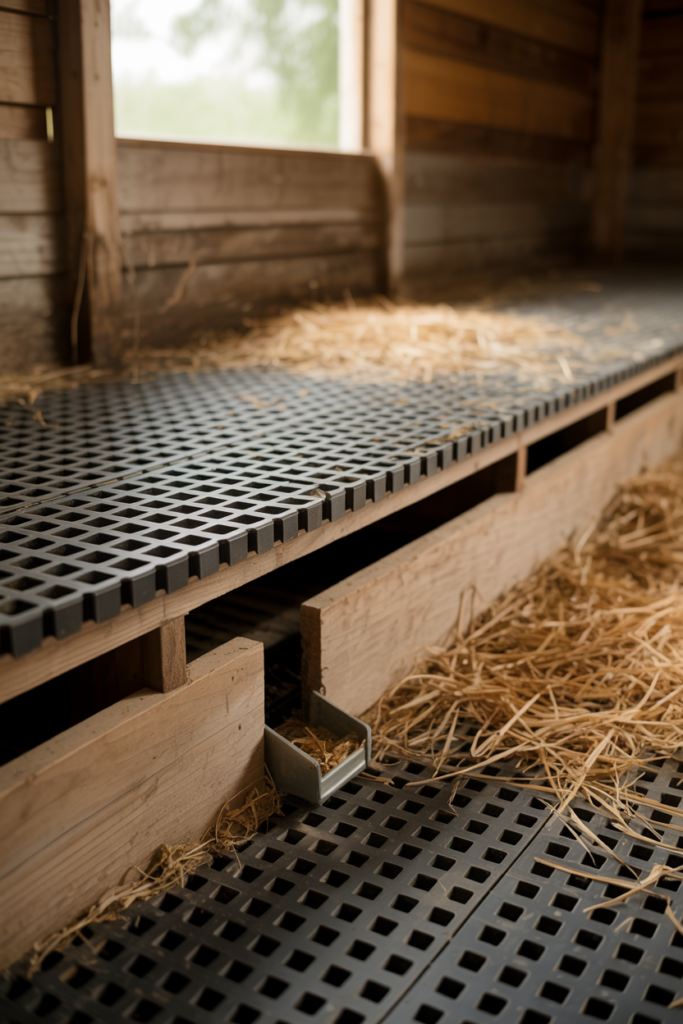
5. Install a Drainable Rubber Mat Floor System Inside Any Existing Coop Structure
A drainable rubber mat floor system is not a coop built in itself, but it is a smart upgrade that transforms almost any existing structure into a far more practical duck house. Interlocking rubber stable mats with drainage holes allow liquid to pass through while giving ducks a comfortable, non-slip surface to walk and rest on. They are easy to clean, long-lasting, and make a real difference to coop hygiene.
Lay the mats over a slightly sloped solid floor or over a gravel drainage bed. The slight slope directs liquid toward a drainage point at one end of the coop, where it can run out through a small gap at the base of the wall. This setup means cleaning involves a quick hosing down rather than scooping out soaked bedding every day.
Rubber mats also insulate the floor slightly, which helps in colder climates where bare concrete or timber floors can get very cold overnight. Ducks sleep on the floor, so floor temperature matters more in a duck coop than in a chicken one. This upgrade costs less than most people expect and genuinely improves the daily experience of keeping ducks.
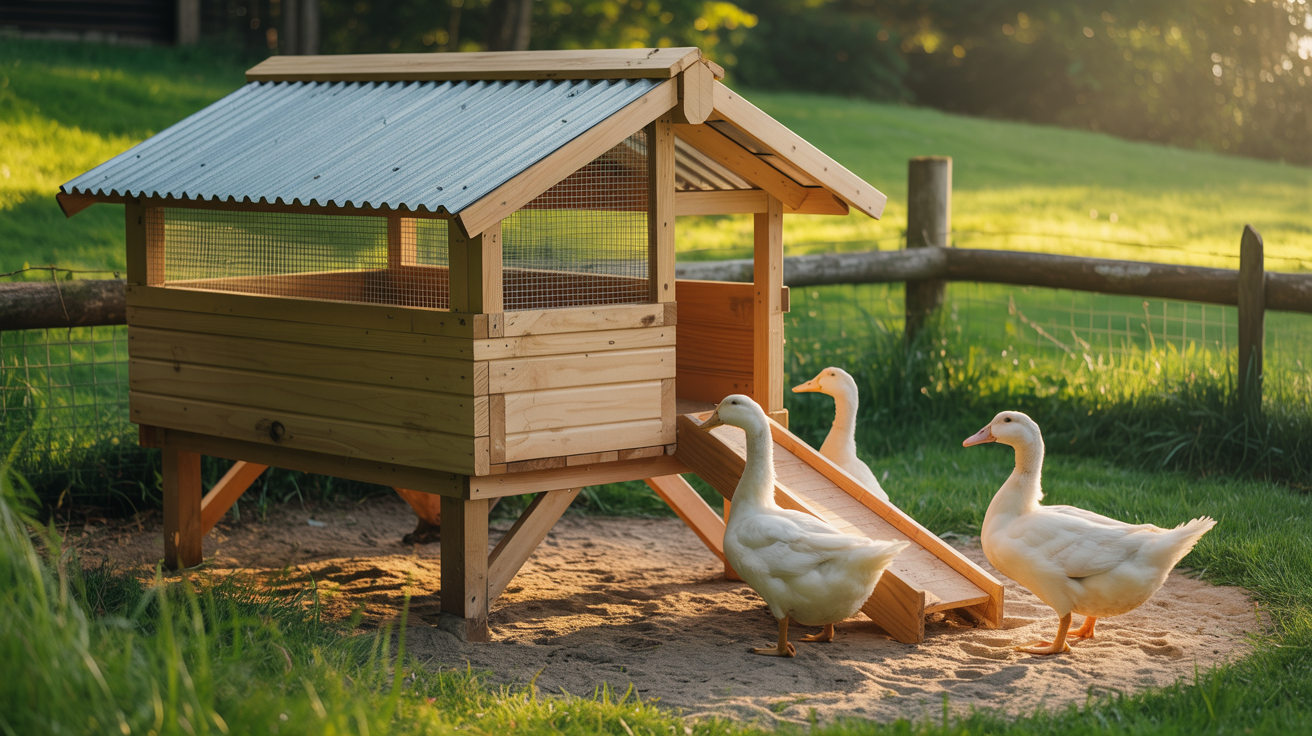
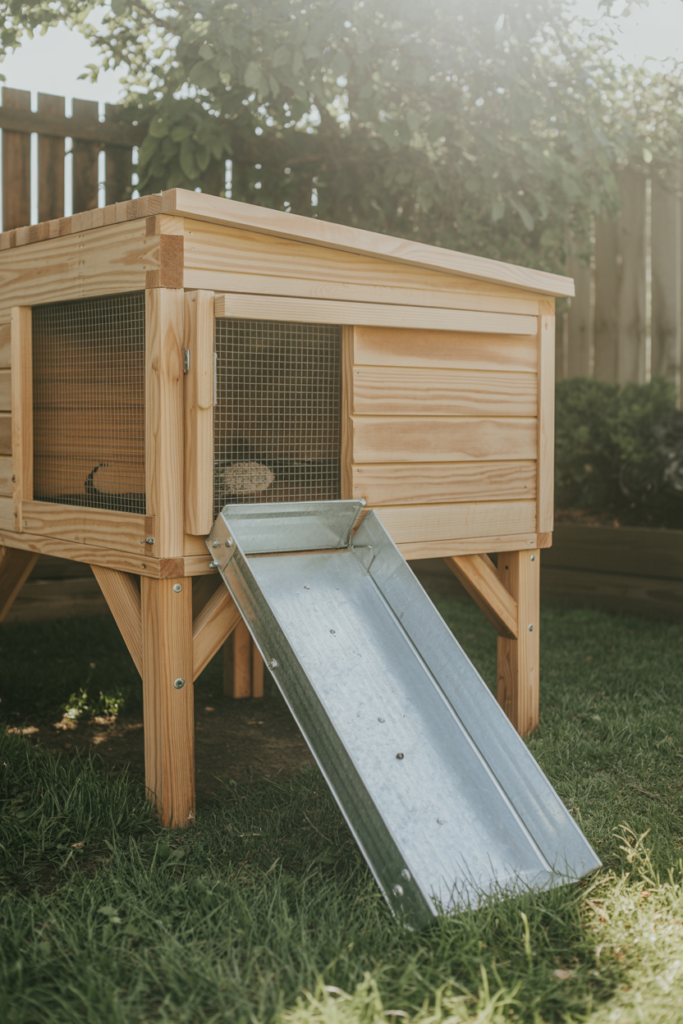
6. Build a Raised Duck Coop on Legs With a Pull-Out Droppings Tray
A raised coop on short legs with a pull-out droppings tray underneath is one of the smartest duck coop designs for easy cleaning. The tray slides out like a drawer, you scrape it clean or hose it off, and slide it back in. The whole process takes five minutes rather than the twenty or thirty minutes that cleaning a solid floor coop requires.
Build the coop frame from 2×4 lumber raised on four corner legs about twelve inches off the ground. Use a solid plywood floor with a large central opening covered by hardware cloth, positioned directly above the pull-out tray. The tray itself can be made from a shallow galvanized metal sheet with folded edges to contain droppings and moisture before you remove it.
The raised design also adds a natural predator barrier because ground-level predators cannot reach the floor directly. Wrap the legs with metal flashing or use smooth metal pipe legs that are difficult for rats and weasels to climb. This combination of easy cleaning and improved predator resistance makes the raised tray coop one of the most practical designs on this entire list.
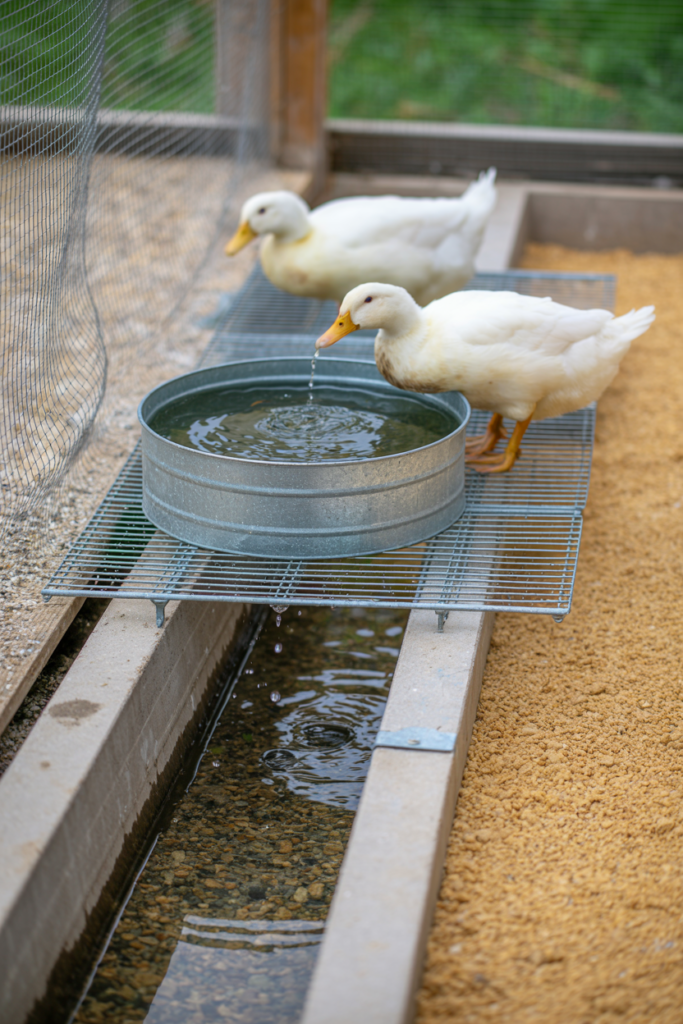
7. Add a Built-In Water Station With Drainage Channels to Any Duck Coop Run
Water management is the single biggest challenge in keeping ducks, and building a dedicated water station with drainage channels directly into the coop run solves most of it. Place the water drinker over a shallow gravel pit or a drainage channel that directs overflow water away from the main coop area. This keeps the surrounding ground from turning into the swamp your ducks would love, but you absolutely would not.
Dig a shallow trench about six inches deep and twelve inches wide under the water station location. Fill it with coarse gravel and lay a section of perforated drainage pipe along the bottom that directs overflow away from the run. Cover the top with a heavy-gauge metal grate that ducks can stand on while drinking, but that allows spilled water to drain straight through.
The difference this makes to a duck run is genuinely significant. Areas without drainage turn into mud within days of setting up a water station. Areas with proper drainage stay firm and manageable even with heavy daily water use. This feature costs very little to build but saves enormous amounts of time and frustration over the life of the coop.
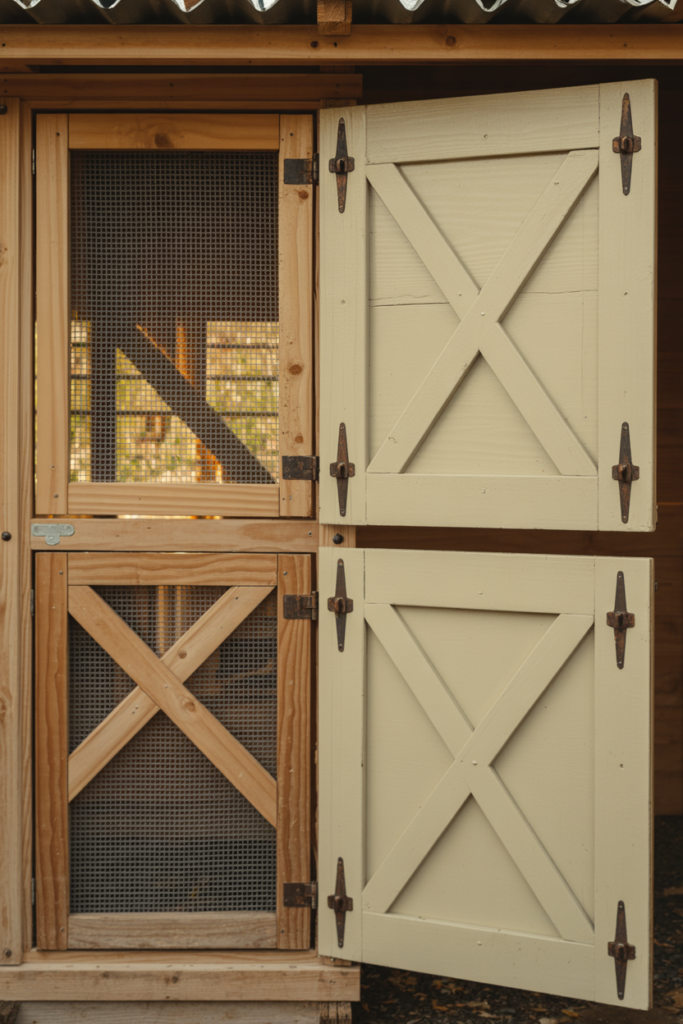
8. Frame a Double-Door Duck Coop Entry for Easy Access and Better Security
A double-door entry system on a duck coop sounds like overengineering until the first time a predator gets in through a single poorly latched door. The outer door creates a buffer zone, which means even if something gets through the first latch, it still faces a second barrier before reaching the ducks. Many experienced keepers consider this one of the most worthwhile structural features to include from the start.
Build the outer door frame from 2×4 lumber and cover it with hardware cloth rather than solid timber. This keeps the entry area ventilated while still providing a physical barrier. The inner door should be solid timber or solid plywood for full protection during nighttime hours when predator pressure is highest.
Fit both doors with heavy-duty bolt latches at the top and bottom rather than just a single central latch. Raccoons specifically can work single central latches open with their front paws, given enough time and motivation, and they have both in abundance. Top and bottom bolts require two separate movements to open, which is beyond what most predators can manage.
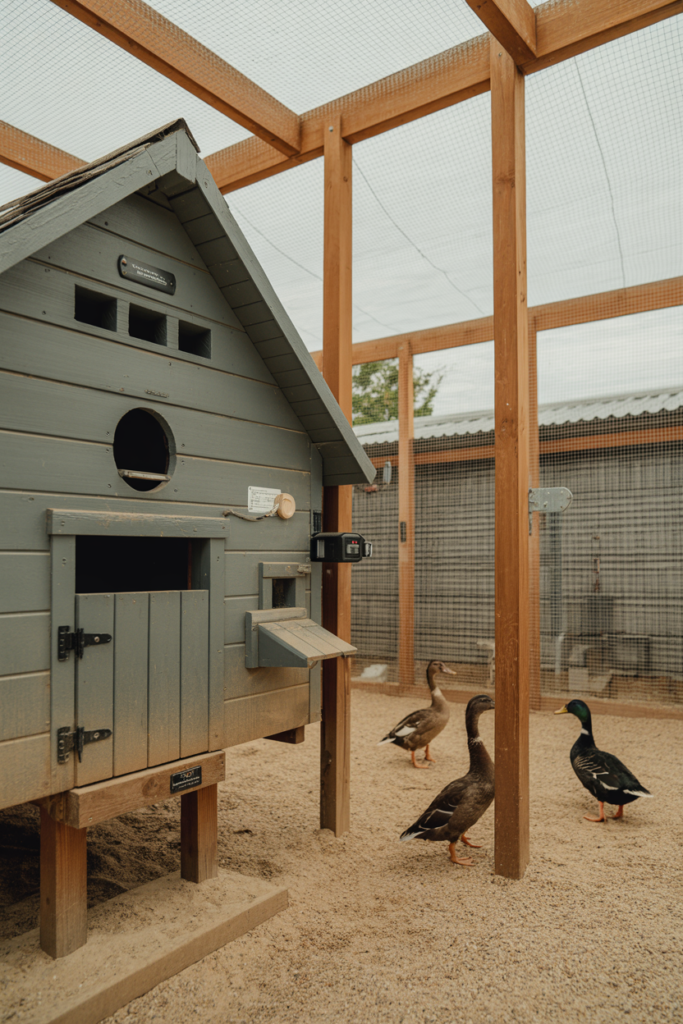
9. Build a Duck Coop With a Separate Night House and Daytime Run Area
Separating the sleeping area from the daytime run creates a duck housing setup that is far easier to manage than an all-in-one design. The night house stays cleaner because ducks only sleep there, and the run takes the brunt of the daily mess. Cleaning the two areas on different schedules means neither one ever gets completely overwhelming.
Build the night house as a small, solid, fully enclosed structure with good ventilation and a secure door. Keep the footprint modest because ducks only use this space for sleeping. Connect it directly to a larger run area through a small pop hole door that you open each morning and close each evening. An automatic pop hole opener on a timer or light sensor makes this even easier.
The run area can be much more basic in construction because security comes from the night house rather than the run itself. Use sturdy posts and hardware cloth for the run walls and roof, and focus the predator-proofing effort on the night house door and latches. This division of function between the two spaces makes the whole system more logical and easier to maintain.
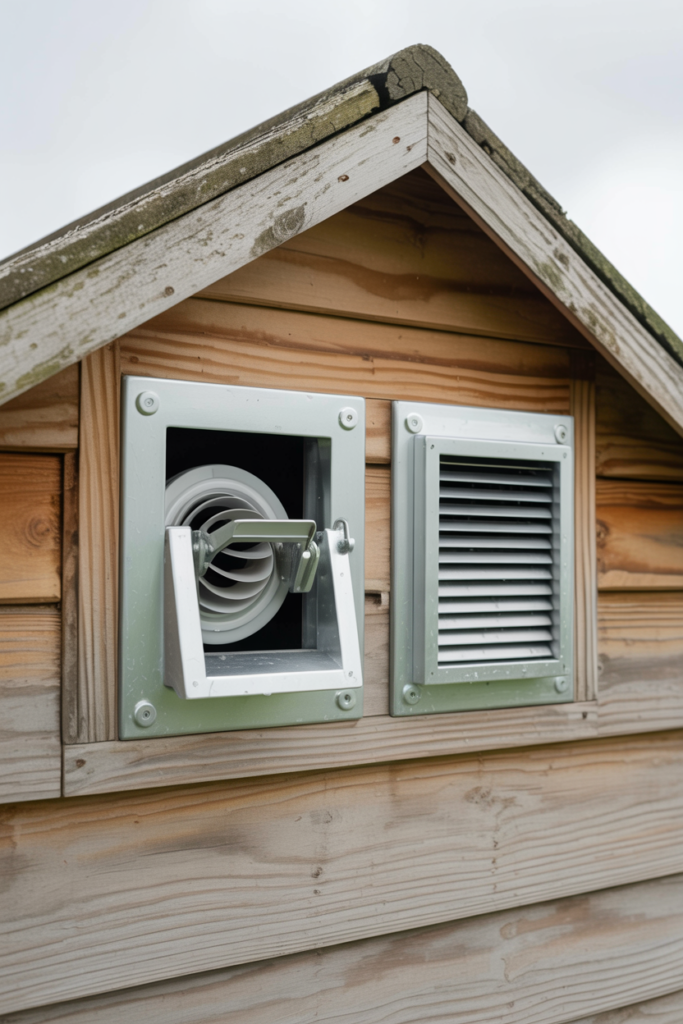
10. Install Automatic Ventilation Vents That Open and Close With Temperature Changes
Automatic thermal vents are a genuinely clever addition to a duck coop that most beginners never consider. These vents use a wax cylinder mechanism that expands with heat and contracts with cold, opening the vent when the coop gets warm and closing it when temperatures drop. They require no electricity, no timers, and no manual adjustment whatsoever.
Fit two or three automatic vents along the upper walls or roof of the coop, positioned above the height where ducks sleep. Upper placement means fresh air enters and stale moist air exits without creating cold drafts at the floor level,l where the ducks actually are. This distinction between ventilation and drafts is one that many first-time duck keepers miss completely.
Automatic vents originally come from greenhouse growing and work extremely well in poultry housing. They cost around fifteen to thirty dollars each, depending on the brand and size, which makes them one of the most affordable smart features on this list relative to the benefit they provide. A well-ventilated duck coop has dramatically fewer respiratory problems, less mold, and noticeably less odor year-round.
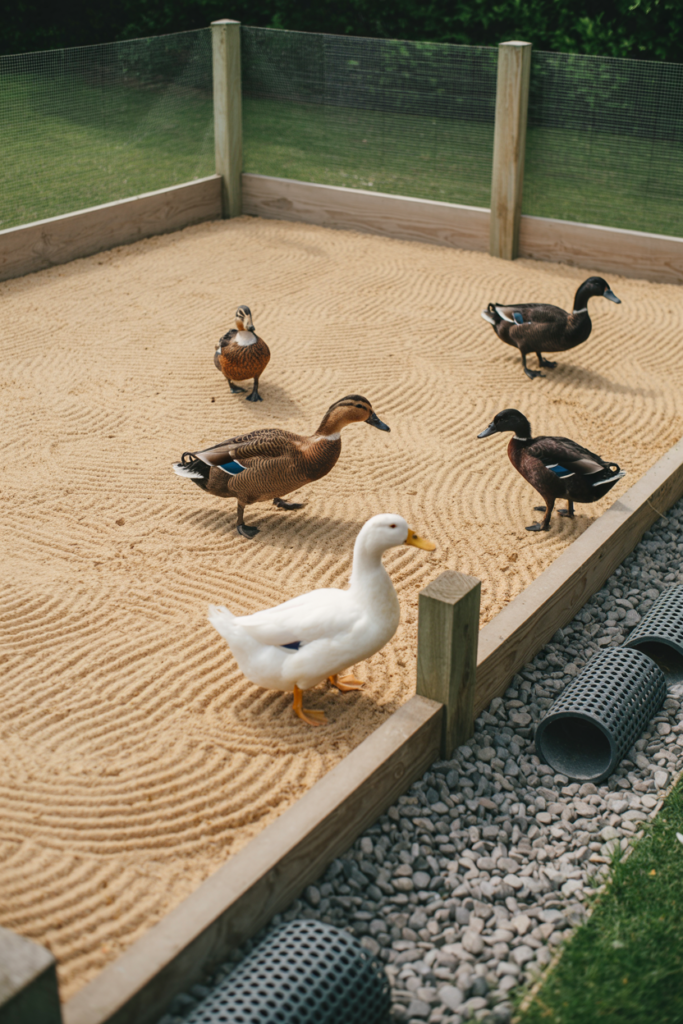
11. Create a Sand-Floored Duck Run With a French Drain System Around the Perimeter
A sand-floored run with a French drain around the perimeter is the closest thing to a self-managing duck run that most backyard keepers ever achieve. The sand absorbs moisture quickly, the French drain carries excess water away from the run edges, and the combination keeps the ground firm and walkable even after heavy rain or enthusiastic water play.
Lay a base layer of coarse gravel about four inches deep across the entire run floor, then cover it with a four-inch layer of coarse builder’s sand. The gravel layer provides drainage below the sand surface while the sand itself stays relatively dry on top. Rake the sand regularly to turn it and expose fresh surface, which speeds up drying and breaks down droppings naturally.
Dig the French drain trench around the perimeter of the run about eight inches deep and six inches wide, fill it with gravel, and lay a perforated drainage pipe along the bottom before covering with more gravel. This directs groundwater and rain runoff away from the run rather than letting it pool at the base of the walls. Combined with the sand floor, this system genuinely keeps a duck run in usable condition through almost any weather.
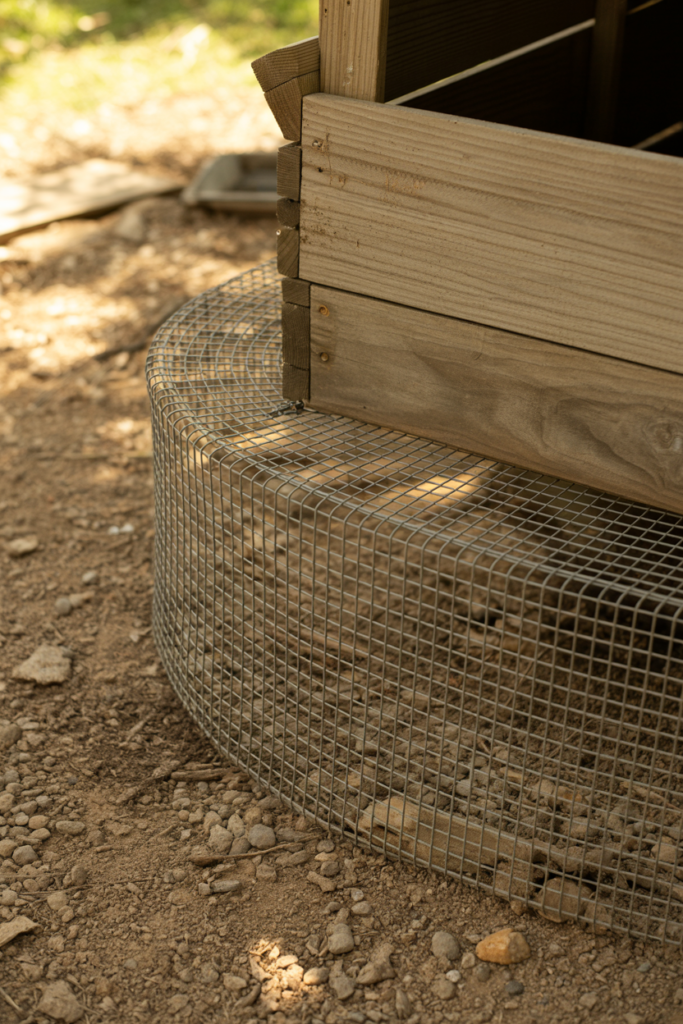
12. Build a Predator-Proof Duck Coop With Hardware Cloth Apron Around the Base
A hardware cloth apron buried around the base of a duck coop is one of the most effective predator deterrents you can add to any build. Foxes, badgers, and mink all dig under coop walls to gain entry, and an apron stops them cold. Bend hardware cloth outward at a ninety-degree angle from the base of the wall and bury it six inches underground, extending twelve inches outward from the coop perimeter.
Use half-inch hardware cloth rather than chicken wire for the apron because chicken wire corrodes faster underground and has larger gaps that small predators can push through. Galvanized half-inch hardware cloth lasts for many years in the ground and provides a genuinely solid barrier. Secure the top edge tightly to the base of the coop wall so there is no gap between the wall and the apron.
This one addition makes an enormous difference to overnight security without adding much cost or complexity to the build. Many duck keepers who lost birds to digging predators added a hardware cloth apron afterward and never had another loss. Building it in from the start rather than retrofitting it later saves a lot of digging and frustration down the track.
13. Add a Roof Overhang and Covered Porch Area to Keep the Coop Entry Dry
A roof overhang extending at least eighteen inches beyond the coop wall keeps rain off the entry area and prevents the ground directly outside the door from turning into mud. Ducks track that entry mud straight into the coop, so keeping it dry dramatically reduces how quickly the interior floor gets dirty. This is one of those small structural details that makes a big difference to daily management.
Extend the roof rafters beyond the wall plate and add a fascia board at the end to create the overhang. Cover the overhang with the same roofing material as the main roof for a clean, weatherproof finish. If the budget allows, extend the overhang far enough to create a small covered porch area where you can stand while filling feeders and waterers without getting rained on yourself.
A covered entry porch also gives ducks a sheltered outdoor space during light rain when they do not necessarily want to go inside but also do not want to be fully exposed. Ducks handle rain far better than chickens do, but a sheltered transition zone between inside and outside is something they genuinely use and appreciate. It adds very little to the build cost but a noticeable amount to the overall functionality.
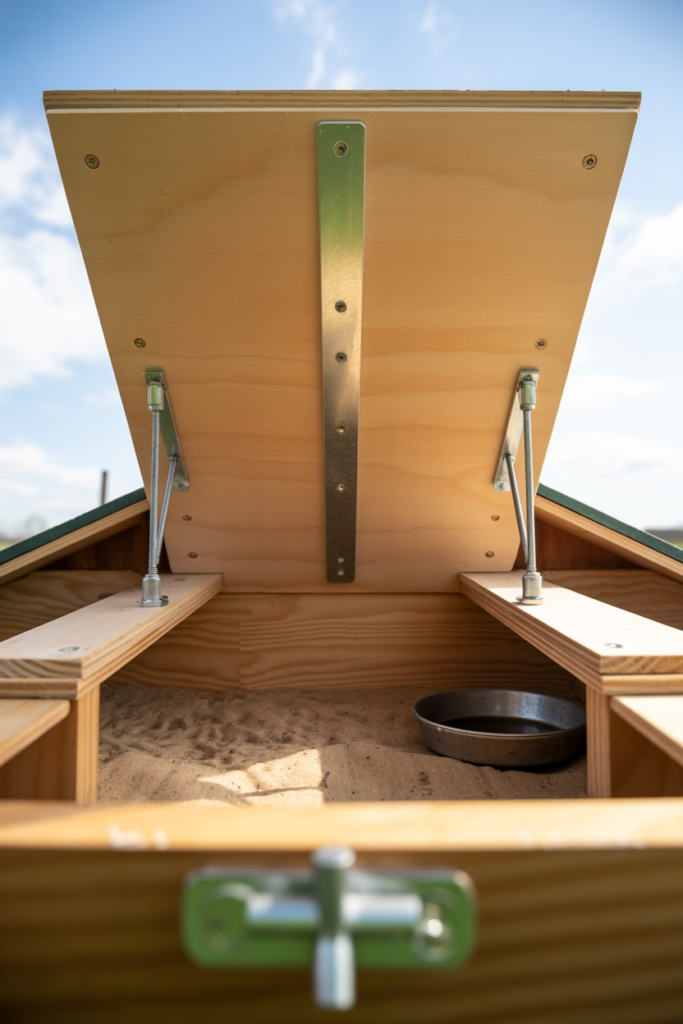
14. Build a Coop With a Full-Length Hinged Roof Panel for Total Interior Access
A hinged roof panel that lifts open along the full length of the coop is one of the most practical cleaning features you can build into a duck house. Instead of reaching awkwardly through a small door to clean corners and change bedding, you simply lift the roof and have complete access to the entire interior from above. The difference in cleaning ease is hard to overstate.
Attach the roof panel to the back wall of the coop using a heavy-duty piano hinge running the full length of the roof. Add a prop rod or gas strut on each side to hold the roof open safely while you work inside. Use a simple barrel bolt on each side of the front roof edge to keep the roof securely closed when you are not cleaning.
The hinged roof design works especially well on smaller coops where a human-sized door would take up a large proportion of the wall space. Coops housing up to six ducks can be quite compact in footprint, and a lift-off roof solves the access problem completely without compromising the structural integrity of the walls or the security of the doors. I think this is one of the cleverest practical features on this entire list.
15. Install a Motion-Activated Light Near the Coop to Deter Nighttime Predators
A motion-activated light mounted near the duck coop entrance is a simple and affordable addition that actively discourages nighttime predator activity. Most predators prefer darkness and hesitate when a bright light suddenly activates. While a light alone does not replace physical security measures, it adds a deterrent layer that costs very little and requires no ongoing effort.
Mount the light high enough that it covers the ground around the coop perimeter and the area approaching the entry door. Choose a solar-powered model to avoid running electrical cables across the yard, and set the sensitivity so normal wind movement does not trigger it constantly through the night. A light that activates a few times a night from genuine animal movement is doing its job well.
Pair the motion light with reflective tape or old CDs hung near the coop that catch and scatter the sudden light burst in multiple directions. This combination of light and reflection creates a more startling effect for approaching predators than light alone. Several backyard duck keepers in online communities report noticeably fewer signs of nighttime predator activity after adding this simple setup.

Smart Features That Make Duck Coops Easier to Live With Every Single Day
The best duck coop is the one you actually enjoy maintaining rather than dreading every morning. Small smart features like pull-out trays, automatic vents, and hinged roofs compound over time into a genuinely manageable daily routine. Getting these details right at the build stage costs very little extra but saves enormous amounts of time and energy over the years.
Predator proofing deserves the same attention as convenience features because losing ducks to a preventable attack is both heartbreaking and entirely avoidable. Hardware cloth aprons, double-door entries, top and bottom bolt latches, and motion lights work together as a layered defense system. No single measure stops every predator, but the combination makes a coop extremely difficult to breach.
| Smart Feature | Main Benefit | Difficulty in Building | Approximate Cost |
| Raised floor with a droppings tray | Easy cleaning | Moderate | Low |
| Hardware cloth apron | Stops digging predators | Easy | Low |
| Automatic thermal vents | Hands-free ventilation | Easy | Low |
| Sand floor with French drain | Moisture management | Moderate | Low |
| Double-door entry system | Extra predator security | Moderate | Low |
| Hinged roof panel | Full interior access | Moderate | Low |
| Motion-activated light | Nighttime deterrent | Easy | Very Low |
| Built-in water drainage channel | Controls water mess | Moderate | Low |
Start with the features that solve your biggest current problem and build from there. If predators are your main concern, prioritize the apron and latches. If cleaning is what you dread, start with drainage and a pull-out tray. Every improvement you make to the coop pays back in time saved and stress avoided every single day.
Conclusion
Building a duck coop that actually works well comes down to understanding what ducks need and designing for those needs from the start. Drainage, ventilation, and secure latches are not optional extras. They are the foundation that every other feature builds on. Get those three things right, and the rest of the build almost takes care of itself.
The fifteen ideas in this list cover a huge range of budgets, skill levels, and flock sizes. From a free pallet coop to a raised build with a pull-out droppings tray, every option here comes from real backyard experience rather than theory. The features that show up across multiple builds, hardware cloth aprons, sand floors, hinged roofs, and double latches, are popular because they genuinely work.
Pick two or three ideas that fit your situation best and start there. A coop does not need to be perfect on day one. It needs to be safe, dry, and ventilated. Everything else improves with experience, and your ducks will be very forgiving of the learning curve as long as they stay warm, dry, and out of reach of whatever is prowling around at night.
Frequently Asked Questions
How much space does a duck need inside a coop? Each duck needs a minimum of four square feet of indoor floor space, though six square feet per duck is more comfortable for most breeds. Larger breeds like Pekins need more space than smaller breeds like Call ducks. More space always reduces stress, keeps the coop cleaner, and makes the flock healthier overall.
What is the best flooring for a duck coop? Coarse builder’s sand is widely considered the best duck coop flooring by experienced keepers. It absorbs moisture quickly, composts droppings efficiently, and stays drier than straw or wood shavings. Raised mesh floors with droppings trays underneath are an excellent alternative for keepers who want the easiest possible cleaning routine.
How do I keep a duck coop from smelling bad? Good ventilation and proper drainage solve most duck coop odor problems. Remove wet bedding or rake sand regularly, ensure the coop has upper wall vents for airflow, and manage the water station to prevent constant flooding of the surrounding area. A clean, dry, well-ventilated coop rarely develops a serious odor problem.
What latches work best on a duck coop? Heavy-duty bolt latches at both the top and bottom of each door provide the most reliable security. Raccoons can open single central latches, so two-point locking systems are far safer. Adding a spring-loaded carabiner clip over the bolt as a secondary measure gives an extra layer of security that almost no predator can defeat.
Do duck coops need windows? Windows are not strictly necessary if the coop has adequate wall vents, but they do improve light levels and airflow significantly. If you add windows, cover them with hardware cloth on the inside so they can stay open for ventilation without creating a security gap. Avoid glass panes without protection, as they break easily and create a hazard.
How high off the ground should a raised duck coop be? Raising a duck coop six to twelve inches off the ground provides good airflow underneath the floor and makes it harder for rodents to nest beneath the structure. Ducks do not mind a gentle ramp up to an elevated entrance. Keep the ramp angle shallow and add grip strips across the surface so ducks can walk up comfortably without slipping.
Can ducks share a coop with chickens? Ducks and chickens can share a coop space, but it requires careful management. Ducks make everything wet, and chickens are prone to respiratory problems in damp conditions. If you keep both together, focus heavily on ventilation and drainage, use sand flooring, and monitor the chickens closely for any signs of moisture-related health issues.