Remodeling a basement bathroom is one of the smartest home improvement moves you can make. It adds real value to your home, gives you extra functional space, and honestly, it feels amazing when it is done. I know it sounds intimidating at first, especially when you are staring at a damp, unfinished basement space with no clue where to begin. But it is more manageable than it looks.
The good news is that you do not need to be a contractor to pull this off. With the right plan, the right tools, and a bit of patience, a beginner can handle most of this project. I have seen homeowners transform a plain, forgotten basement corner into a clean, stylish bathroom that guests actually compliment. That alone makes every sweaty hour worth it.
In this guide, I am walking you through the entire process, from the very first planning stage to the finishing touches. Whether you are adding a bathroom from scratch or updating an old one, this step-by-step breakdown will make the whole thing feel a lot less overwhelming. So let us get into it.
What to Know Before You Start a Basement Bathroom Remodel
Before swinging a single hammer, you need to understand what makes a basement bathroom different from any other bathroom in your house. The biggest challenge is that basements sit below the main sewer line. That means drainage works differently down here, and ignoring that fact early on will cost you a lot of money later.
Ventilation is another major factor. Basements tend to hold moisture, and a bathroom only adds more humidity to the mix. Without proper ventilation, you are looking at mold problems within months. I always recommend installing a high-quality exhaust fan rated for the square footage of your bathroom before anything else goes in.
Permits are something most beginners overlook, and that is a costly mistake. Most cities and counties require a permit for bathroom additions, especially when plumbing is involved. Check with your local building department before you start. Getting caught without a permit can mean tearing out finished walls, which is absolutely no fun.
Step 1: Plan Your Basement Bathroom Layout
Planning is where your remodel either succeeds or falls apart. A good layout considers plumbing access, door swing, fixture placement, and traffic flow. The most common basement bathroom layouts are the three-piece (toilet, sink, shower) and the half bath (toilet and sink only). Your available square footage will largely decide which one works best.
The minimum size for a functional three-piece basement bathroom is about 36 to 40 square feet. Anything smaller will feel cramped and make installation difficult. If space is tight, a corner shower unit is your best friend. It takes up less room without sacrificing function, and there are some genuinely good-looking options available today.
When placing fixtures, keep them as close to the existing drain stack as possible. The further your toilet or shower drain is from the main stack, the more complex and expensive the plumbing gets. I always sketch the layout on graph paper before committing to anything. It saves a surprising amount of time and frustration during the actual build.
| Layout Type | Minimum Size | Best For |
| Half Bath | 18 sq ft | Small spaces, guest use |
| Three-Piece Bath | 36-40 sq ft | Full functionality |
| Full Bath with Tub | 50+ sq ft | Comfort and resale value |
Step 2: Sort Out the Plumbing First
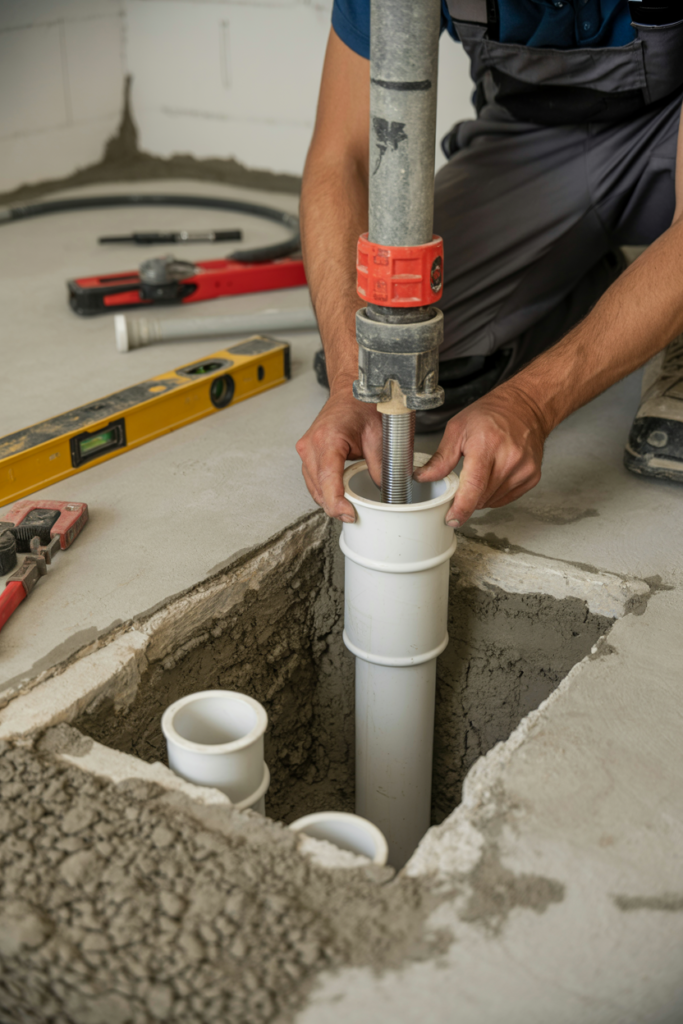
Plumbing is the backbone of any basement bathroom remodel, and it deserves serious attention. Since basements are below the main sewer line, gravity drainage often does not work. You will likely need an upflush toilet system or a sewage ejector pump to move waste up and out of the basement.
An upflush toilet system is a popular choice for basement bathrooms because it does not require breaking into the concrete floor. The system pumps waste up to the sewer line through a small pipe that runs along the wall or ceiling. Installation is relatively straightforward, and several reliable brands make units that are quiet and built to last. These are great options for a beginner who wants to avoid major concrete work.
If you prefer a traditional floor drain setup, you will need to break into the concrete slab to install the drain lines. This is more involved and usually requires a jackhammer rental and some basic understanding of pipe slope. The drain pipe needs to slope at least 1/4 inch per foot toward the main drain. Getting this wrong means slow draining or complete blockages, so precision matters here.
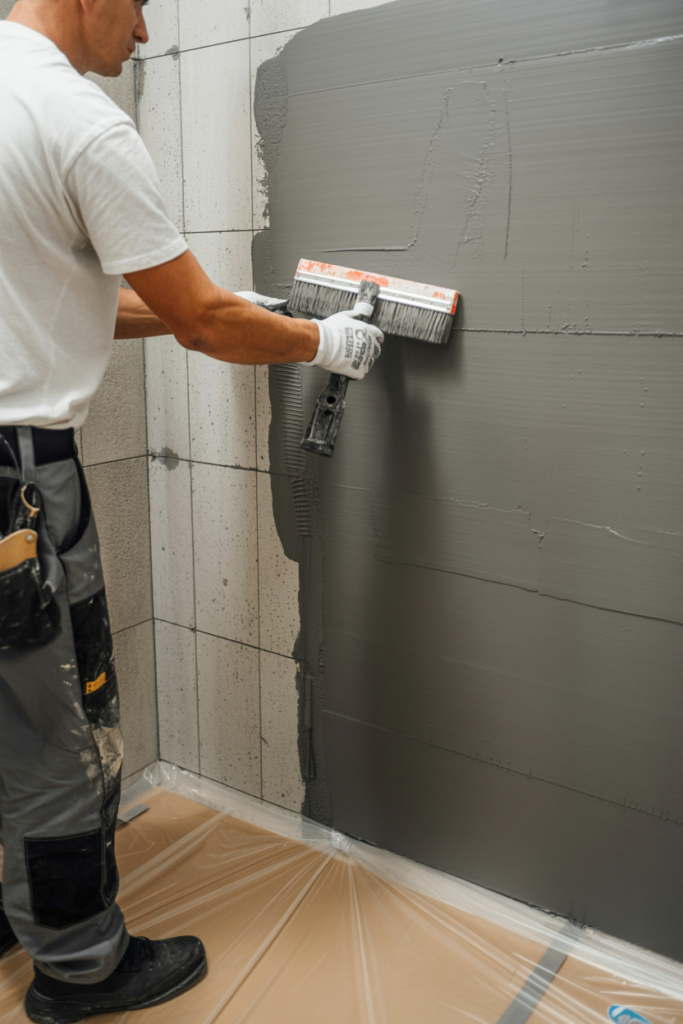
Step 3: Handle Waterproofing Like a Pro
Waterproofing a basement bathroom is non-negotiable. Water and basements are already a complicated relationship, and adding a shower or sink to the mix makes it even more critical. Skipping this step is the number one reason basement bathrooms develop mold, structural damage, and expensive repair bills down the line.
Start with the walls. Use a waterproof membrane or cement backer board behind all tile areas, especially in the shower zone. Regular drywall will absorb moisture and eventually crumble, no matter how good your tile job looks on the surface. Cement board or a product like HardieBacker is the right call here.
For the floor, apply a liquid waterproofing membrane before tiling. Pay special attention to corners and seams, as these are the most common spots where water sneaks through. I also recommend using a caulk joint instead of grout in the corners of the shower. Grout cracks over time, but a quality silicone caulk stays flexible and keeps water out for years.
Quick Waterproofing Checklist:
- Use cement backer board on all wet walls
- Apply liquid membrane on shower floors before tiling
- Seal all corners with silicone caulk
- Install an exhaust fan rated for your bathroom size
- Check for existing foundation cracks and seal them before framing
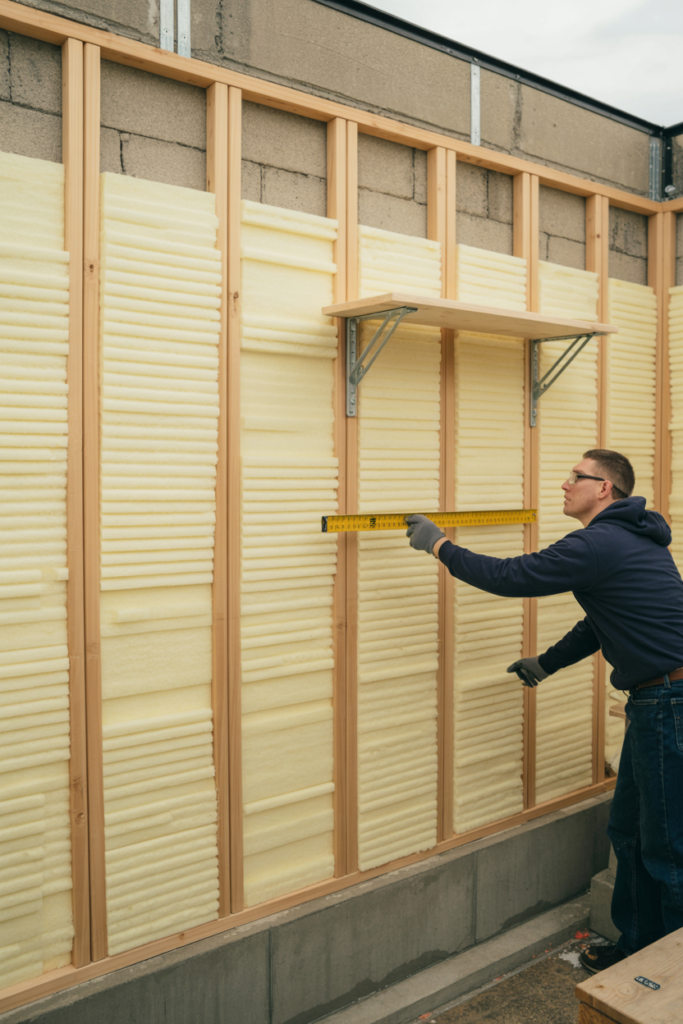
Step 4: Frame the Walls and Install Insulation
Framing the walls is where your basement bathroom really starts to take shape. Use pressure-treated lumber for the bottom plate, which is the horizontal piece that sits directly on the concrete floor. Regular wood in direct contact with concrete will absorb moisture and rot over time. Pressure-treated lumber is moisture-resistant and built to handle that environment.
For the wall studs, standard 2×4 lumber works perfectly fine in most cases. Space them 16 inches apart on center for solid support. If you are building a wall that will hold heavy tile or a large mirror, consider going with 2×6 studs for extra strength. It costs a little more upfront but saves you from wall flex issues later.
Once the framing is up, insulation goes in before any drywall or backer board. In a basement bathroom, I recommend using rigid foam insulation or closed-cell spray foam on exterior walls. These resist moisture far better than fiberglass batts. Fiberglass holds water like a sponge, and in a basement setting, that is just asking for mold problems.
Step 5: Rough-In Electrical Work
Electrical work in a basement bathroom requires careful planning and strict code compliance. Every bathroom needs GFCI-protected outlets, which are the outlets with the little reset buttons on them. These cut power instantly if they detect moisture, which is a genuine lifesaver in a wet environment. Do not even think about skipping this requirement.
You will need at least one dedicated 20-amp circuit for the bathroom. If you are adding a heated floor, a high-wattage exhaust fan, or a lighted mirror, plan for additional circuits accordingly. I always map out every electrical need before the walls close up, because adding circuits after drywall is installed is painful and expensive.
The exhaust fan wiring deserves its own mention. Wire your exhaust fan to a separate switch from the main light so you can run it independently. Better yet, install a fan with a built-in humidity sensor. It turns on automatically when moisture levels rise and shuts off when the air clears. For a basement bathroom, that kind of automation is genuinely worth the extra cost.
Electrical Requirements at a Glance:
| Item | Requirement |
| Outlets | GFCI protected |
| Circuit | Minimum 20-amp dedicated |
| Exhaust Fan | Separate switch or humidity sensor |
| Lighting | Vapor-rated fixtures near shower |
| Heated Floor | Separate thermostat and circuit |
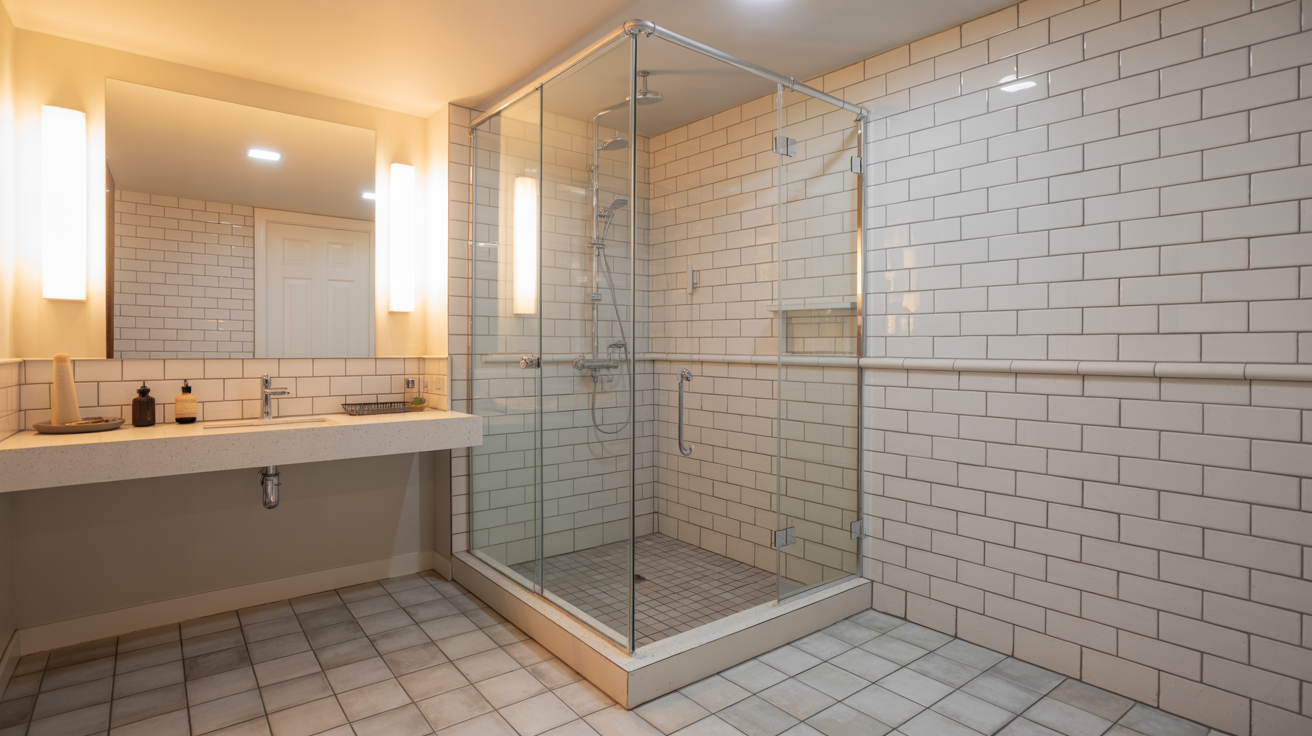
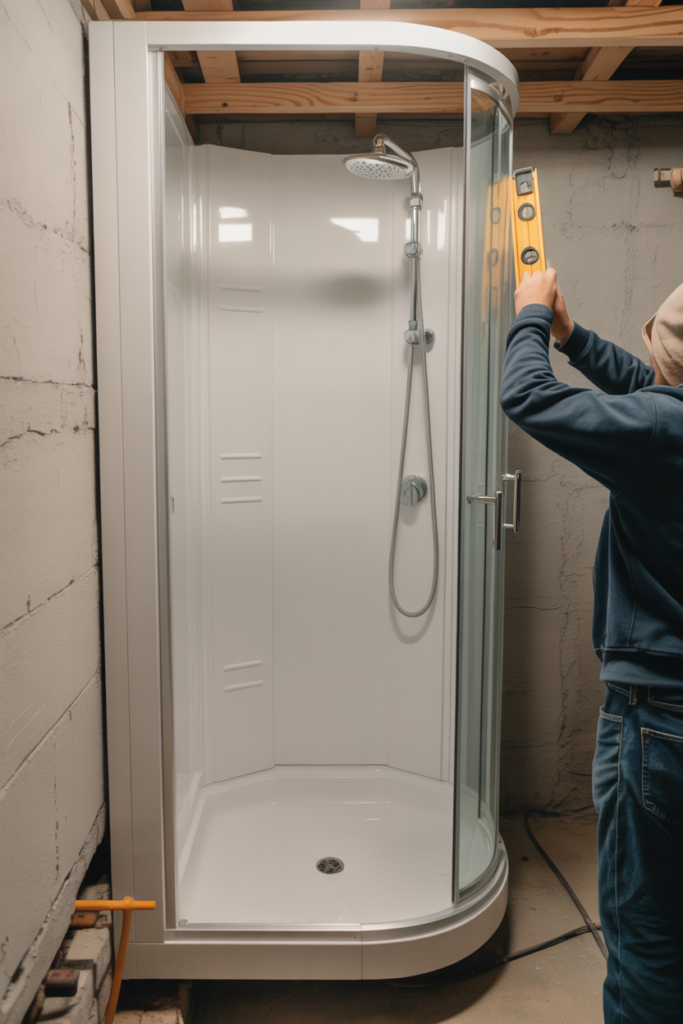
Step 6: Install the Shower or Tub Unit
Installing the shower is usually the most satisfying part of the whole project. For a basement bathroom, a prefab shower unit or a tile shower pan are the two most practical options. A prefab unit is quicker to install and easier for beginners. A custom tile shower looks more polished but takes more time and skill to execute properly.
If you go with a prefab unit, dry-fit it before connecting anything. Make sure the drain lines up correctly with your rough-in drain location. Most prefab units come with detailed installation instructions, and following them step by step is genuinely the best approach. Do not improvise when it comes to shower installation because water will find every mistake you make.
For a tile shower, the mortar bed or shower pan liner goes in first, then the backer board on the walls, then waterproofing membrane, and finally the tile. Work from the bottom up and use a level constantly. Uneven tile on a shower floor is not just ugly, it causes water to pool in the wrong spots. Take your time with this step and it will pay off in the final result.
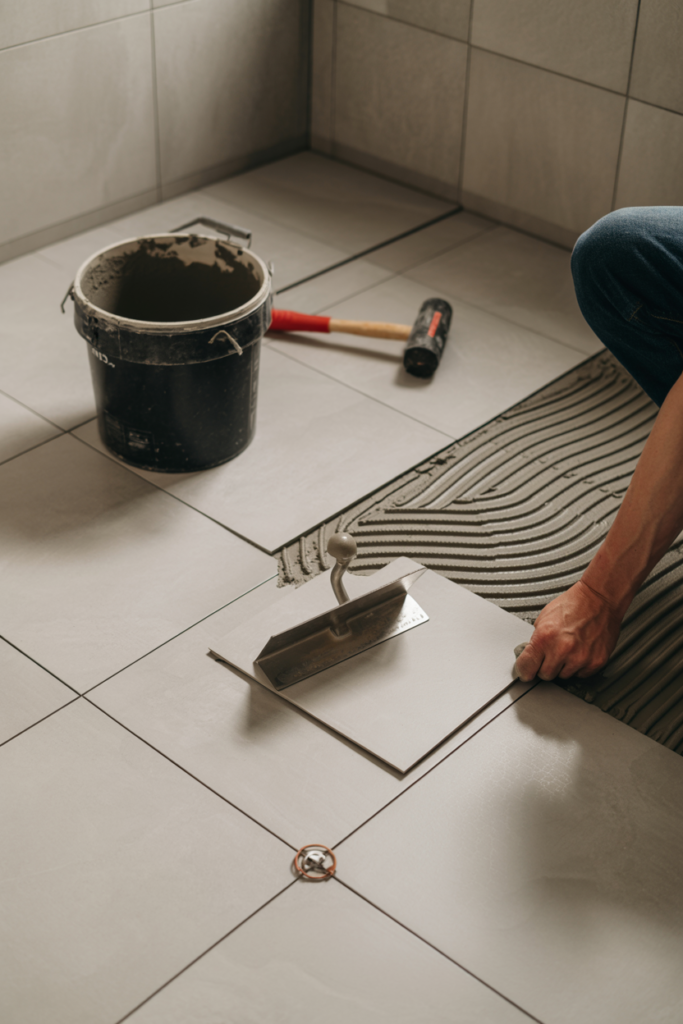
Step 7: Lay the Flooring
Flooring for a basement bathroom needs to be moisture-resistant above everything else. Ceramic tile and porcelain tile are the top choices here, and for good reason. They handle water, humidity, and heavy foot traffic without warping, swelling, or staining. They are also easy to clean, which matters a lot in a bathroom.
Vinyl plank flooring is another solid option, especially if you want something warmer underfoot than tile. Look for 100% waterproof vinyl plank, not just water-resistant. The difference matters in a basement setting where moisture can come from multiple directions. Avoid laminate flooring entirely in a basement bathroom. It looks fine at first but swells and buckles quickly when exposed to moisture.
Before laying any flooring, make sure the concrete subfloor is level. Use a self-leveling compound to fill in any low spots. An uneven subfloor will cause tiles to crack and grout lines to fail prematurely. I always give the compound at least 24 hours to fully cure before starting the tile installation. Patience at this stage protects all the work you have already done.
Best Flooring Options for Basement Bathrooms:
| Flooring Type | Water Resistance | Ease of Install | Cost Range |
| Porcelain Tile | Excellent | Moderate | $3 to $10 per sq ft |
| Ceramic Tile | Excellent | Moderate | $2 to $8 per sq ft |
| Vinyl Plank (100% waterproof) | Excellent | Easy | $2 to $7 per sq ft |
| Natural Stone | Good (needs sealing) | Difficult | $5 to $15 per sq ft |
| Laminate | Poor | Easy | Not recommended |
Step 8: Install the Toilet, Sink, and Vanity
This is the step where your basement bathroom starts looking like an actual bathroom. Install the toilet last among the three main fixtures, because it is the easiest to maneuver around while you work on the sink and vanity. Set the wax ring on the toilet flange, lower the toilet straight down, and press firmly to create a watertight seal. Do not rock the toilet side to side once it touches the wax ring.
For the sink, a wall-mounted sink or a pedestal sink works well in smaller basement bathrooms. They keep the floor visible, which makes the space feel larger. If you have enough room, a vanity with storage is a smarter long-term choice. Basement bathrooms often lack nearby storage, so built-in cabinet space under the sink is genuinely useful.
Connecting the supply lines and drain for the sink is straightforward if you have your rough-in plumbing in the right place. Use braided stainless steel supply lines for both the toilet and sink. They are more durable than the old plastic ones and far less likely to spring a leak. Tighten connections by hand first, then give them a quarter turn with a wrench. Over-tightening cracks fittings, which is a headache nobody needs.
Step 9: Tile the Walls and Add Finishing Details
Wall tile transforms a plain basement bathroom into something that actually looks intentional. Subway tile is a classic and affordable choice that suits almost any style. Large format tiles, like 12×24 inches, make a small bathroom feel bigger by reducing the number of grout lines the eye has to process. Either option works well as long as the backer board and waterproofing underneath are done correctly.
Start tiling from the center of the wall and work outward. This ensures the cuts at the edges are symmetrical, which looks far more professional than starting from one corner and ending with a random sliver of tile on the other side. Use a tile leveling system to keep everything flat and even. Lippage, which is when tiles sit at slightly different heights, is one of the most common beginner mistakes and it is very noticeable in finished bathrooms.
Grout is the final tile step, and color choice matters more than most people think. Light grout shows stains quickly in a high-moisture environment. A medium gray or warm beige grout hides dirt better and tends to age more gracefully in a basement bathroom. Seal the grout within 48 to 72 hours of application to protect it from moisture penetration. I use a penetrating grout sealer and reapply it once a year for lasting protection.
Common Mistakes to Avoid in a Basement Bathroom Remodel
Even the most careful beginners make mistakes during a basement bathroom remodel. Knowing what to watch out for ahead of time saves you money, time, and a whole lot of headaches. The most frequent mistake I see is rushing through the planning stage just to get to the fun part of picking tiles and fixtures.
Skipping the permit process is another big one. Some homeowners think they can quietly finish the work and nobody will notice. But when you go to sell your home, unpermitted work shows up during inspection and can seriously complicate the sale. Pull the permit, do the inspections, and protect yourself properly.
Using the wrong materials is a mistake that shows up slowly over time. Regular drywall behind tile, fiberglass insulation on exterior basement walls, or laminate flooring in a wet space will all fail eventually. The right materials cost a little more upfront but save you from a very expensive redo two or three years down the road.
How Much Does It Cost to Remodel a Basement Bathroom?
Budget is one of the first things people want to know, and the honest answer is that it depends on your choices. A basic basement bathroom remodel with builder-grade fixtures and simple tile can cost between $3,000 and $8,000 if you do most of the work yourself. Hiring out all the labor pushes that number to $10,000 and beyond fairly quickly.
Plumbing tends to be the biggest variable in the budget. If you need to break concrete for drain lines, add a sewage ejector pump, or run new water supply lines from a far distance, costs climb fast. Getting two or three quotes from licensed plumbers before committing to a layout is always a smart move.
Here is a rough cost breakdown to help with your planning:
| Item | DIY Cost Estimate | Professional Cost Estimate |
| Permits | $100 to $500 | $100 to $500 |
| Plumbing Rough-In | $300 to $800 | $1,500 to $4,000 |
| Electrical | $200 to $600 | $800 to $2,000 |
| Shower or Tub Unit | $300 to $1,500 | $500 to $2,500 |
| Flooring | $200 to $800 | $500 to $1,500 |
| Toilet and Sink | $150 to $600 | $300 to $1,000 |
| Tile and Grout | $200 to $1,000 | $600 to $2,000 |
| Vanity and Fixtures | $200 to $1,200 | $400 to $2,000 |
| Waterproofing | $100 to $400 | $300 to $800 |
| Total Estimate | $1,750 to $7,400 | $5,000 to $16,300 |
Conclusion
Remodeling a basement bathroom is a project that rewards patience, good planning, and attention to detail. From sorting out your drainage situation and waterproofing your walls to laying tile and connecting fixtures, every step builds on the one before it. When you follow the right sequence and use the right materials, the results genuinely speak for themselves.
Plan your layout carefully and keep fixtures close to the drain stack. Use moisture-resistant materials throughout, especially behind wet walls and on the floor. Handle plumbing and electrical work with care, pull your permits, and never skip waterproofing. Those fundamentals are what separate a basement bathroom that lasts decades from one that needs a full redo in five years.
Whether you are building a simple half bath or a full three-piece bathroom, the investment is worth every bit of effort. A finished basement bathroom adds comfort, convenience, and real resale value to your home. Take it one step at a time, and you will get there.
Frequently Asked Questions
1. Do I need a permit to remodel a basement bathroom?
Yes, in most areas a permit is required whenever plumbing or electrical work is involved. Check with your local building department before starting. Unpermitted work can cause serious problems when selling your home.
2. Can I add a bathroom to a basement without breaking concrete?
Yes, you can use an upflush toilet system or a macerator unit that pumps waste up to the sewer line. These systems avoid the need for concrete cutting and work well in most basement setups.
3. What is the best flooring for a basement bathroom?
Porcelain tile and 100% waterproof vinyl plank are the best choices. Both handle moisture well and hold up in basement conditions. Avoid laminate flooring as it swells and warps when exposed to humidity.
4. How long does a basement bathroom remodel take?
A DIY basement bathroom remodel typically takes 4 to 8 weeks depending on the scope of work. Hiring professionals can shorten that timeline significantly, especially for plumbing and electrical stages.
5. What size does a basement bathroom need to be?
A half bath needs a minimum of about 18 square feet. A three-piece bathroom with a shower requires at least 36 to 40 square feet for comfortable use and proper fixture clearances.
6. Do I need a special toilet for a basement bathroom?
If your basement sits below the main sewer line, a standard gravity-flush toilet will not drain properly. You will need an upflush toilet or a sewage ejector pump system to move waste up to the sewer line.
7. How do I prevent mold in a basement bathroom?
Use moisture-resistant materials throughout, waterproof all wet areas, and install a quality exhaust fan rated for your bathroom size. Run the fan during and after every shower to keep humidity levels under control.