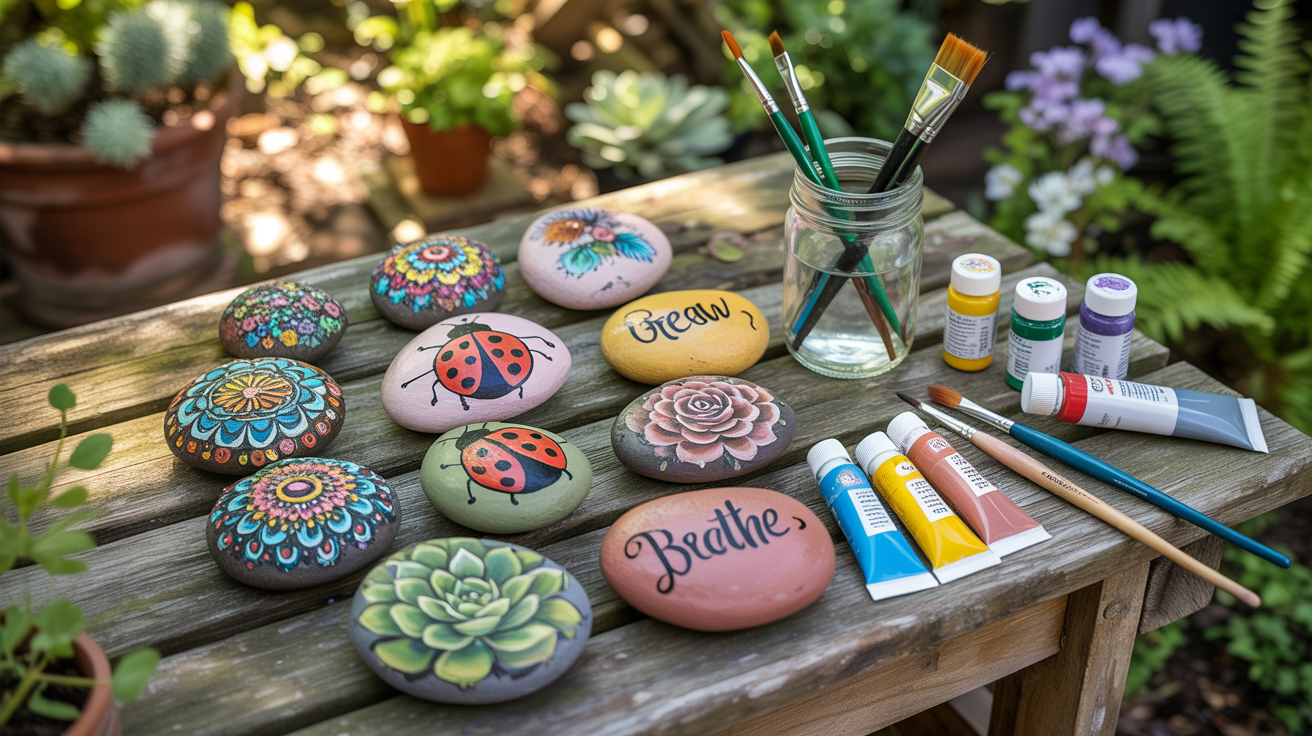
Painted rocks are one of the easiest ways to add a personal touch to your outdoor garden. They are affordable, fun to make, and can completely change the look of a plain garden bed. I started doing this a couple of years ago, and honestly, it became one of my favorite weekend hobbies.
You do not need any special artistic talent to get started. A few basic supplies and a bit of patience are all you really need. Even simple designs can look stunning when placed in the right spot outdoors.
The great thing about painted rocks is that they work in any garden style. Whether your garden is neat and formal or wild and cottage-style, there is always a painted rock idea that fits. Some of these ideas might even get you a little addicted to collecting rocks on your next walk.
What to Know Before You Paint Rocks for Outside
Getting your supplies and prep work right from the start makes everything easier. The type of paint and sealant you use will determine how long your designs actually last outdoors. I made the mistake of skipping the sealant early on and watched my first designs fade after just a few weeks of rain.
Always wash your rocks thoroughly and let them dry completely before painting. Any dirt or moisture on the surface will stop the paint from sticking properly. A clean, dry rock gives you a much better painting surface and helps the colors look more vibrant.
Here is a simple guide to the supplies you will need:
| Supply | Best Type to Use | Why It Matters |
| Acrylic paint | Outdoor-grade acrylic | Resists weather and fading |
| Primer | White spray primer | Helps paint bond to the rock surface |
| Sealant | UV-resistant clear coat | Protects the design from the sun and rain |
| Paintbrushes | Flat and fine detail brushes | Gives you control over different design elements |
| Paint pens | Oil-based paint pens | Great for clean lettering and outlines |
| Rubbing alcohol | Isopropyl 70% or higher | Cleans the rock surface before painting |
Sealing your finished rocks with at least two coats of UV-resistant sealant is something I always recommend. It is the single biggest factor in how long your painted rocks hold up to sun, rain, and cold. Do not skip this step.
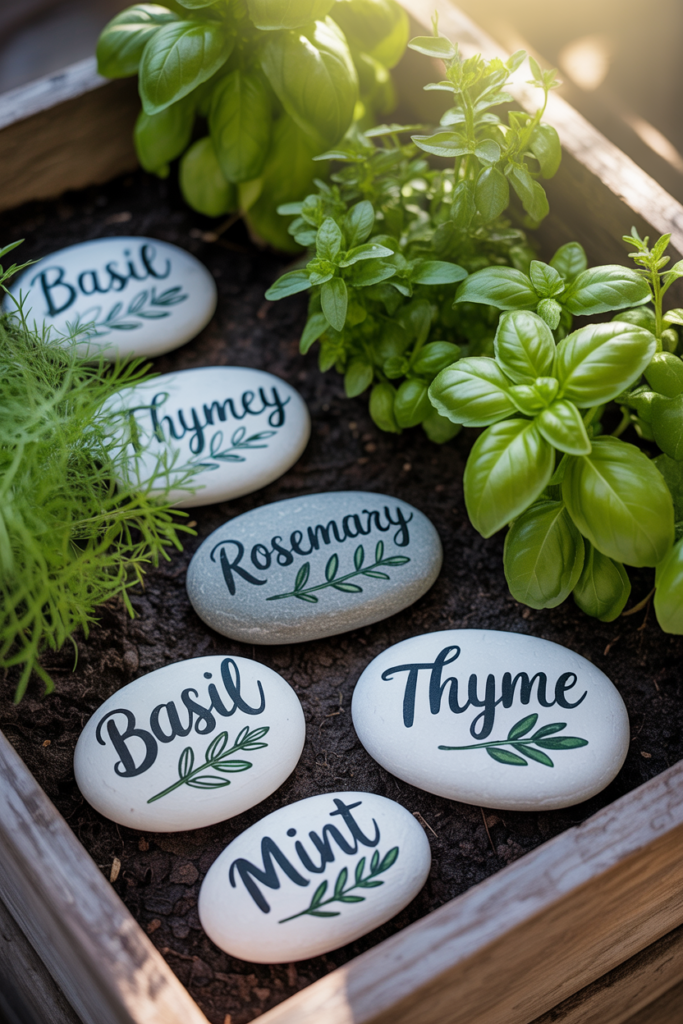
1. Herb and Vegetable Garden Marker Rocks
Garden marker rocks are both useful and good-looking at the same time. I painted the names of my herbs onto smooth, flat rocks and placed them at the base of each plant. It made my whole herb garden look tidier without spending a single dollar on store-bought markers.
Flat river stones work best for this because they give you a smooth writing surface. Paint a white base coat first, let it dry, then write the plant name using a black or dark green paint pen. You can add a small leaf sketch beside the name to make it look a little more decorative.
These are one of the most beginner-friendly ideas on this list and take less than 30 minutes each. Picking rocks that are roughly the same size gives your garden a more uniform and organized look. They are also easy to swap out when the growing season changes.
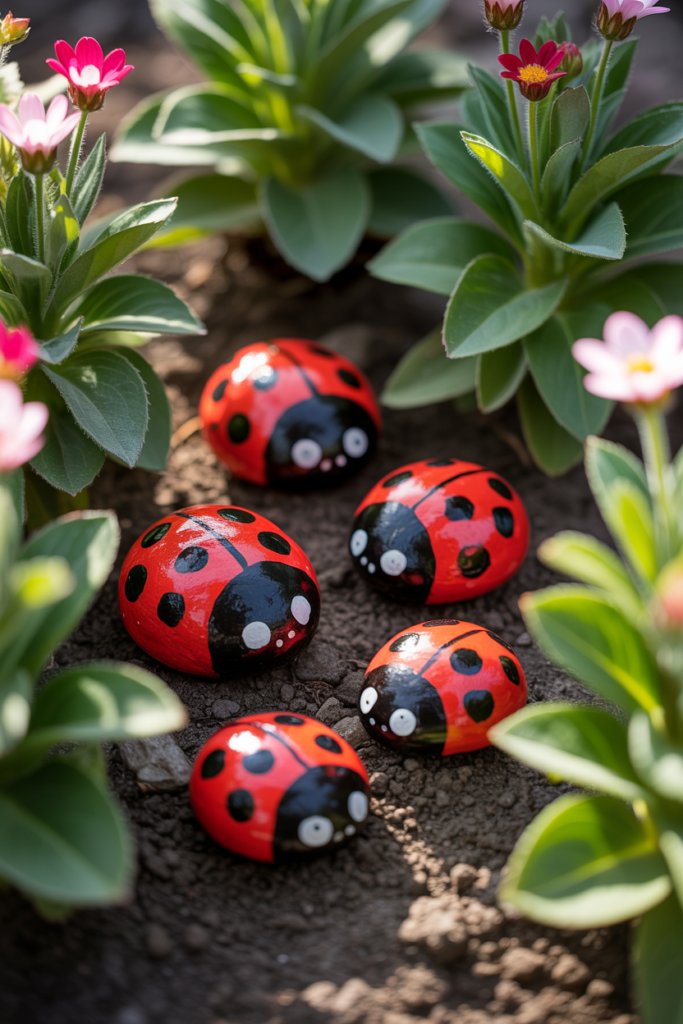
2. Ladybug Rocks for Bright Garden Beds
Ladybug rocks are a classic painted rock idea that never really goes out of style. They are simple to paint, look cheerful in any garden bed, and even the most basic version turns out well. I have a small cluster of five ladybug rocks near my rose bushes, and they are always the first thing people notice.
Start with a solid red base coat over the whole rock. Once it dries, paint a black semicircle at one end for the head and draw a straight line down the center of the body. Add a few black dots on each side, and you have yourself a very convincing ladybug.
Round or oval rocks work best for this design since the shape naturally suits a ladybug’s body. Grouping three or five looks more intentional than placing just one alone. Kids love making these, too, so it is a great activity to do together on a weekend afternoon.
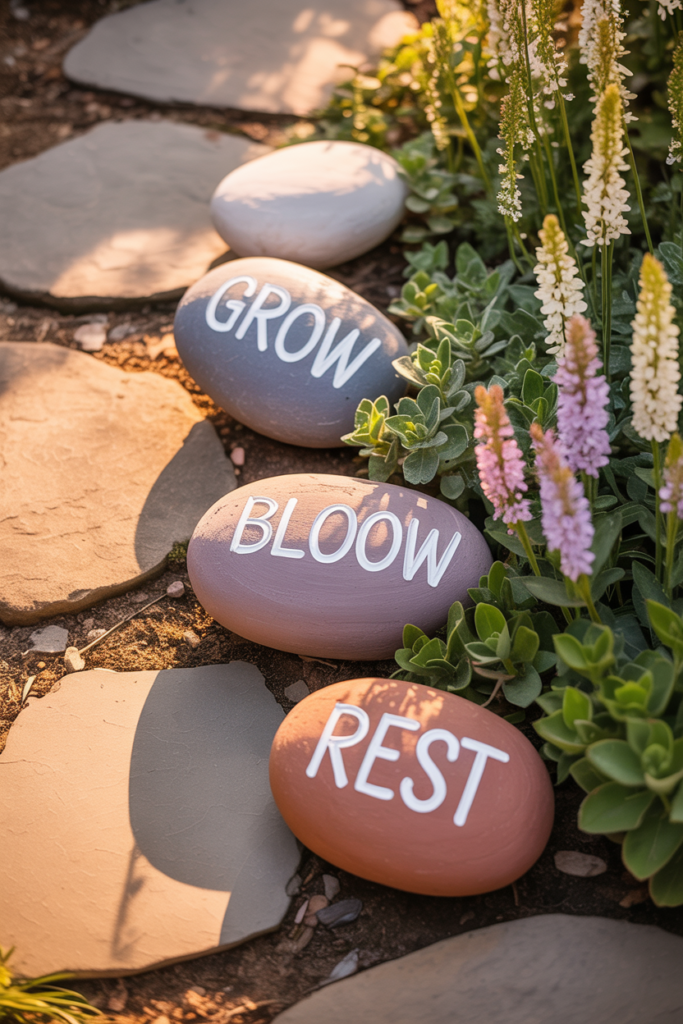
3. Inspirational Word Rocks Along Garden Paths
Word rocks are one of those ideas that look simple but add a lot of character to a garden. I painted words like “grow,” “bloom,” and “rest” onto smooth stones and lined them along my garden path. Every time I walk past them, it feels like a small reminder to slow down and enjoy the space.
A paint pen gives you much cleaner results than a brush for lettering work. Practice the word on paper first to figure out sizing and spacing before you commit to the rock. A light pencil sketch directly on the rock also helps you stay centered and even.
Neutral rocks with white or black lettering always look clean and timeless. You can also match the lettering color to your existing garden palette for a more pulled-together look. These also make genuinely thoughtful handmade gifts for anyone who loves gardening.
4. Mandala Rocks for a Boho Garden Style
Mandala rocks have become incredibly popular in the rock painting community, and it is easy to see why. The patterns look complex and detailed, but are actually quite approachable once you understand the basic technique. I use the blunt end of a pencil dipped in paint to create the dot patterns, and it works better than any fancy tool I have tried.
Start at the center of the rock and build your design outward in rings of dots and lines. Keeping your dot sizes consistent within each ring is what makes the pattern look intentional rather than random. Jewel tones like teal, gold, and deep purple on a black base coat produce the most striking results.
These rocks look great near potted plants or along a garden border where people will actually stop and look at them. The more time you put into the layers and detail, the more impressive the finished piece looks. They also photograph really well if you enjoy sharing your garden on social media.

5. Animal Face Rocks to Add Fun to Garden Corners
Animal face rocks are a personal favorite of mine and a great way to inject some personality into quieter garden corners. I painted a hedgehog, a fox, and a small owl for my back garden, and they have sparked more conversations than almost anything else out there. Each one takes about an hour, and you really do not need advanced painting skills to pull them off.
Choose an animal that suits the overall feel of your garden. Forest creatures like foxes, hedgehogs, and owls work beautifully in naturalistic or woodland-style gardens. Brighter animals like parrots or frogs suit more colorful and playful outdoor spaces.
Round rocks are the best choice here since the shape naturally works as a head. Build the face up in layers, starting with the base color and adding features like eyes and a nose last, using a fine detail brush. Seal these really well since you will want them looking good for more than one season.

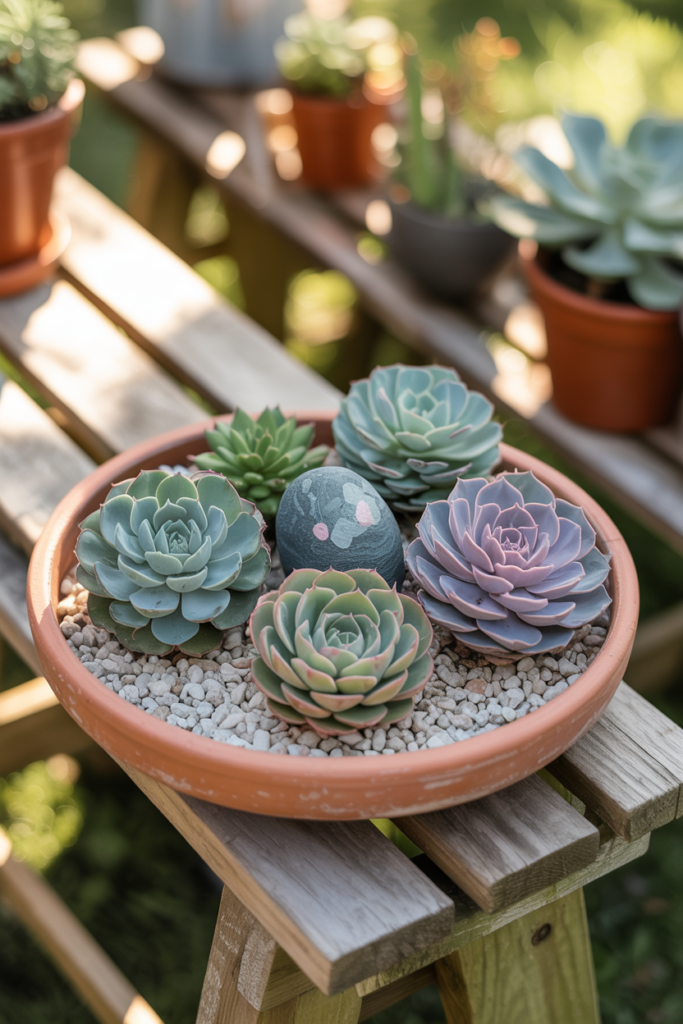
6. Painted Succulent Rocks for Low-Maintenance Garden Decor
Painted succulent rocks are perfect if you want the look of real plants without any of the upkeep. I placed a few of these among my actual succulents, and honestly, some visitors could not tell the difference at first glance. They add a fun, quirky element to any rock garden or container display.
Use green, teal, and dusty pink tones to mimic the colors of real succulents. Paint the base color first, then add petal-like shapes, layering outward from the center. A dry brush technique for the petal edges gives a more realistic and textured finish.
Round, slightly domed rocks work best for this design since they mimic the shape of a real succulent rosette. These look especially good grouped in a shallow dish or tray filled with gravel. They also work well as a permanent filler in outdoor planters during the colder months when real plants are not growing.
7. Galaxy and Night Sky Rocks for a Dreamy Garden Touch
Galaxy rocks are one of those ideas that look incredibly hard but are actually very forgiving to paint. The technique involves layering colors loosely and letting them blend, which means small mistakes just blend right into the design. I tried this for the first time, expecting a disaster, and ended up with something I was genuinely proud of.
Start with a black base coat and let it dry fully. Then use a sponge to dab on deep blue, purple, and dark teal in overlapping patches across the rock. Add a few white dots and tiny star clusters using a fine brush or the tip of a paint pen to complete the galaxy effect.
These rocks look stunning in gardens that have evening lighting or fairy lights. The dark tones and sparkly details catch the light beautifully after sunset. Place them along a garden border or near an outdoor seating area where people will actually sit and appreciate them up close.

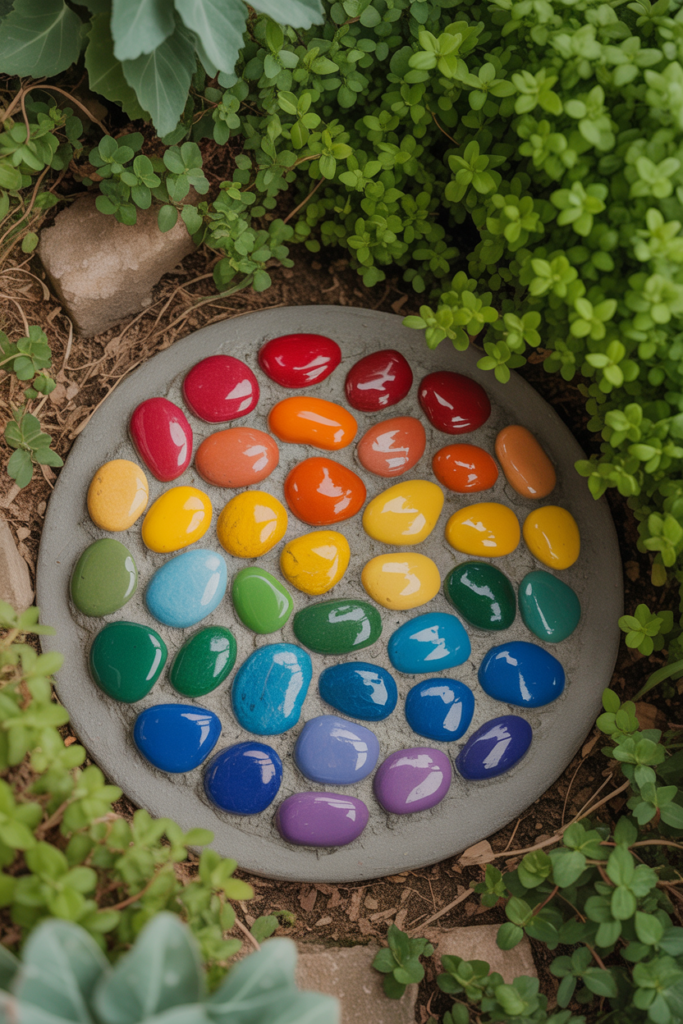
8. Painted Pebble Mosaic Stepping Stones
This idea goes a step beyond individual rocks and turns a collection of painted pebbles into a full garden feature. I arranged a group of painted pebbles inside a stepping stone mold to create a colorful mosaic path through my garden. It took an afternoon to put together, but the result looked like something from a professional landscape design.
Paint each pebble a solid color or simple pattern before arranging them. You can follow a color theme like all blues and greens, or go eclectic with a rainbow mix. The key is to plan your arrangement on a flat surface first before committing to the final placement.
Set the pebbles into quick-setting concrete inside a round or square mold for a permanent stepping stone. Once cured and removed from the mold, it becomes a durable and completely unique garden path feature. Seal the pebbles before setting them to keep the colors from being affected by the concrete.
What Makes Outdoor Painted Rocks Last Longer
Paint durability is one of the most common concerns people have about outdoor rock art. The good news is that with the right products and a little extra care, painted rocks can easily last for several years outside. I have rocks in my garden from three years ago that still look as sharp as the day I painted them.
Here is a comparison of the most popular sealant options for outdoor painted rocks:
| Sealant Type | Weather Resistance | Finish | Best For |
| Mod Podge Outdoor | Moderate | Glossy or matte | Occasional rain exposure |
| Krylon UV-Resistant Clear | High | Glossy | Year-round outdoor use |
| Rust-Oleum Crystal Clear | High | Gloss or satin | Rocks in direct sunlight |
| Polycrylic Water-Based | Moderate | Satin | Covered outdoor areas |
| Resin Coat | Very High | High gloss | Permanently displayed statement rocks |
Applying sealant in thin, even layers works better than one thick coat. Thick coats tend to bubble or peel over time, especially in temperature extremes. Two to three thin coats with drying time between each coat gives the most reliable protection.
Storing your painted rocks indoors during harsh winter months is another easy way to extend their life. Even the best sealant has limits when faced with freezing and thawing cycles repeatedly. A little seasonal care goes a long way.
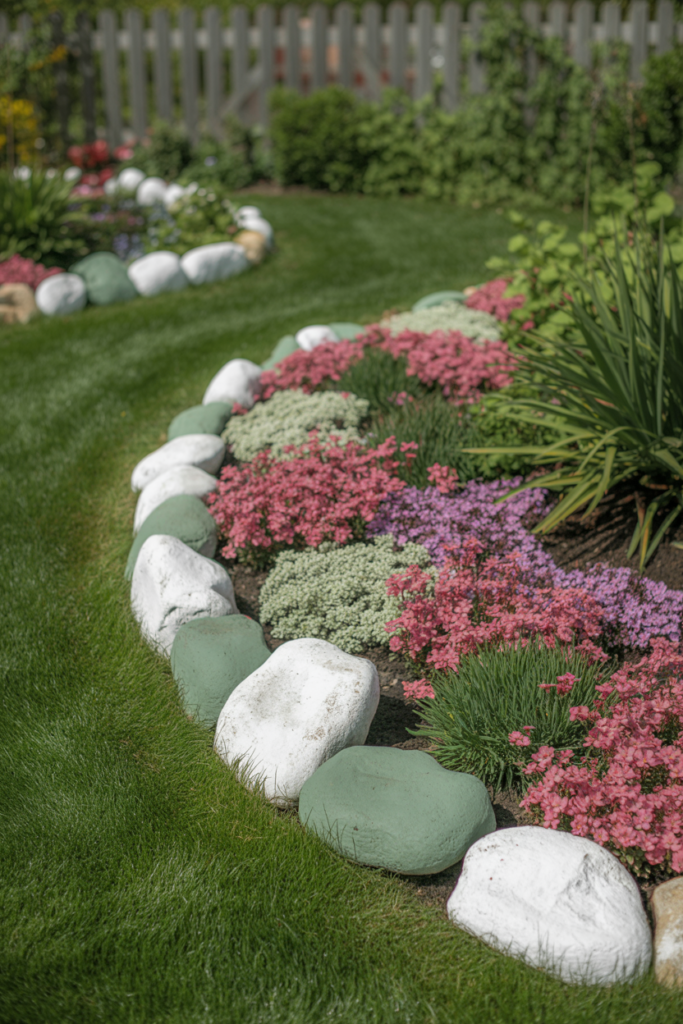
9. Painted Rock Borders Around Flower Beds
A painted rock border is one of the most practical and decorative ways to use this hobby in your actual garden layout. I painted a set of medium-sized rocks in soft white and sage green and used them to edge my main flower bed. It completely changed how finished and intentional that part of the garden looked.
You do not need a complicated design for this idea to work well. Simple color blocking, stripes, or a single pattern repeated across all the rocks creates a cohesive and polished border. Keeping the color palette consistent is more important than the intricacy of each design.
Choose rocks that are similar in size and height so the border sits evenly along the garden edge. Flat-bottomed rocks are easier to position and stay in place better during rain or wind. This is also a great way to use up a large collection of rocks you have been gathering over time.
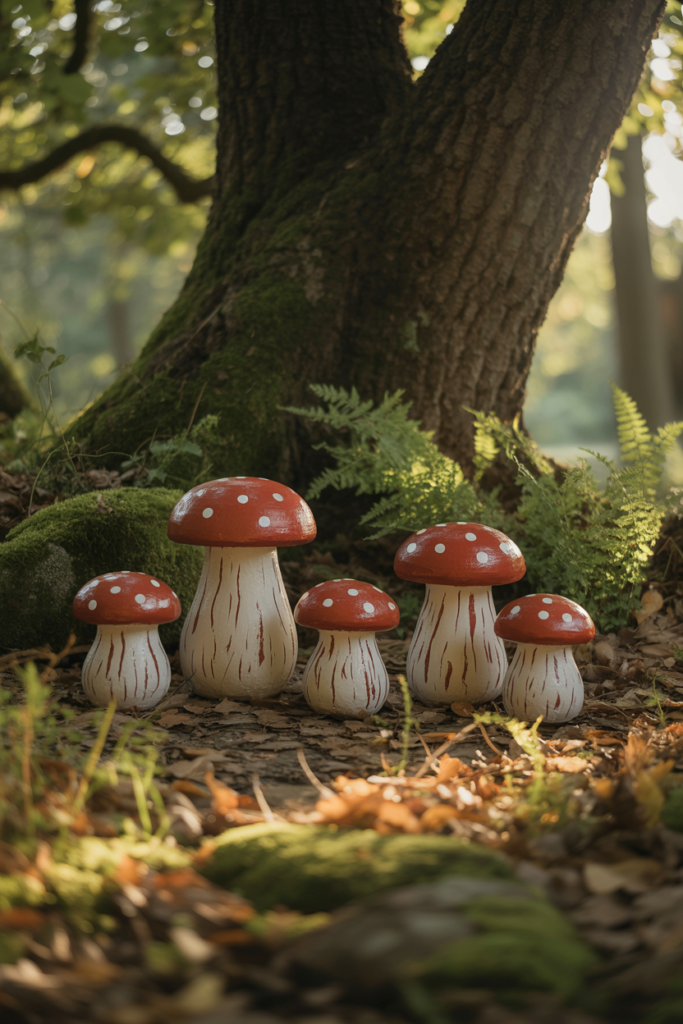
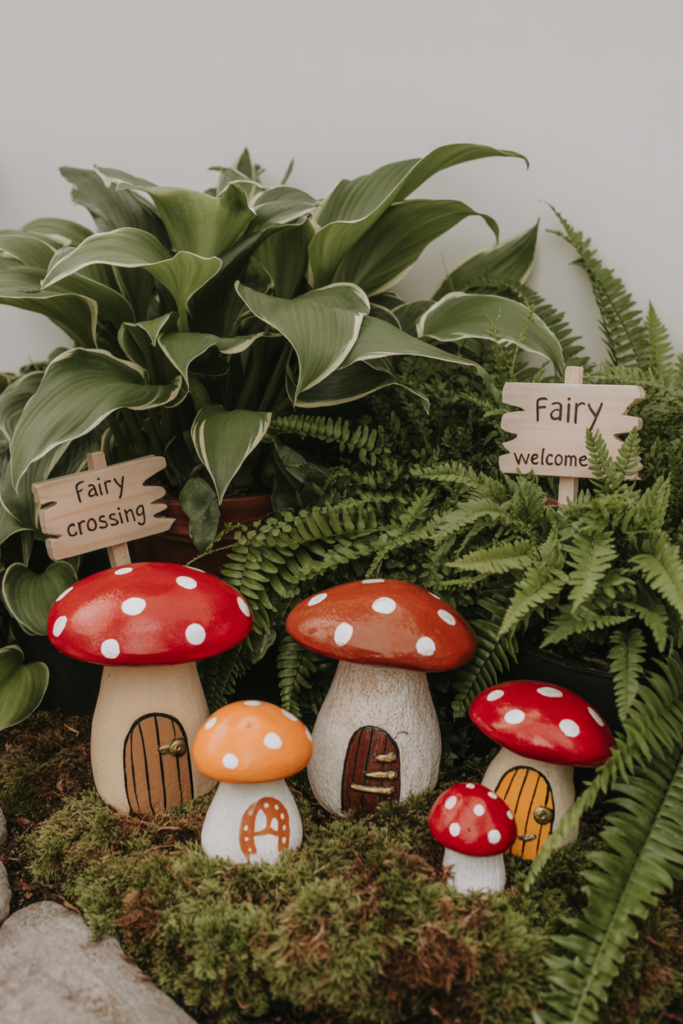
10. Painted Rocks Shaped as Miniature Mushrooms
Mushroom rocks have become one of the most popular trends in garden rock painting right now. They add a woodland and fairy-tale quality to garden spaces that is hard to achieve with any other decoration. I painted a set of red and white spotted mushrooms for a shaded corner of my garden, and it transformed that dull spot completely.
Use a rounded rock for the mushroom cap and a taller, narrower rock for the stem. Paint the cap red with white dots for the classic toadstool look, or go with earthy browns and tans for a more realistic mushroom style. The two-rock approach gives the finished piece more dimension than painting on a single stone.
Arrange a small cluster of different-sized mushroom rocks together for the best visual effect. Grouping them near the base of a tree or along a shaded path looks especially natural. These also work really well alongside fairy garden setups if that is a style you already have going in your outdoor space.
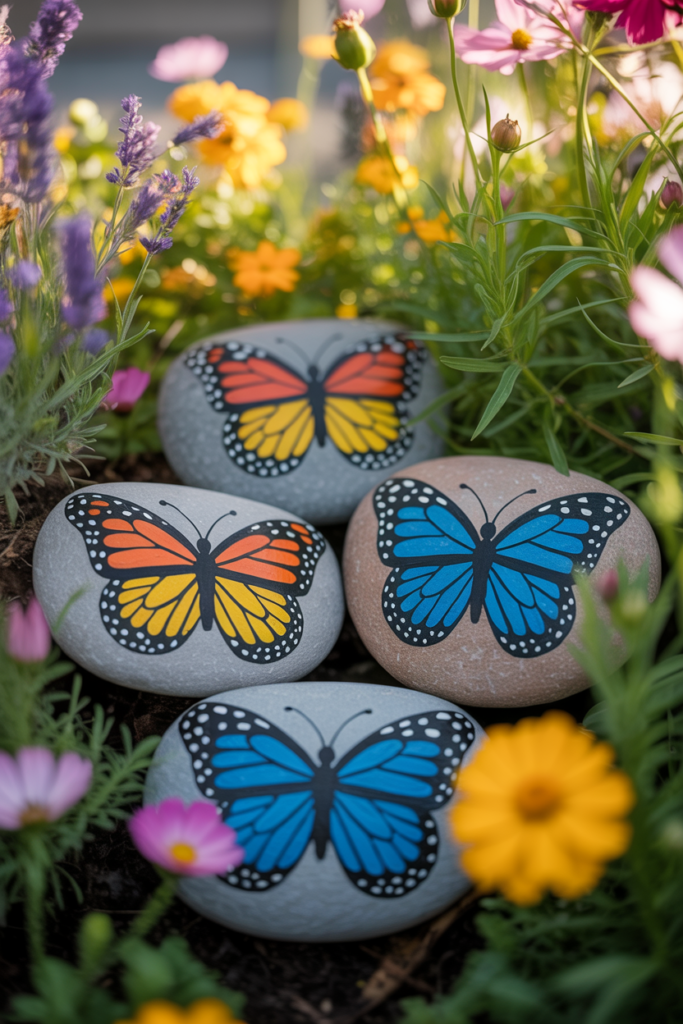
11. Painted Butterfly Rocks for Colorful Garden Displays
Butterfly rocks are one of the most visually striking ideas you can add to an outdoor garden. I painted a set of these in bright oranges and yellows and scattered them among my flower beds to mimic the look of real butterflies resting on the ground. The effect is genuinely beautiful, especially when the sun hits the colors directly.
Use a flat, oval rock and paint the butterfly body down the center first. Then build out the wing shapes on either side using bold, contrasting colors. Adding thin black outlines around the wings and small white dot details makes the finished design look much more polished.
These work really well when placed at varying heights by propping some rocks against stones or garden edging. Mixing a few different butterfly species and color combinations across your garden creates a more natural and layered look. They also hold up well outdoors as long as you seal them properly with a UV-resistant coat.
12. Painted Rock Toadstools for Fairy Garden Setups
Fairy garden styled rocks have a charm that suits almost any garden corner. I used painted toadstool rocks to fill in the gaps around my potted plants, and it gave the whole display a magical, storybook quality. They are especially popular in shaded garden areas where colorful flowers do not always thrive.
Paint the top half of a round rock red or orange for the cap, and the bottom half white or cream for the stem. Add white spots across the cap and a thin line where the two halves meet to define the shape cleanly. A small curved line detail at the base of the stem adds a nice finishing touch.
Group three or five toadstool rocks together in odd numbers for the most natural-looking arrangement. Tuck them near the base of potted ferns, hostas, or any large-leafed plant for a forest-floor effect. This idea pairs really well with the mushroom rocks from idea ten if you want to build a full woodland-themed garden corner.
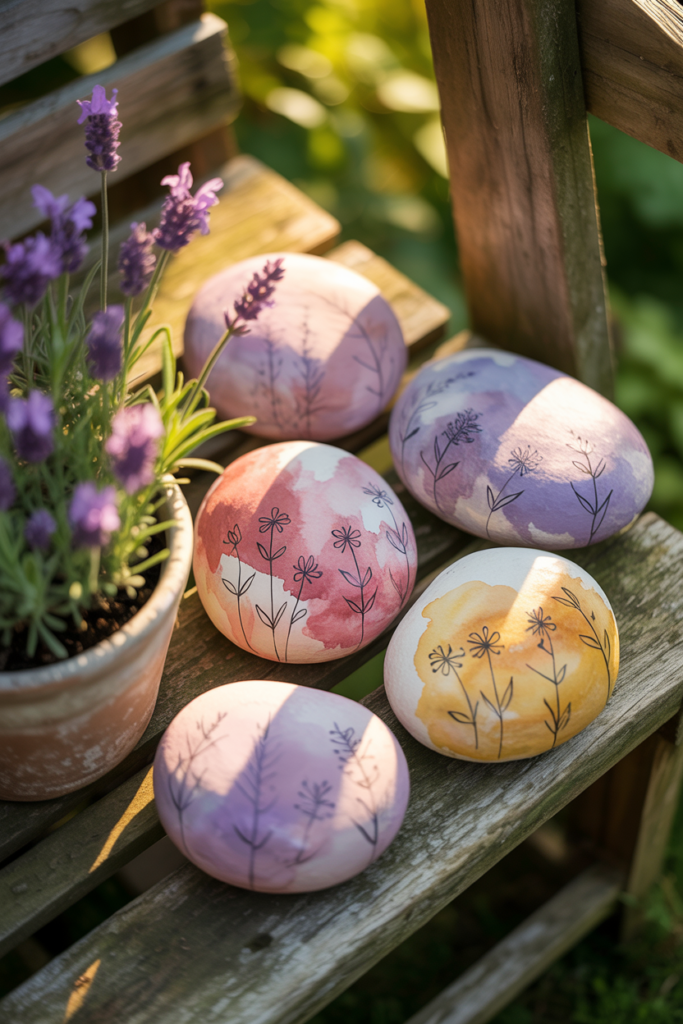
13. Painted Watercolor Effect Rocks for Soft Garden Accents
Watercolor-style rocks are a softer and more painterly alternative to bold graphic designs. I discovered this technique by accident when my paint was slightly too watered down, and the blended result looked so pretty that I kept doing it on purpose. It gives rocks a delicate, artistic quality that works beautifully in cottage and bohemian garden styles.
Wet the rock surface lightly with water before applying thinned acrylic paint. The paint spreads and blends across the surface in soft, organic shapes that mimic real watercolor paper. Soft pinks, lavenders, and warm yellows work especially well with this approach.
Let each color layer dry before adding the next one to avoid muddying the tones. Once dry, you can add simple floral outlines or leaf shapes on top using a fine detail brush. These rocks look stunning when grouped as a decorative cluster near a garden bench or outdoor table.
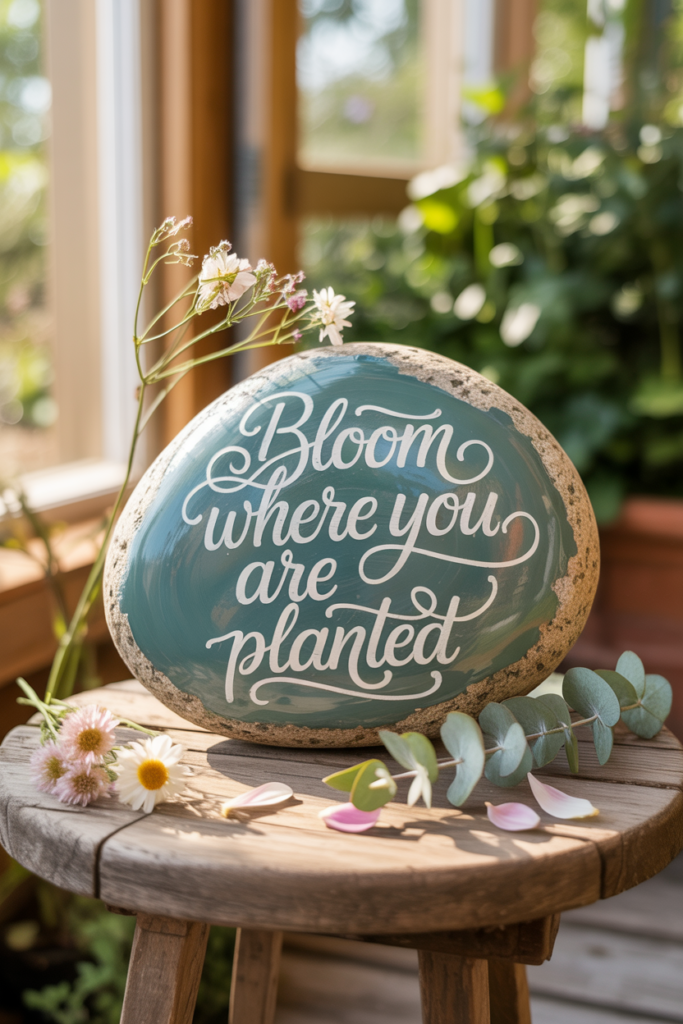
14. Painted Quote Rocks as Personalized Garden Gifts
Quote rocks are a step up from simple word rocks and make incredibly thoughtful personalized gifts for fellow garden lovers. I painted a meaningful quote onto a large smooth river stone for a friend’s birthday, and she told me it was one of the most personal gifts she had ever received. There is something special about a handmade object that carries a meaningful message.
Choose a short quote that fits the recipient’s personality or love of gardening. Something like “bloom where you are planted” works perfectly and is short enough to fit neatly on most medium-sized rocks. Sketch the lettering lightly in pencil first to get the spacing right before committing with paint.
Script-style lettering using a fine paint pen gives the most elegant result for quote rocks. A soft, muted background color behind the text makes the words stand out without looking too busy. These are best sealed with a gloss finish sealant to give them a refined, almost ceramic-like appearance.
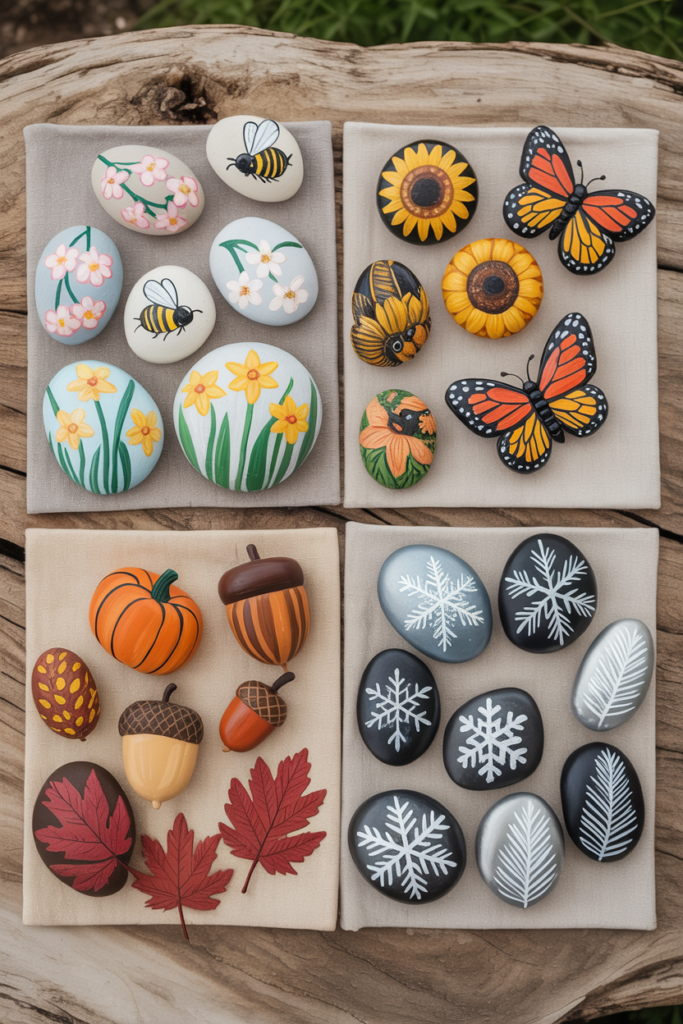
15. Painted Seasonal Rocks to Refresh Your Garden Year-Round
Seasonal rocks are one of my favorite ideas because they give you a reason to keep painting throughout the year. I keep a small collection of rocks for each season and swap them out as the months change. It is a simple habit that keeps the garden feeling fresh and relevant, no matter what time of year it is.
For spring, think painted flowers, bees, and pastel colors. Summer calls for bright sunflowers, butterflies, and bold tropical tones. Autumn suits painted pumpkins, acorns, and warm oranges and reds, while winter rocks painted with snowflakes or pine branches add a festive touch to an otherwise bare garden.
Keeping a dedicated box or tray for each season makes the swapping process easy and organized. It also means your rocks stay protected when they are not in use, which extends their lifespan significantly. This idea is also a great excuse to keep experimenting with new designs and techniques all year long.
Wrapping Up: Your Outdoor Garden Deserves a Personal Touch
Painted rocks are one of those rare hobbies that are equal parts relaxing, creative, and genuinely useful for your garden. From simple herb markers to detailed mandala designs, there is a style and skill level here for everyone. I hope this list has given you at least a few ideas that you are excited to try in your own outdoor space.
The key things to remember are good surface preparation, outdoor-grade acrylic paint, and a solid UV-resistant sealant. These three basics are what separate painted rocks that last for years from ones that fade after the first rainstorm. Get those right and everything else is just creative expression.
Start with one or two simple ideas and build your confidence from there. Before long, you will find yourself eyeing every smooth stone on a nature walk as a potential canvas, which is either a sign of a great new hobby or a minor obsession. Either way, your garden is going to look fantastic.
Frequently Asked Questions
What is the best paint to use for painting rocks outside? Outdoor-grade acrylic paint is the best choice for painting rocks that will stay outside. It bonds well to rock surfaces, dries quickly, and holds up against rain and sun far better than regular craft paint.
Do I need to seal painted rocks for outdoor use? Yes, sealing is necessary for outdoor painted rocks. A UV-resistant clear coat sealant protects the design from fading, moisture, and temperature changes. Apply at least two thin coats for the best protection.
What kind of rocks are best for painting? Smooth river rocks and flat pebbles are the easiest to paint on. They have a clean, even surface that takes paint well and holds detail without too much effort. Rough or porous rocks are harder to work with and require more prep.
How long do painted rocks last outside? With the right paint and sealant, painted rocks can last anywhere from two to five years outdoors. Bringing them inside during harsh winters or heavy frost periods will extend their lifespan even further.
Can I use regular acrylic paint on outdoor rocks? Regular acrylic paint can work, but it fades and chips much faster than outdoor-grade acrylic. It is worth spending a little more on paint labeled specifically for outdoor use, especially for rocks that will sit in direct sunlight.
Do I need to prime rocks before painting them? Priming is not required, but it makes a noticeable difference in how vibrant your colors turn out. A white spray primer gives you a bright base that makes every paint color sit more vividly on the rock surface.
Can kids paint rocks for the garden, too? Absolutely, rock painting is one of the most kid-friendly craft activities around. Simple designs like ladybugs, smiley faces, and color-blocked patterns are easy for children to do and look great in the garden.