A headboard is the one piece of bedroom furniture that does more visual work than anything else in the room, and the fact that you can build a great one yourself for a fraction of retail cost is one of the better-kept secrets in home decor. Store-bought headboards range from overpriced to outrageously overpriced, and most of them look exactly like every other headboard on the market anyway. A DIY headboard lets you get exactly the size, shape, color, and material you actually want for your specific bedroom.
I got into DIY headboards after spending an embarrassing amount of time looking at upholstered options online and realizing that none of them were quite right and all of them cost more than I wanted to spend. Building my own turned out to be genuinely straightforward, and the finished result looked more intentional and personal than anything I had seen at furniture stores in that price range. That experience convinced me that a DIY headboard is one of the highest-return weekend projects a bedroom can get.
The options on this list cover every skill level, every bedroom aesthetic, and every budget, from nearly zero to a modest weekend project spend. Whether you want something upholstered and luxurious, rustic and reclaimed, or minimal and modern, there is a DIY headboard approach here that suits your bedroom and your Saturday afternoon availability.
Why a DIY Headboard Is One of the Best Low-Cost Bedroom Upgrades You Can Make This Weekend
A DIY headboard changes the entire focal point of a bedroom in a single afternoon, which is a genuinely rare return on a weekend project. The wall behind the bed is the first thing anyone sees when they walk into a bedroom, and a bare wall in that spot makes even a well-furnished room feel unfinished. Adding a headboard, even a simple one, gives the room an anchor that pulls everything else together visually.
The cost difference between a store-bought headboard and a well-made DIY version is significant enough to matter. A basic upholstered headboard from a furniture retailer costs several hundred dollars at minimum, while the same look built at home with plywood, foam, fabric, and a staple gun typically costs between thirty and eighty dollars, depending on the materials chosen. That difference pays for a lot of other bedroom upgrades.
DIY headboards also solve a problem that store-bought options rarely address: getting the exact right size for your specific bed and wall. Standard retail headboards come in fixed widths that often look too narrow for a king bed against a wide wall or too bulky for a small bedroom. Building your own means the headboard fits the space perfectly from the first day it goes up.
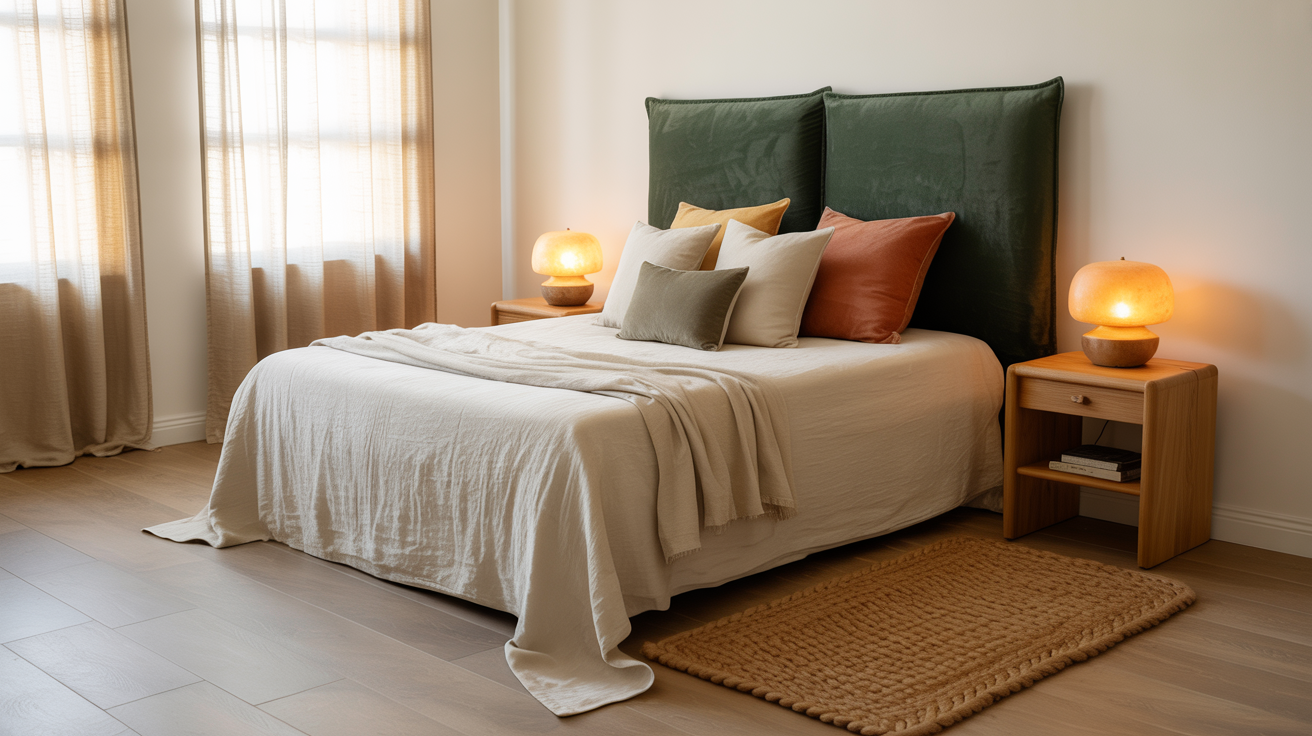
1. A DIY Upholstered Headboard With Foam and Fabric That Looks Like a High-End Furniture Store Find
A DIY upholstered headboard is the most popular homemade headboard project for good reason: it looks genuinely expensive, feels comfortable to lean against, and requires only basic tools and materials available at any hardware and fabric store. The core construction involves cutting a plywood base to the desired headboard shape, gluing high-density foam to the front face, wrapping everything in batting for a soft, rounded edge, and then stapling your chosen fabric tightly across the entire front surface. The finished result looks like something from a boutique hotel rather than a Saturday afternoon project.
Fabric choice drives the entire look of an upholstered headboard, so spending a little extra time choosing the right material pays back visually every single day. Linen, velvet, boucle, and heavyweight cotton all work beautifully as headboard fabrics, and each creates a distinctly different bedroom atmosphere. Velvet reads as luxurious and dramatic, linen reads as relaxed and natural, and boucle reads as modern and textural, so the fabric selection effectively sets the entire tone of the bedroom.
The plywood base works best at three-quarter-inch thickness for stability without excessive weight, and cutting it with a jigsaw allows for shaped tops like arched, curved, or pointed profiles that add visual interest beyond a standard rectangle. Mounting the finished headboard to the wall with French cleats or direct wall screws keeps it secure without requiring any modification to the bed frame itself.
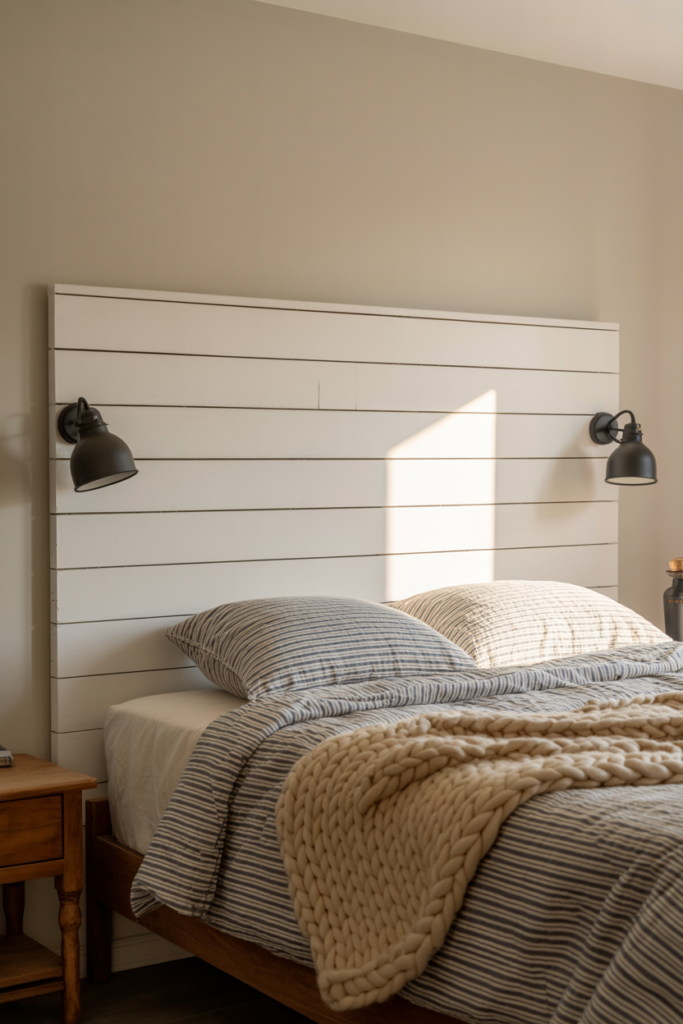
2. A Shiplap DIY Headboard That Brings Farmhouse Warmth and Texture to Any Bedroom Wall
A shiplap headboard is one of the most achievable DIY headboard projects for anyone with basic woodworking confidence and access to a few simple power tools. Horizontal shiplap boards cut to the width of the headboard and stacked with small, consistent gaps between each row create that classic farmhouse texture that looks equally good in rustic, coastal, and transitional bedroom styles. Painted white, it reads as clean and fresh, left natural, it reads as warm and organic, and painted in a dark tone, it reads as dramatic and contemporary.
Standard pine shiplap boards from a hardware store are the most affordable material for this project, though cedar adds a natural fragrance and slightly more visual character to the finished piece. Cutting the boards to identical lengths, painting or staining them before assembly, and then nailing them to a plywood backing panel creates a headboard that looks professionally built rather than assembled from individual pieces. The small gaps between boards add shadow lines that give the finished headboard a three-dimensional quality that flat surfaces never achieve.
Sizing the shiplap headboard wider than the bed itself, so it extends six to twelve inches beyond each side of the mattress, creates a proportion that looks particularly intentional and suits most bedroom wall widths well. That extra width on each side gives the headboard an architectural presence rather than looking like it just barely covers the bed behind it.
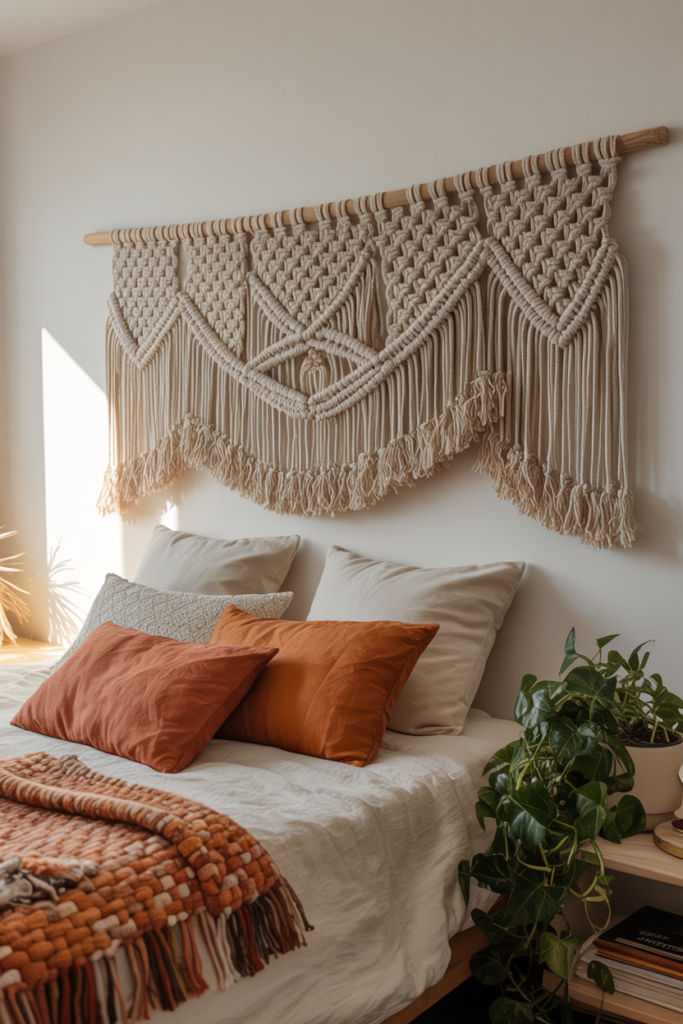
3. A DIY Macrame Headboard That Adds Bohemian Texture and Handmade Charm Above the Bed
A macrame headboard suits boho, eclectic, and natural bedroom aesthetics perfectly and requires zero woodworking tools or power equipment to create. The entire project involves knotting macrame cord across a wooden dowel rod mounted on the wall above the bed, working downward in a pattern of square knots, spiral knots, and fringe sections until the piece reaches the desired length. The finished piece adds extraordinary texture to the bedroom wall while maintaining a light, airy quality that heavier headboard materials can’t replicate.
Natural cotton macrame cord in a three or four-millimeter thickness works best for headboard projects because it produces clearly defined knots that read well from across the room without the piece looking too delicate or too chunky. Thicker cord creates a bolder, more graphic look while thinner cord produces more intricate detailing, so the choice depends on how much visual weight the bedroom wall needs. A dowel rod in a natural wood finish or a matte black metal rod both suit macrame headboards well, depending on the existing bedroom hardware and decor.
The width of the macrame headboard should match the width of the bed at a minimum, though extending the piece wider than the mattress creates a more dramatic wall installation. Leaving the bottom edge as loose fringe rather than cutting it to a clean line adds movement and a handmade quality that distinguishes a macrame headboard from anything available in a furniture store.
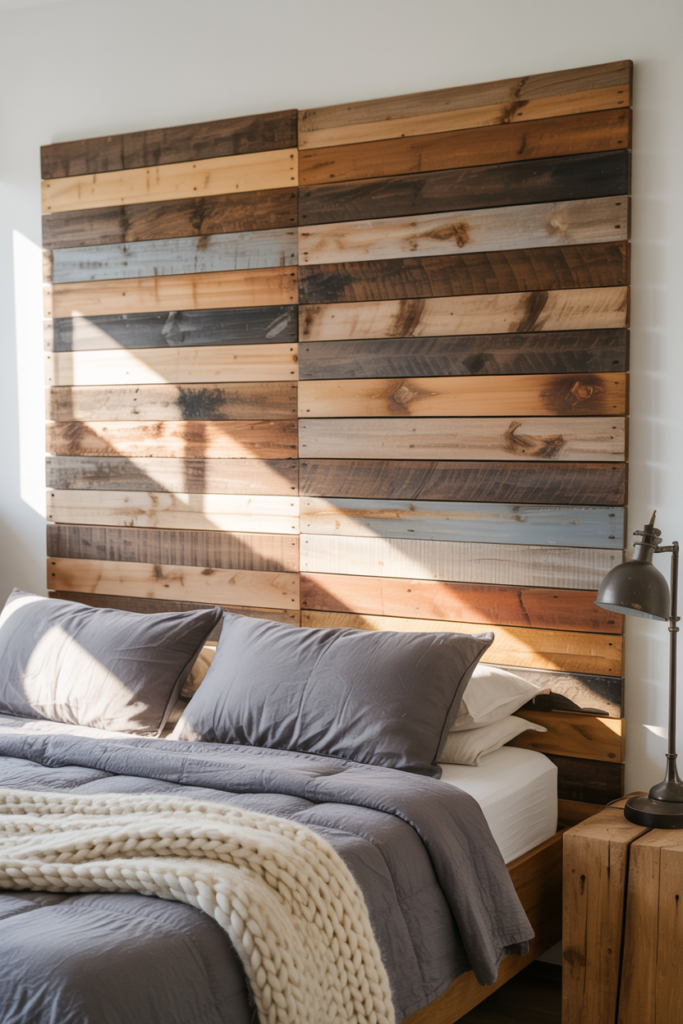
4. A DIY Reclaimed Wood Headboard That Adds Rustic Character and Sustainability to the Bedroom
A reclaimed wood headboard built from salvaged timber, old fence boards, barn wood, or pallet planks adds a level of character and history to a bedroom that brand-new materials simply cannot replicate. Each piece of reclaimed wood carries its own unique grain pattern, weathering marks, and color variation that creates a headboard with genuine visual depth and personality. No two reclaimed wood headboards look exactly alike, which gives the finished piece a one-of-a-kind quality that mass-produced furniture never achieves.
Sourcing reclaimed wood from salvage yards, demolition sites, old barns, or even pallets from local businesses keeps the material cost extremely low while producing some of the most visually interesting headboard surfaces available. Sanding the boards lightly to remove any splinters while leaving the natural weathering and patina intact strikes the right balance between practical comfort and aesthetic authenticity. A light coat of clear matte wax or outdoor sealer locks in the look while protecting the wood surface from the humidity and oils that come with daily bedroom use.
Arranging the reclaimed boards in a vertical stack, a horizontal arrangement, or a herringbone pattern before fixing them to a plywood backing panel gives you control over the final look of the headboard surface. The herringbone arrangement, in particular, creates a visually striking geometric pattern from completely irregular reclaimed materials that looks far more intentional and designed than the straightforward stacked approach.
5. A DIY Fabric Panel Headboard Using a Canvas Stretcher Frame That Requires No Power Tools at All
A fabric panel headboard built on a canvas stretcher frame is one of the most genuinely beginner-friendly DIY headboard projects on this list because it requires no cutting, no power tools, and no construction experience whatsoever. Canvas stretcher bars from an art supply store are assembled by hand into a rectangular frame, fabric wraps around the frame and staples or folds to the back, and the finished panel hangs on the wall above the bed exactly like a large piece of framed artwork. The entire project takes about an hour from start to finish.
Choosing a fabric with a bold pattern, an interesting texture, or a strong color makes the panel headboard feel like a deliberate design statement rather than a simple fabric-covered board. Large-scale botanical prints, geometric patterns, abstract painterly designs, and solid-color textured weaves all work beautifully in this format and create very different bedroom atmospheres depending on the selection. The stretcher frame format also makes it extremely easy to change the headboard fabric when the room needs a refresh, which is a flexibility that no other headboard type offers.
Hanging two or three panels of different sizes side by side rather than using a single large panel creates a gallery-wall-inspired headboard arrangement that suits eclectic and contemporary bedroom styles particularly well. Varying the fabric patterns across the panels while keeping a consistent color palette ties the arrangement together without making it feel matchy or overly coordinated.
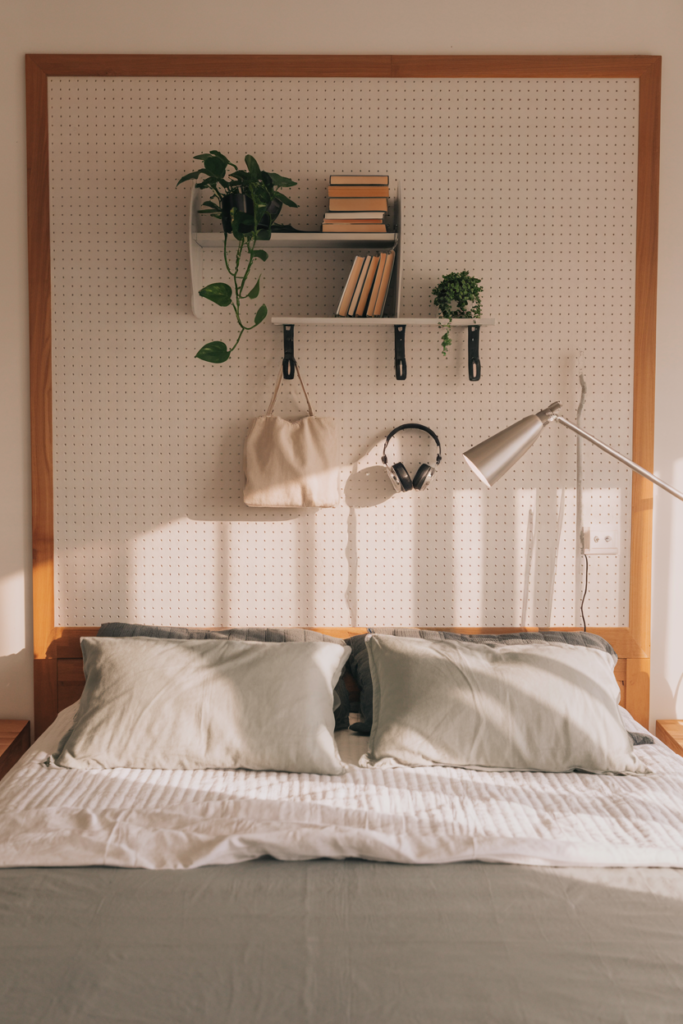
6. A DIY Pegboard Headboard That Combines Storage and Style in One Clever Bedroom Wall Installation
A pegboard headboard solves two bedroom problems simultaneously by providing a visual focal point above the bed and functional storage for books, plants, alarm clocks, and small accessories all in one wall-mounted installation. Painting the pegboard in a color that suits the bedroom palette, adding a simple timber frame border around the edges, and loading it with a curated selection of hooks, shelves, and baskets creates a headboard that works harder than any purely decorative option on this list. It suits small bedrooms particularly well because it replaces a nightstand’s worth of storage without occupying any floor space.
The key to a pegboard headboard that looks intentional rather than industrial is in the finishing details. A solid painted frame around the perimeter of the board gives it clear visual boundaries that read as a headboard rather than a random wall installation. Choosing pegboard accessories in a consistent finish, matte black, brass, or white, keeps the loaded board looking curated rather than cluttered, regardless of how many items hang from it.
Standard pegboard from a hardware store comes in four-by-eight-foot sheets that cut down easily to any headboard size with a circular saw or even a handsaw for smaller dimensions. Mounting the board on standoffs rather than flat against the wall creates the small gap needed for pegboard hooks to insert properly and also adds a subtle shadow line around the board that makes it look more finished and three-dimensional from across the room.
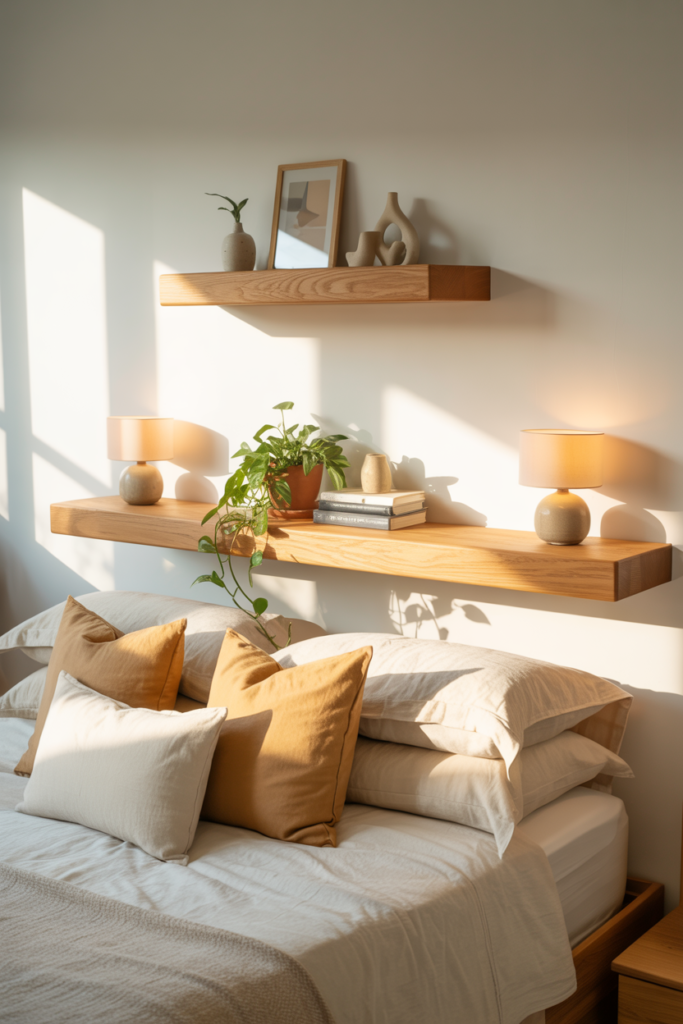
7. A DIY Floating Shelf Headboard That Replaces Nightstands and Creates a Streamlined Modern Bedroom Look
A floating shelf headboard combines the visual function of a traditional headboard with the practical function of bedside storage, which makes it one of the most space-efficient DIY bedroom upgrades available for small rooms. A single wide floating shelf mounted at headboard height above the bed holds lamps, books, plants, and personal items while the shelf itself reads as the headboard from across the room. Adding a second, narrower shelf slightly higher creates a two-tier arrangement that adds visual layering and even more storage capacity.
Deep floating shelves in the thirty to forty centimeter range provide enough surface area to hold a proper bedside lamp alongside books and accessories without everything feeling crowded on the shelf surface. Shallower shelves look cleaner and more minimal, but limit what you can place on them practically, so the depth decision comes down to how much storage you actually need versus how streamlined you want the finished look to feel. I find the deeper option almost always wins once you’re actually living with the headboard and want to put things on it.
Timber floating shelves in natural oak, walnut, or pine suit warm and natural bedroom aesthetics, while painted MDF shelves in white, black, or a deep tone suit more contemporary and minimal bedroom designs. The wall mounting hardware for a floating shelf headboard needs to be rated for the combined weight of the shelf and everything placed on it, so always check the load rating of wall anchors before installation and use stud fixings wherever possible.
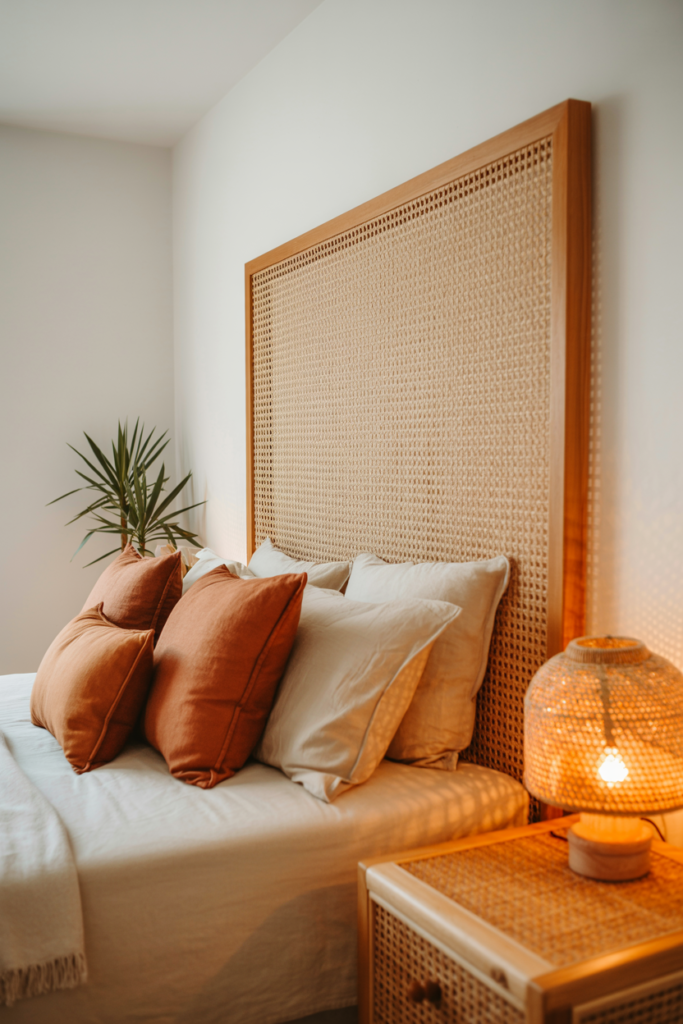
8. A DIY Cane or Rattan Headboard That Brings Natural Texture and a Relaxed Coastal Vibe to the Bedroom
A cane or rattan headboard suits coastal, tropical, boho, and Japandi bedroom aesthetics beautifully and creates a light, airy visual quality that heavier solid headboards never achieve. The DIY version involves framing a sheet of woven cane webbing in a simple timber border, which creates a finished headboard panel that looks like a high-end furniture piece from any coastal home decor brand. Cane webbing is available by the roll from craft and upholstery suppliers and costs a fraction of what a retail cane headboard commands.
Building the timber frame from routed hardwood gives the headboard a clean, furniture-quality finish, while simple butt-joined softwood painted in white, natural, or black produces a more casual result that still looks genuinely good above a bed. The cane webbing inserts into the frame by stapling to the back of the timber border, which keeps the fixing points completely hidden from the front face of the headboard. Wetting the cane slightly before installing it allows the material to pull taut as it dries, creating that clean, flat surface that characterizes well-made cane furniture.
Natural, unbleached cane webbing suits warm, earthy, and coastal bedroom palettes, while bleached or painted cane in white or sage green suits lighter, more Scandinavian-influenced room schemes. The natural material quality of cane also adds an organic texture to the bedroom wall that painted or upholstered headboards simply cannot replicate, regardless of how well they’re made.
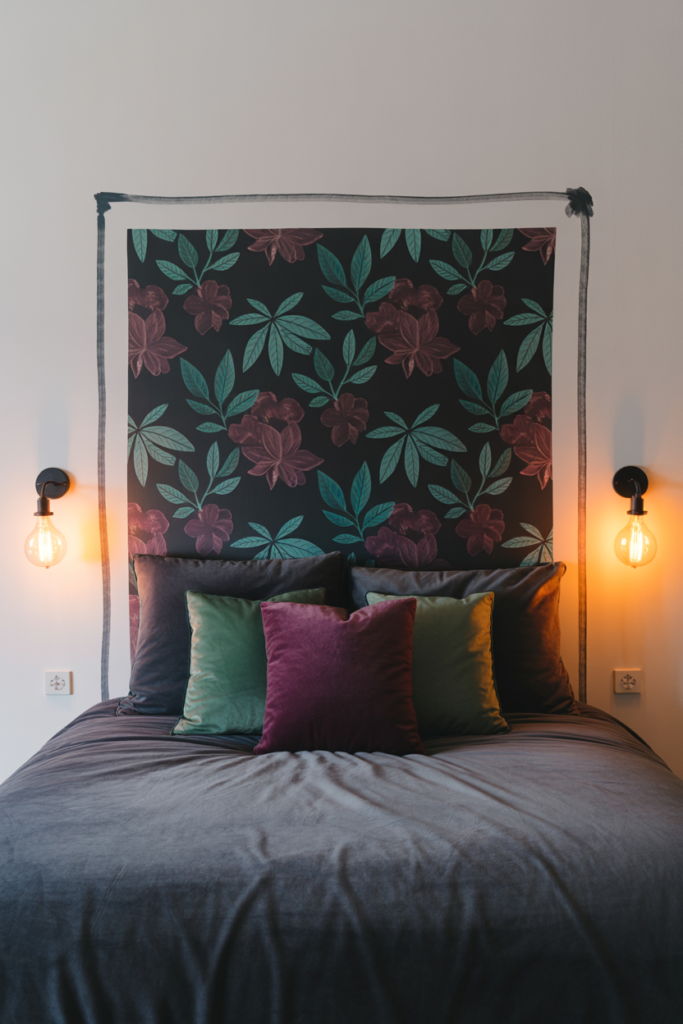
9. A DIY Wallpaper Panel Headboard That Creates a Dramatic Focal Point Without Any Construction at All
A wallpaper panel headboard is the most genuinely no-tools DIY headboard option on this list because the entire project involves nothing more than applying removable peel-and-stick wallpaper to a defined rectangular area on the wall above the bed. Choosing a bold botanical print, a geometric pattern, a painterly abstract design, or a dramatic dark floral creates a headboard-shaped visual feature that reads as intentional and designed from across the room. The removable wallpaper format means zero damage to the wall and complete freedom to change the look whenever the room needs refreshing.
Defining the edges of the wallpaper panel headboard with a thin painted border in a contrasting color gives it the visual frame that separates it from a standard accent wall. A two-centimeter border painted around the perimeter of the wallpaper section in a dark or contrasting tone creates a clear visual boundary that makes the panel read as a headboard feature rather than just a patch of different wallpaper. That simple painted border detail elevates the entire effect significantly without adding any complexity to the project.
Sizing the wallpaper panel to extend from just above mattress height to roughly sixty to seventy centimeters above the top of the bed creates the proportions that most closely mimic a physical headboard silhouette. Going taller than that starts to read more like a full accent wall treatment, which is a valid design choice, but a different effect from a headboard focal point specifically.
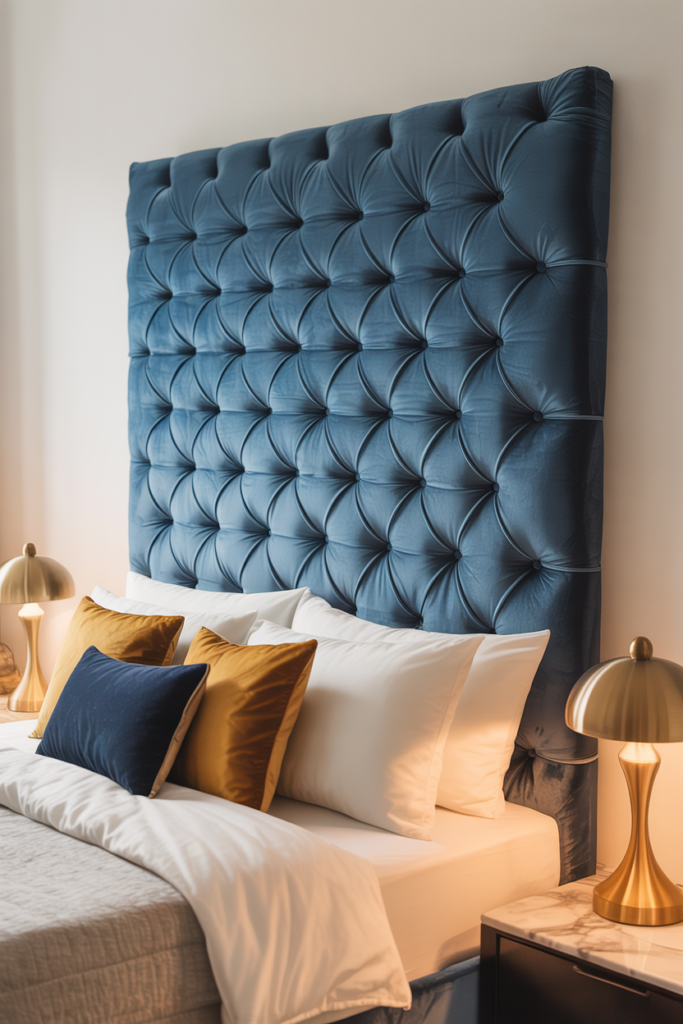
10. A DIY Tufted Headboard With Button Details That Creates an Elegant and Luxurious Bedroom Focal Point
A tufted DIY headboard with button detailing is the most ambitious upholstered headboard project on this list, but it produces the most luxurious and hotel-inspired finished result of any DIY bedroom upgrade. The tufting process involves marking a grid pattern on the foam face of a standard upholstered headboard base, drilling through the foam and plywood at each grid intersection, threading a needle with strong upholstery thread through a fabric-covered button, and pulling each button back through the headboard to create the characteristic dimpled pattern. The finished effect looks like it came straight from a boutique hotel room.
Diamond tufting with evenly spaced buttons across the entire headboard face creates the most classic and recognizable tufted look, while a single row of buttons along the top third of the headboard produces a more restrained and contemporary interpretation of the same technique. Velvet fabric shows off tufting detail more dramatically than any other material because the pile catches light differently in the raised and recessed sections, which amplifies the three-dimensional quality of the button pattern across the entire headboard surface.
Spacing the tuft points twenty to twenty-five centimeters apart in a consistent diamond grid produces the proportion that most closely resembles retail tufted headboards in the mid to high price range. Tighter spacing creates a more intricate and formal result, while wider spacing creates a more relaxed and contemporary interpretation that suits modern bedroom styles better than the traditional close-tufted approach.
11. A DIY Washi Tape or Paint Pen Headboard That Creates a Removable Graphic Headboard in Under an Hour
A washi tape headboard is the most temporary and most affordable DIY headboard option available, which makes it a genuinely useful solution for renters, students, and anyone who changes their bedroom decor frequently. Applying rows of coordinated washi tape directly to the wall above the bed in geometric patterns, arch shapes, or simple horizontal lines creates a graphic headboard effect that costs almost nothing, damages nothing, and removes completely without leaving any residue. The entire project takes under an hour and requires only a tape measure, a level, and a collection of coordinated tape rolls.
Wide washi tape in solid colors creates bolder graphic lines while patterned tape adds more visual complexity to the arrangement. Combining three or four coordinated tape widths and colors in a layered geometric composition produces a headboard effect that looks far more considered and intentional than the simplicity of the medium suggests. An arched tape headboard that mimics the silhouette of a real arched headboard is one of the most popular versions of this idea and looks surprisingly convincing on a bedroom wall.
Paint pen headboards work on the same principle but create a more permanent result that suits people who want the graphic quality of a tape headboard with a finished look that doesn’t lift at the edges over time. A painted arch outline in a contrasting wall color, a series of horizontal painted lines in graduating widths, or a simple painted panel rectangle above the bed each creates a headboard effect using nothing more than a painter’s tape border and a wall paint in a contrasting tone.

12. A DIY Bookcase Headboard That Turns the Space Above and Beside the Bed Into a Full Reading Library
A DIY bookcase headboard built from standard shelving units creates one of the most functional and visually impressive bedroom installations on this list by combining headboard presence with genuine storage capacity for a serious book collection. Two tall, narrow shelving units placed on either side of the bed with a lower connecting shelf running between them across the wall above the mattress create a built-in bookcase headboard effect that looks custom-designed rather than assembled from off-the-shelf components. Painting all the units the same color as the wall behind them makes the whole installation read as a single architectural feature rather than separate furniture pieces.
The connecting shelf above the bed functions as the headboard surface visually while also providing a convenient spot for a reading lamp, a small plant, and whatever is currently on the bedside table. Keeping the shelf above the bed relatively clear while loading the flanking towers with books creates the right visual balance between storage density and open breathing room in the installation. Too many objects on the central connecting shelf make the space above the bed feel cluttered and heavy rather than purposeful.
Standard flat-pack shelving units from budget home stores work perfectly for this project when painted in a consistent color and installed with clean alignment between all the components. The total cost for a full bookcase headboard installation using affordable flat-pack units typically runs between sixty and one hundred and fifty dollars, depending on the number of units and the size of the bed, which compares extremely favorably against any custom-built-in alternative.

What to Consider Before Starting Your DIY Headboard Project to Get the Best Result Every Time
Measuring the wall behind the bed before starting any DIY headboard project saves a significant amount of wasted time and material. The headboard should ideally extend at least as wide as the mattress and ideally six to twelve inches wider on each side for visual balance against the wall. Getting the width right from the start is far easier than modifying a finished headboard that looks too narrow once it goes up on the wall.
Mounting method matters as much as the headboard design itself for a result that looks professional and stays secure over time. Wall-mounted headboards using French cleats distribute weight evenly and allow for easy removal and repositioning without leaving multiple holes in the wall. Freestanding headboards that attach to the bed frame eliminate wall mounting entirely, but require checking compatibility with the specific bed frame before building begins.
| DIY Headboard Type | Skill Level | Approximate Cost | Best Bedroom Style | Tools Required |
| Upholstered Panel | Beginner | $40 to $80 | Any style | Staple gun, jigsaw |
| Shiplap Wood | Beginner | $30 to $60 | Farmhouse, coastal | Nail gun, saw |
| Macrame | Beginner | $20 to $40 | Boho, natural | None |
| Reclaimed Wood | Intermediate | $10 to $50 | Rustic, industrial | Saw, drill |
| Cane Webbing Frame | Intermediate | $50 to $90 | Coastal, Japandi | Router, staple gun |
| Tufted Upholstered | Advanced | $60 to $100 | Traditional, luxe | Drill, upholstery needle |
| Pegboard | Beginner | $25 to $50 | Modern, minimal | Saw, drill |
| Bookcase | Beginner | $60 to $150 | Any style | Drill, level |
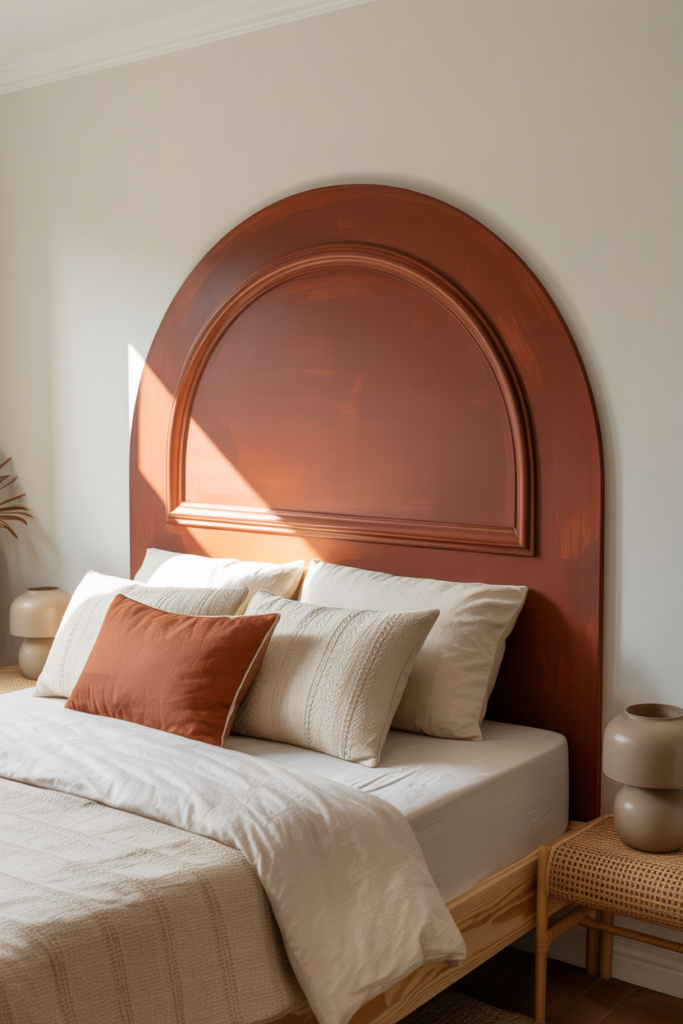
13. A DIY Wooden Arch Headboard That Adds a Sculptural, Contemporary Shape to the Bedroom Wall
A wooden arch headboard is one of the most striking DIY headboard shapes available and has become one of the most searched bedroom design elements across home decor communities in recent years. The curved arch silhouette adds a softness and architectural quality to the bedroom wall that rectangular headboards never achieve, and cutting the arch shape from a single sheet of plywood produces a clean, furniture-quality result that looks genuinely custom-made. Painted in a deep tone or left in a natural timber finish, an arch headboard reads as a deliberate design statement rather than a simple DIY project.
Cutting a clean arch shape from plywood requires a jigsaw and a little patience, tracing a smooth curve using a large compass made from a piece of string, a pencil, and a nail at the center point. Taking time to sand the curved edge smooth after cutting makes the difference between a headboard that looks homemade and one that looks professionally built. A router with a round-over bit runs along the front face of the cut edge, adding a subtle beveled profile that elevates the finished piece significantly beyond a flat cut edge.
Painting the arch headboard in a wall-contrasting color like deep terracotta, forest green, dusty blue, or matte black creates a bold focal point that anchors the entire bedroom. Leaving it in a natural timber finish with a clear matte sealer suits Japandi, Scandinavian, and organic modern bedroom aesthetics, where the warmth and grain of the wood itself does all the decorative work without any added color.
14. A DIY Curtain or Canopy Headboard That Creates a Dreamy, Romantic Bedroom Atmosphere Instantly
A curtain or canopy headboard creates one of the most romantic and atmospheric bedroom effects available without any construction work whatsoever. Mounting a curtain rod on the wall above the bed and hanging two full-length curtain panels on either side of the bed creates a framed, canopy-like effect that reads as a headboard while adding softness, height, and drama to the bedroom wall simultaneously. The curtains frame the sleeping space beautifully and create that enclosed, sanctuary-like quality that makes a bedroom feel genuinely restful.
Choosing curtains in a fabric and color that complements the existing bedding and bedroom palette pulls the whole setup together as an intentional design choice rather than a makeshift solution. Sheer white or ivory panels create a light, romantic, ethereal quality that suits feminine and eclectic bedroom styles. Heavier velvet or linen panels in deep jewel tones create a more dramatic, cocoon-like effect that suits moody, maximalist, and whimsigoth bedroom aesthetics. Either way, hanging the curtain rod as close to the ceiling as possible maximizes the height drama that makes this headboard approach so effective.
Adding a second rod directly above the bed between the two side panels and draping a sheer fabric across it creates a full canopy effect that takes the romantic atmosphere to a completely different level. Fairy lights woven through the canopy fabric add an evening lighting element that makes the bed area feel genuinely magical at night, which is the kind of unexpected comfort detail that makes a bedroom feel like somewhere you actually want to spend time.

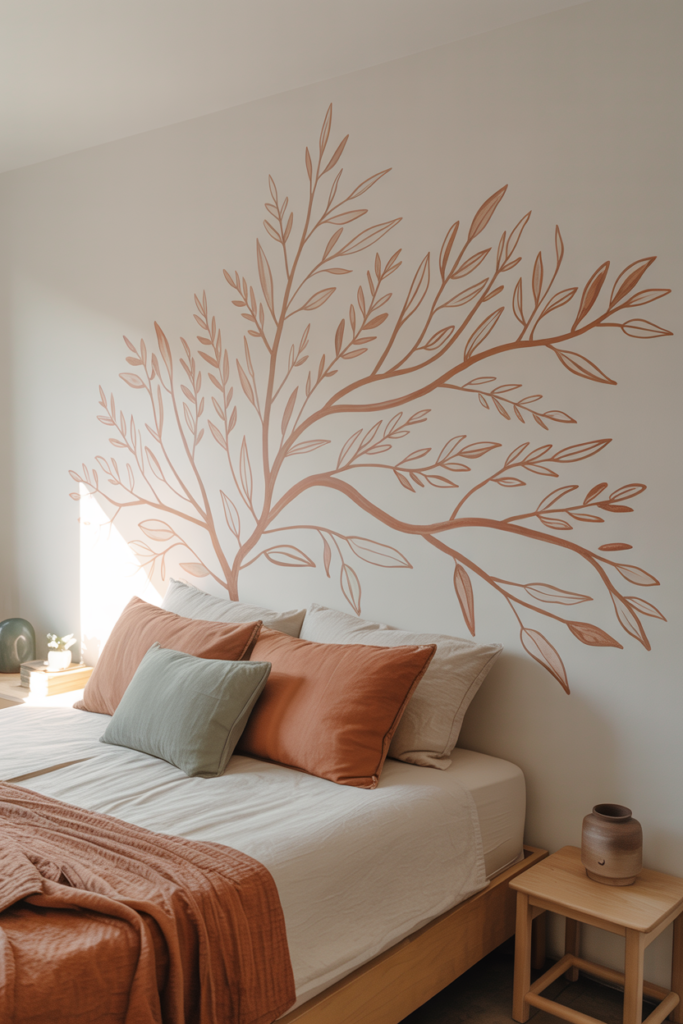
15. A DIY Painted Mural Headboard That Turns the Wall Behind the Bed Into a Personal Artwork
A painted mural headboard is the most personal and creative DIY headboard option on this entire list and requires no carpentry, no upholstery, and no materials beyond wall paint and brushes. Painting a large-scale design directly onto the wall above the bed, whether a simple abstract shape, a botanical illustration, a landscape horizon, a geometric composition, or a freehand pattern, creates a completely one-of-a-kind bedroom feature that no furniture store can sell and no other home can replicate. The mural becomes a permanent expression of the personality of the person sleeping in the room, which gives it a meaning that purchased furniture never achieves.
Simple mural headboard designs that work well even without formal painting skills include a large painted arch or semicircle in a contrasting wall color, a series of vertical brushstroke lines in a tonal palette, a loose botanical branch design painted in a single color above the bed, and an abstract watercolor-style wash of color that fades from full saturation at the center to nothing at the edges. Each of these designs reads clearly as a headboard feature from across the room while staying well within the painting ability of anyone willing to practice the design on paper before committing to the wall.
Using a projector to trace a more complex design onto the wall before painting makes ambitious mural headboard designs accessible to anyone, regardless of freehand drawing confidence. Projecting a botanical illustration, an architectural arch design, or a geometric pattern directly onto the wall and tracing the outlines in pencil before filling in with paint removes the intimidation factor entirely and produces a result that looks considerably more skilled than the process actually requires.
The Bottom Line on DIY Headboard Ideas That Give Your Bedroom a High-End Look on a Realistic Budget
A DIY headboard is one of the few bedroom projects that delivers a genuinely significant visual transformation for a very modest investment of time and money. The fifteen ideas on this list range from a one-hour no-tools project using peel-and-stick wallpaper to a more involved weekend build with plywood and upholstery foam, and every single one of them produces a bedroom focal point that looks more considered and personal than most retail headboards at any price point.
The best DIY headboard for any bedroom is the one that suits the existing aesthetic, fits the wall proportions correctly, and matches the skill level and available time of the person building it. Starting with a simpler project like a fabric panel, a macrame piece, or a washi tape design and working up to more involved builds like tufted upholstery or a wooden arch gives a realistic progression that builds both confidence and skill across multiple bedroom projects over time.
Every bedroom wall behind a bed deserves something interesting on it, and the options on this list prove convincingly that interesting does not have to mean expensive. A well-executed DIY headboard built from affordable materials and installed with care genuinely competes with retail furniture at three or four times the cost, and the personal satisfaction of building something yourself adds value to the finished result that no store purchase ever quite replicates.
Frequently Asked Questions About DIY Headboard Ideas for Every Bedroom Style and Budget
What is the easiest DIY headboard to make for a complete beginner? A fabric panel headboard built on a canvas stretcher frame is the most beginner-friendly option because it requires no cutting, no power tools, and no construction skills whatsoever. The stretcher bars are assembled by hand, and the fabric is stapled to the back of the frame in under an hour. A washi tape headboard is equally simple and requires nothing more than tape, a level, and a tape measure.
How do I attach a DIY headboard to the wall without damaging it? French cleats are the most reliable wall-mounting method for DIY headboards because they distribute weight evenly and allow for easy removal without multiple wall holes. Command strips work for lighter headboard panels under about five kilograms in total weight. For heavier builds like solid wood or full upholstered panels, screwing directly into wall studs through a hanging bracket gives the most secure and damage-resistant installation.
What is the best fabric for a DIY upholstered headboard? Velvet, linen, and boucle are the three most popular fabric choices for DIY upholstered headboards because all three wear well, staple cleanly around a plywood frame, and look genuinely high-end in a finished bedroom. Velvet shows off shape and tufting detail most dramatically, while linen suits relaxed and natural bedroom aesthetics best. Avoid stretchy fabrics like jersey or loose weaves that pull unevenly when stapled across the headboard frame.
How wide should a DIY headboard be relative to the bed size? A DIY headboard should match the width of the mattress at minimum and ideally extend six to twelve inches beyond each side of the mattress for the most balanced proportion against a standard bedroom wall. A headboard that matches the mattress width exactly often looks too narrow once installed, particularly on king and queen beds against wider walls. Going slightly wider than the mattress is almost always the better visual choice.
Can I make a DIY headboard without any power tools? Several DIY headboard options on this list require zero power tools, including macrame headboards, fabric panel headboards on stretcher frames, washi tape headboards, curtain canopy headboards, and wallpaper panel headboards. Each of these options produces a genuine bedroom focal point without a single power tool involved in the process. For wood-based headboards, a handsaw handles most straight cuts if a jigsaw or circular saw is not available.
How much does it typically cost to build a DIY headboard? Most DIY headboards cost between twenty and one hundred dollars in materials, depending on the type of headboard and the quality of materials chosen. A macrame headboard using basic cotton cord costs around twenty to thirty dollars, while a fully upholstered tufted panel with quality velvet fabric and high-density foam costs closer to eighty to one hundred dollars. Reclaimed wood headboards often cost almost nothing if salvage materials are sourced for free from local demolition sites or community groups.
How do I make a DIY headboard look professional rather than homemade? The finishing details make the biggest difference between a DIY headboard that looks professional and one that looks obviously handmade. Sanding all wood edges smooth before painting, pulling fabric evenly without wrinkles before stapling, using a level during wall installation, and painting clean, straight edges with proper painter’s tape all contribute to a result that reads as deliberately crafted rather than quickly assembled. Taking an extra hour to finish details consistently produces a result that looks significantly more considered than rushing through the final steps.