A clean flower bed edge can make your entire yard look like a professional landscaper just left. I have seen gardens with stunning plants completely overshadowed by messy, undefined borders. The good news is that fixing this does not require a big budget or any special skills.
DIY flower bed edging is one of those weekend projects that pays off immediately. The moment you define your garden borders, the whole yard looks more intentional and put-together. It is one of the quickest ways to boost your curb appeal without replanting a single flower.
Whether you are working with a formal front yard or a relaxed cottage-style backyard, there is an edging idea here that fits your space perfectly. I have pulled together 15 ideas that range from completely free to surprisingly affordable. Some of these I would genuinely do myself this weekend.
Why Your Flower Bed Edges Matter More Than You Think
Most people spend hours choosing the right plants and then completely ignore the borders. That is a little like framing a beautiful painting with a piece of cardboard. The edging around your flower bed is what gives the whole garden a finished, intentional look.
A defined edge also does some serious practical work. It keeps lawn grass from creeping into your beds and stops mulch from spilling onto the grass. You end up spending less time weeding and more time actually enjoying your garden.
Good edging also improves water retention inside the bed. When borders are loose or undefined, water runs off in every direction instead of soaking in where your plants actually need it. A proper edge keeps moisture exactly where it belongs.
What to Consider Before You Start Edging Your Flower Bed
Before you pick up a spade or head to the hardware store, it helps to think through a few things. The style of your home, the shape of your garden, and your maintenance tolerance all play a role in choosing the right edging material. What looks gorgeous in a cottage garden might look completely out of place in a sleek modern yard.
You also want to think about permanence. Some edging options, like concrete or metal, are long-term commitments, while others, like rope or recycled bottles, can be swapped out with the seasons. There is no wrong answer, just what works best for your space and lifestyle.
Budget is another real factor. The good news is that some of the best-looking edging ideas cost almost nothing. A few of the ideas below use materials you may already have sitting in your garage or backyard right now.
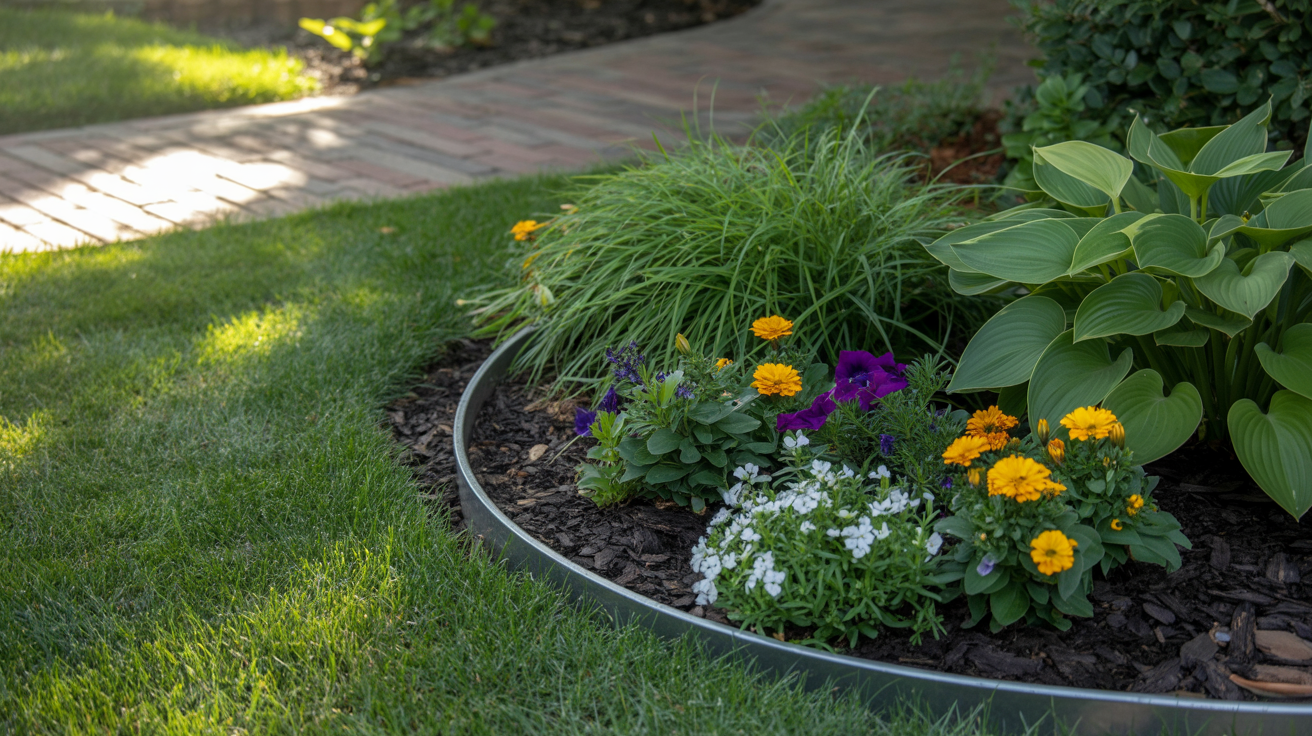
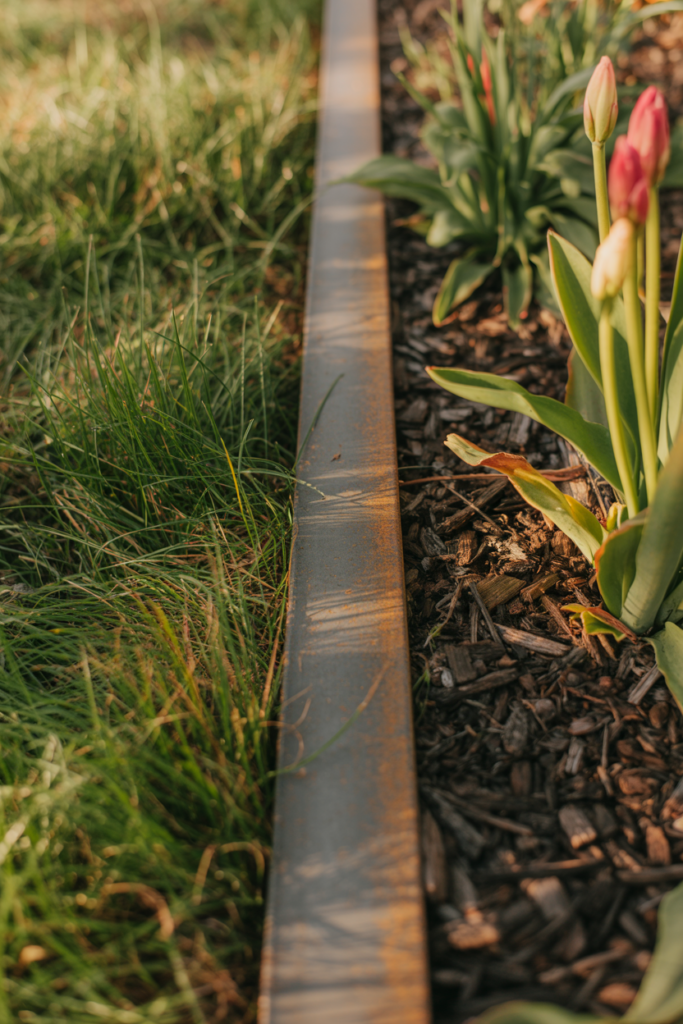
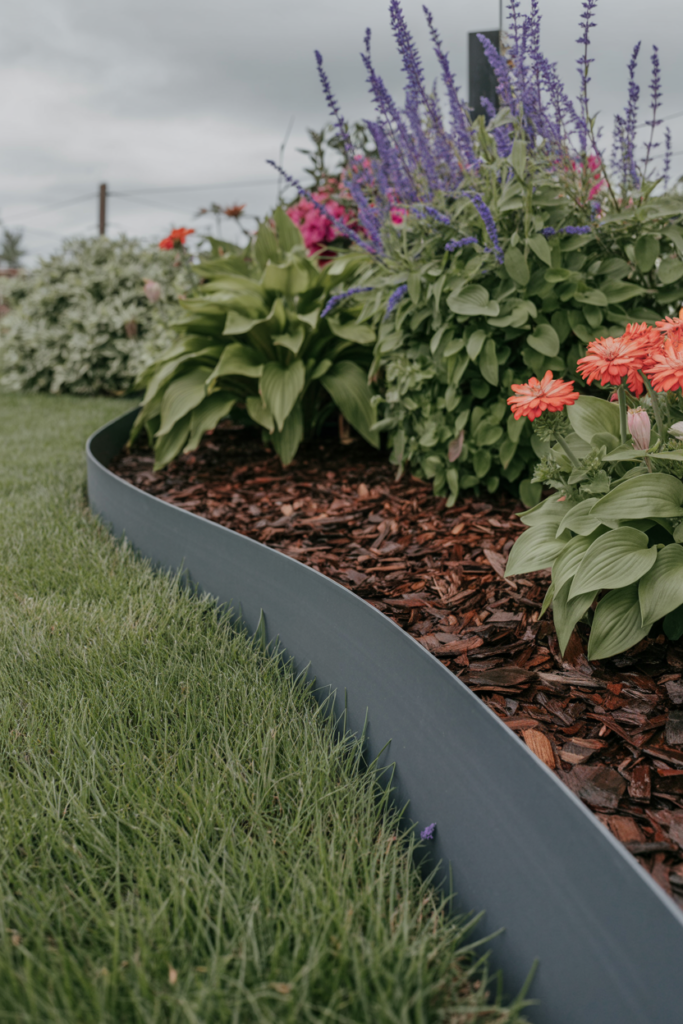
1. Classic Steel Landscape Edging
Steel edging gives flower beds the sharpest, cleanest line you can get without hiring anyone. It sits low to the ground and creates a crisp boundary between your lawn and your garden bed. This is the kind of edging you see in high-end landscaping, and it is surprisingly easy to install yourself.
I like steel edging because it is almost invisible once it is in place. You get all the benefits of a defined border without the material competing with your plants. It flexes around curves easily, which makes it great for beds with rounded or organic shapes.
It does cost a bit more than some other options, but it lasts for years without rusting or warping. For a front yard bed that you want to look polished year-round, steel is hard to beat.
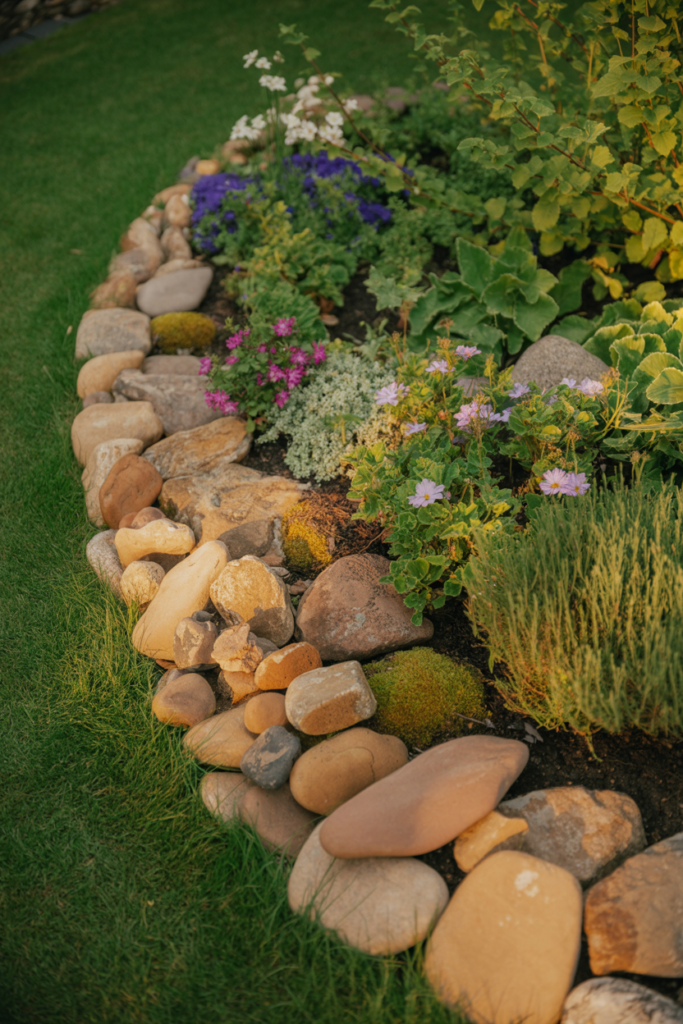
2. Natural Stone Border
Nothing looks more naturally elegant than a row of stones lining a flower bed. You can use fieldstones, river rocks, or flat flagstones, depending on the look you are going for. The best part is that you can often source stones for free from your own yard or a nearby construction site.
Larger flat stones work well for a more formal border, while rounded river rocks give a relaxed, cottage-garden feel. I personally love the way mismatched stones look when arranged with a little care. It gives the garden a handcrafted quality that no manufactured edging can replicate.
Stones also double as a heat sink, absorbing warmth during the day and releasing it at night. This can actually benefit plants along the border, especially in cooler climates. It is a case where the practical and the pretty work together.
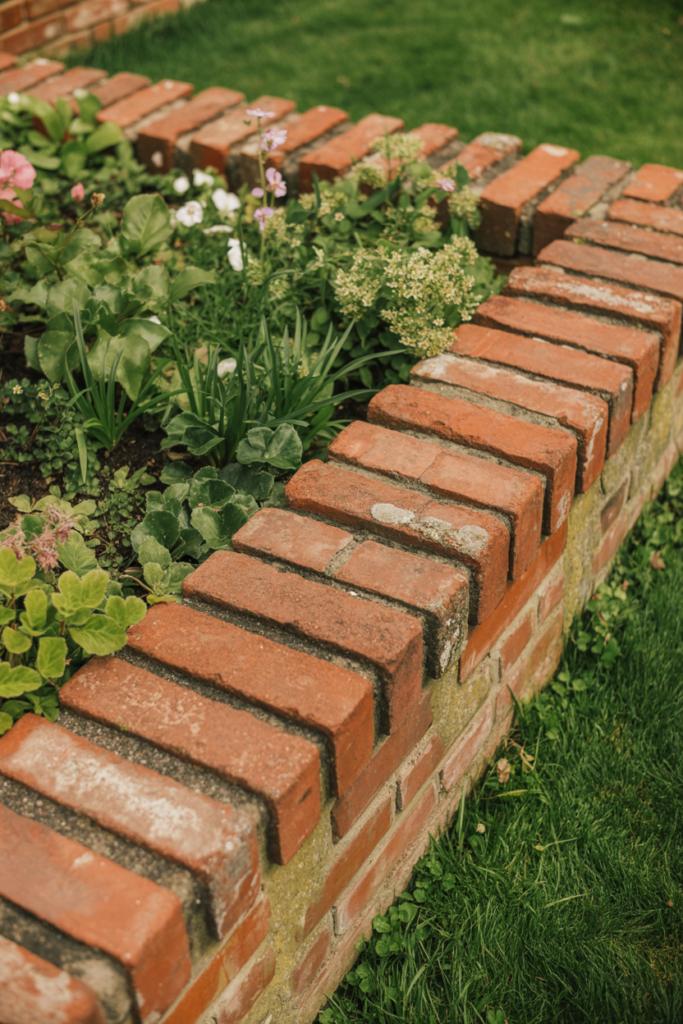
3. Brick Edging
Brick edging has been a garden staple for centuries, and there is a reason it has stayed popular. It gives flower beds a structured, traditional look that suits both classic and contemporary yards. You can lay bricks flat, on their sides, or even at an angle for a sawtooth pattern that adds texture.
I find the diagonal sawtooth style particularly charming. It takes a little more time to install, but the finished result looks like something out of a proper English garden. You can usually find reclaimed bricks at salvage yards for very little money.
Brick holds up beautifully in all weather and requires almost no maintenance once it is set. Unlike wooden borders, it will not rot or shift much over time. It is one of those materials that actually looks better as it ages and weathers.
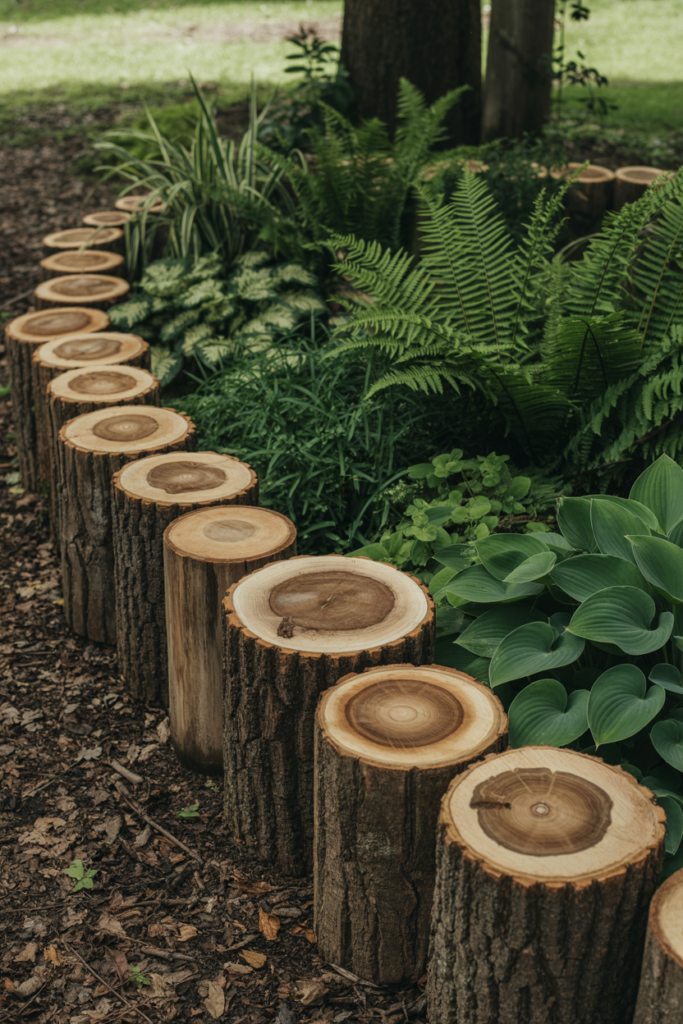
4. Wooden Log Rounds
If you have a tree that recently came down in your yard, you already have free edging material. Slicing the trunk into rounds and placing them end up along your flower bed creates a rustic, woodland-inspired border. Each piece is naturally unique, which gives the edging a lot of character.
Log rounds work especially well in cottage gardens, woodland-style beds, or any space with a natural aesthetic. They pair beautifully with ferns, hostas, and wildflowers. I would not use them in a formal, geometric garden, but for relaxed planting styles, they are a perfect match.
Keep in mind that wood will eventually decompose, which actually adds organic matter back into your soil over time. You can treat the cut ends with a wood preservative to extend their life if you want them to last a few extra seasons.
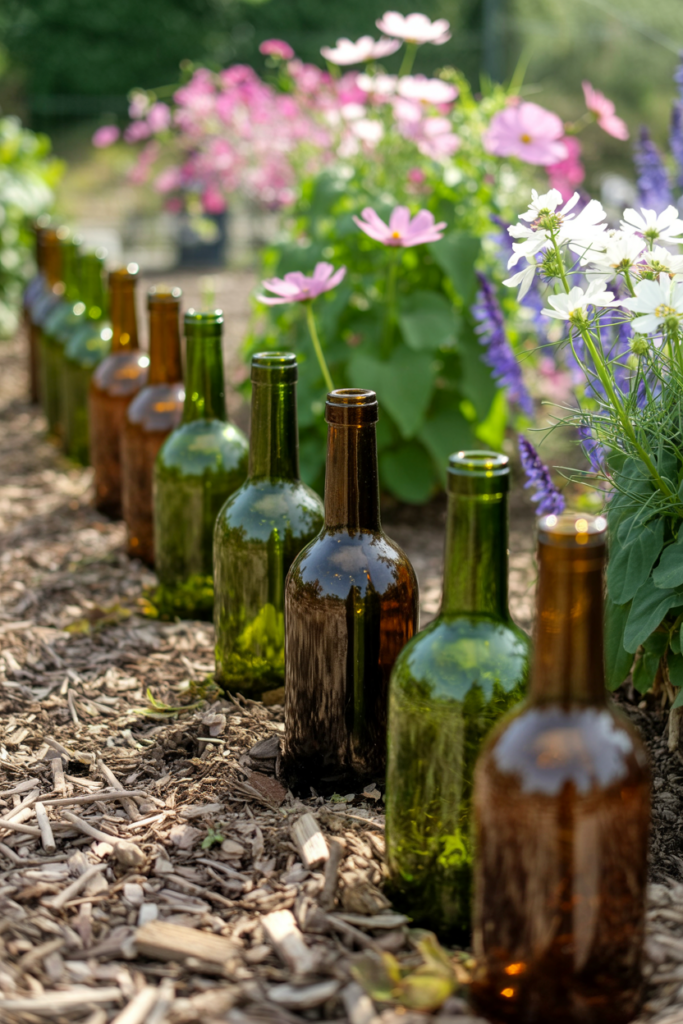
5. Recycled Wine Bottles
This one always gets a reaction from visitors, usually a surprised Did you make that yourself?” Burying wine bottles neck-down along the edge of a flower bed creates a colorful, eye-catching border that costs nothing if you have been saving bottles. Green, brown, and clear glass all create different effects in sunlight.
The trick is to bury them deep enough that they stay stable through rain and foot traffic. About two-thirds of the bottle should be underground. Once they are set, they catch the light beautifully and give your garden a genuinely artsy, one-of-a-kind look.
This idea works best in casual, creative gardens rather than formal landscapes. It is a great option for cottage-style yards, bohemian gardens, or any space where you want to show a little personality. Plus, it is a legitimately satisfying way to recycle.
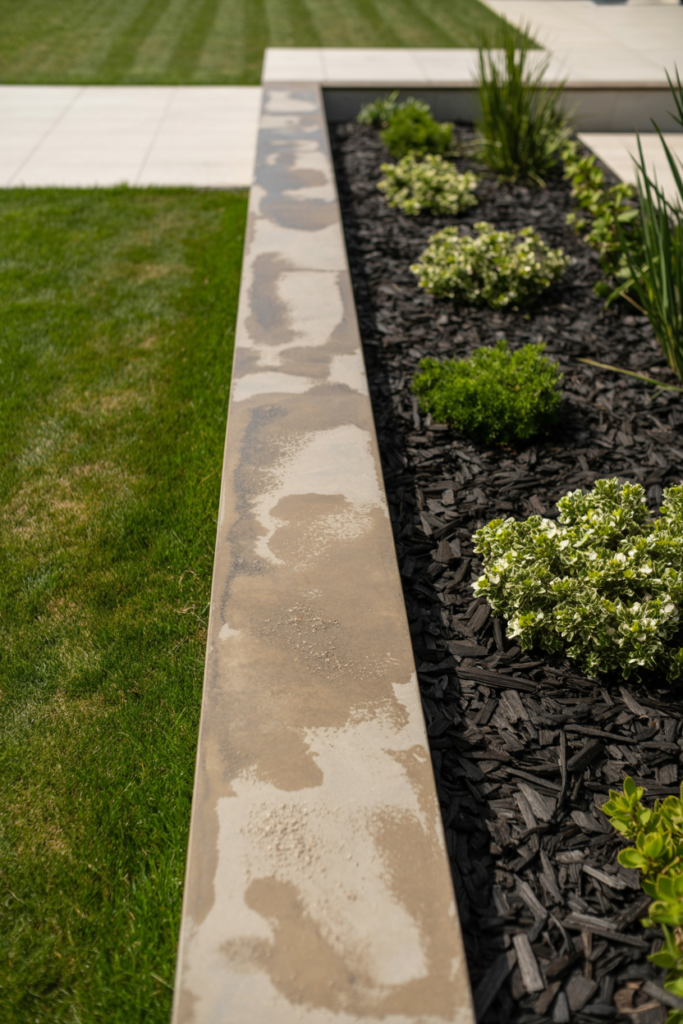
6. Concrete Edging
Concrete edging is one of the most durable options you can choose for a flower bed border. Once it is set, it is not going anywhere, and it holds a clean line for years without needing any attention. You can pour it yourself using simple molds, which makes it a genuinely doable weekend project.
The look is clean and modern, which suits contemporary yards really well. You can also tint the concrete or add texture while it is still wet to give it a more custom finish. A simple exposed aggregate finish, for example, adds just enough visual interest without looking overdone.
The downside is that concrete is permanent, so take your time planning the shape before you pour. If you decide to reshape your beds later, removal is more work than with other materials. That said, for a bed with a defined shape you love, concrete is a long-term solution that genuinely earns its place.
7. Rubber Edging
Rubber edging is one of those options that quietly does everything right. It is flexible, durable, weather-resistant, and made from recycled materials, which is a nice bonus. You can find it in black or brown tones that blend naturally into the garden without drawing attention away from your plants.
I appreciate rubber edging for curved beds, especially. It bends easily without cracking and holds its shape over time, even in freezing temperatures. Installation is straightforward and requires nothing more than a rubber mallet and some landscape stakes.
It is not the most glamorous option visually, but it is incredibly practical. If you want a low-maintenance border that just works year after year without any fuss, rubber edging delivers exactly that.
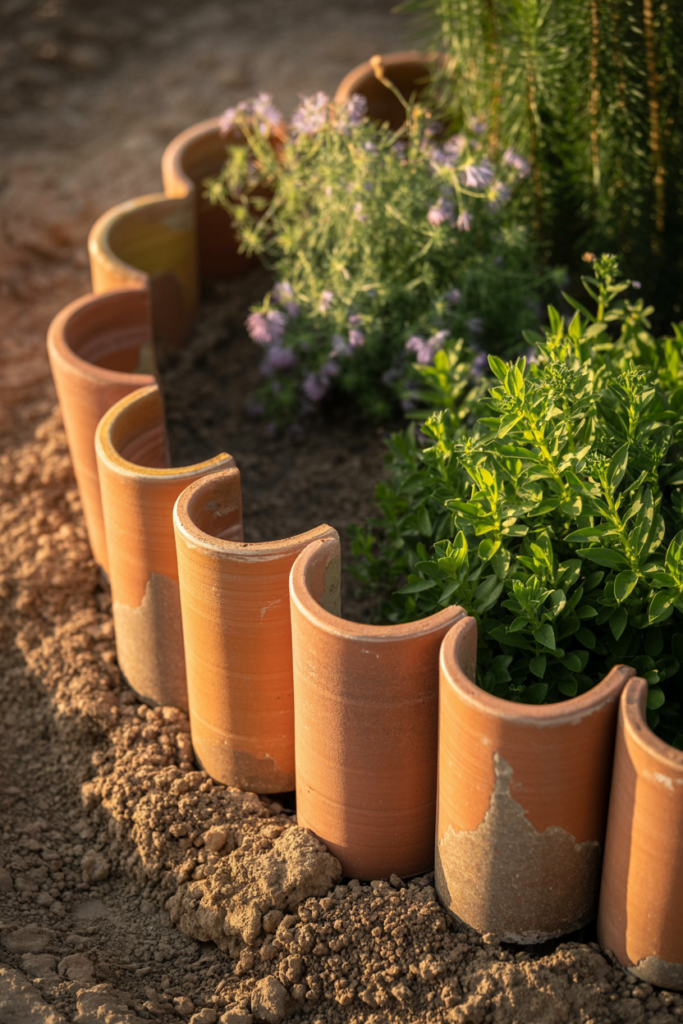
8. Terracotta Pot Shards
Broken terracotta pots are something most gardeners have tucked away somewhere, and they make surprisingly beautiful edging. Pressing the curved shards vertically into the soil along your bed edge creates a scalloped, handmade-looking border with real visual warmth. The earthy tones complement almost any planting style.
This is a zero-cost idea if you have old pots on hand, and it gives your garden a creative, artisanal touch. I like how each shard is slightly different in shape and size, which gives the border an organic, lived-in quality. It suits cottage gardens and Mediterranean-style planting beautifully.
Handle the broken edges carefully during installation, as terracotta can be sharp. Once the pieces are set into the soil, they are completely safe and stable. This is one of my favorite budget edging ideas because the result looks far more intentional than the cost suggests.
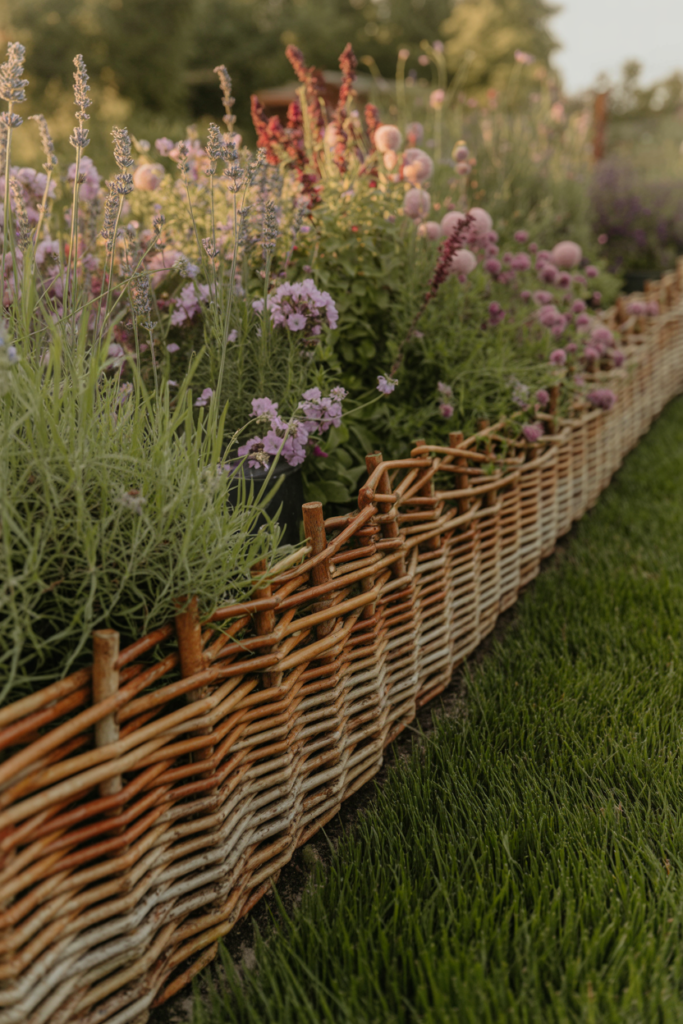
9. Woven Willow or Bamboo Edging
Woven willow and bamboo edging rolls are widely available at garden centers and bring a natural, textured look to flower bed borders. They work especially well in cottage gardens, Japanese-inspired spaces, or any yard with a relaxed, organic aesthetic. The warm tones of natural wood complement both flowering plants and foliage.
Installation is simple since most rolls come ready to unroll and secure along the bed edge with stakes. The height of the edging gives it a slightly more substantial presence than flat options, which I find helps define the border even more clearly. It also adds a nice vertical element at ground level.
Willow will naturally weather and silver over time, which many gardeners actually prefer. Bamboo tends to hold its color a little longer. Either way, both materials are biodegradable and will eventually break down without leaving anything harmful behind in your soil.
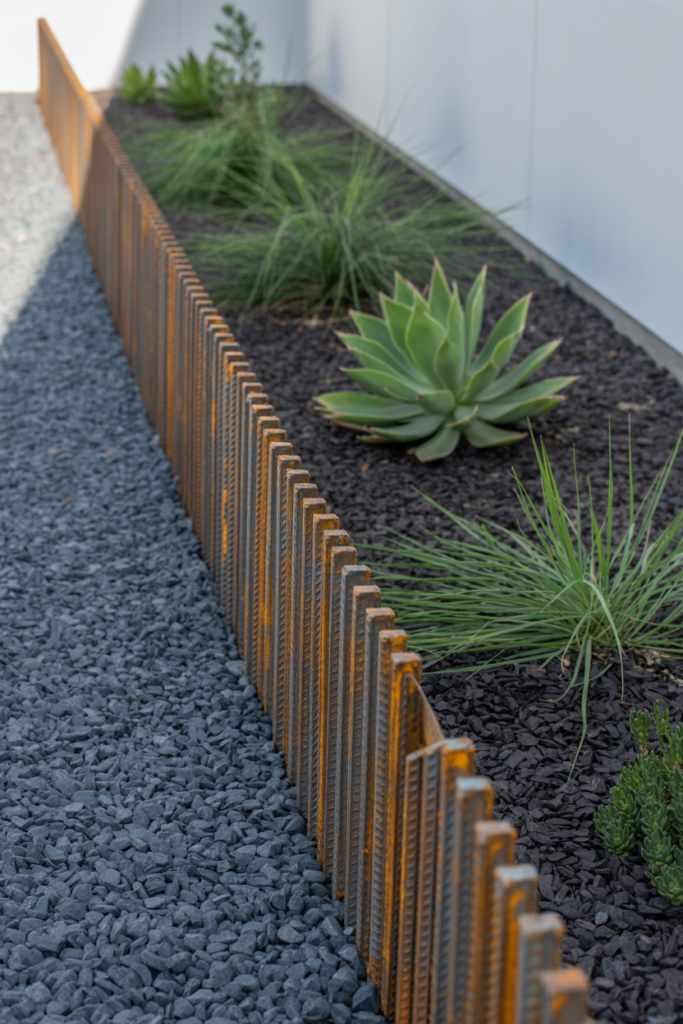
10. Metal Pipe or Rebar Edging
Rebar and metal pipe edging give a garden a distinctly industrial edge, literally. Lengths of rebar hammered into the ground at regular intervals create a simple, graphic border that looks striking in modern or minimalist gardens. It is also incredibly sturdy and practically indestructible once it is in place.
You can leave the rebar raw for a rustic iron look, or spray paint it in any color to match your outdoor aesthetic. A matte black finish looks particularly sharp against green mulch or dark soil. The spacing between pieces lets you see the soil and plants, which gives it an open, airy quality compared to continuous edging.
This is a great option if you have leftover rebar from a construction project. Even when purchased new, it is an affordable material that costs very little per linear foot. It is one of those edging styles that looks deliberately designed rather than simply functional.
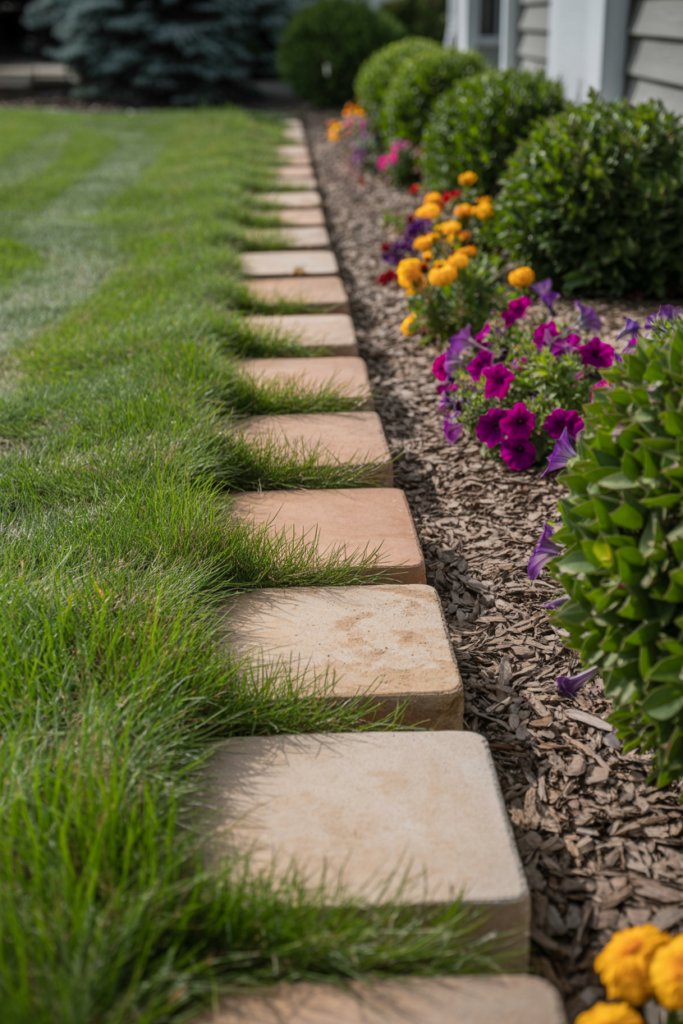
11. Paver Edge Borders
Concrete or natural stone pavers laid flat along the perimeter of a flower bed create a mowing strip as well as a visual border. This is one of the most practical edging ideas on this list because you can run the mower wheel along the flat surface without trimming afterward. That alone saves a noticeable amount of time each week.
The look is clean, structured, and suits a wide range of garden styles from formal to relaxed. Pavers come in so many shapes, sizes, and finishes that you can find something that genuinely complements your outdoor space. Rectangular concrete pavers give a modern look, while irregular flagstone feels more natural and relaxed.
Setting pavers properly does take a little groundwork. You want to dig a shallow trench, add a layer of sand for leveling, and then set each paver flush with the lawn surface. It takes an afternoon, but the result is a border that stays level and looks polished for years.
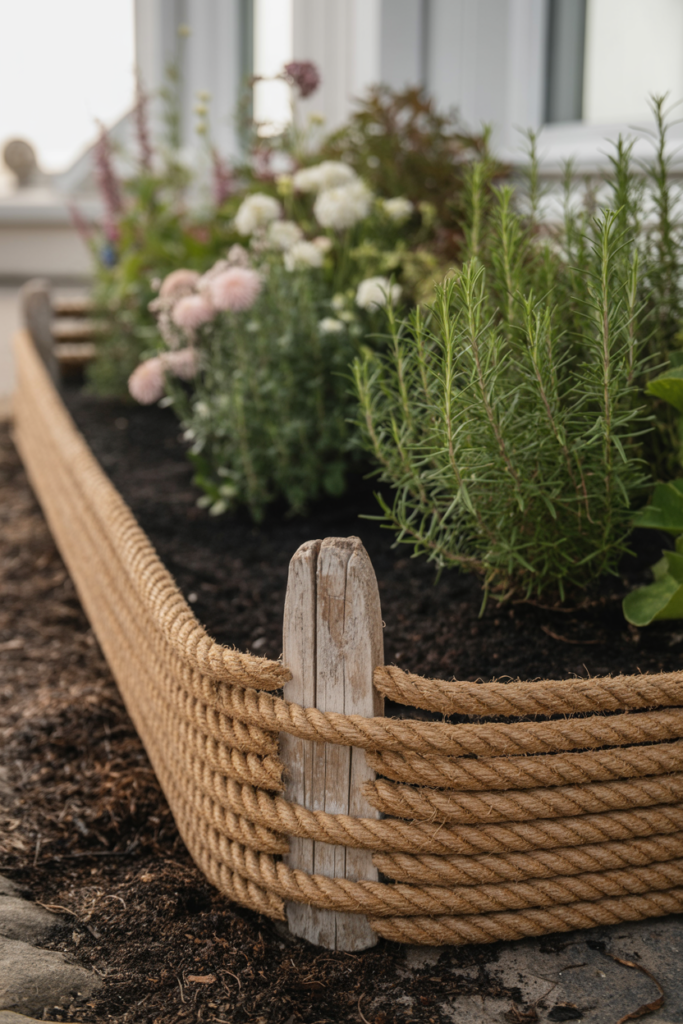
12. Rope or Coir Edging
Rope edging is one of the most underrated DIY options out there. Thick natural rope or coir twisted along the edge of a flower bed gives a nautical, coastal, or relaxed boho feel, depending on how you style it. It is incredibly inexpensive and takes about twenty minutes to install.
You secure the rope by pressing it into a shallow trench and anchoring it with landscape staples or simple wooden pegs. The natural tan and brown tones work well against green grass and dark mulch. I think it looks especially charming in raised beds or cottage-style gardens with a softer, more relaxed planting scheme.
Rope will not last as long as stone or metal, but it is so easy and cheap to replace that it barely matters. Some gardeners change it out seasonally to refresh the look, which is actually a nice way to update your garden without replanting anything.
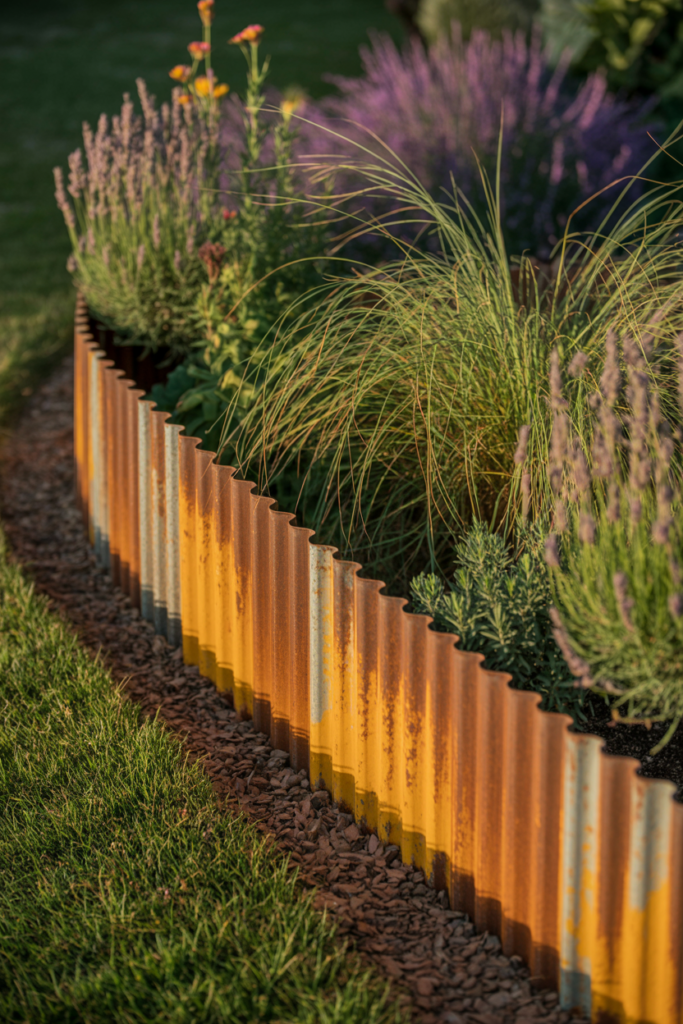
13. Corrugated Metal Sheets
Corrugated metal edging brings a trendy, farmhouse-industrial look to garden borders. Cut to height and pressed into the soil, corrugated metal creates a bold, textural edge that stands out in all the right ways. It has become really popular in modern farmhouse and industrial-style gardens over the last few years.
The ridged texture catches the light differently throughout the day, which gives it a dynamic quality that flat edging simply does not have. It also weathers beautifully, developing a patina over time that many gardeners specifically want. You can speed up the rusting process with a saltwater spray if you love that aged look right away.
Use gloves when cutting and handling corrugated metal, as the edges can be sharp. Once it is installed, it is completely safe and very durable. This is a great option if you want your edging to be a design feature in its own right rather than something that fades into the background.
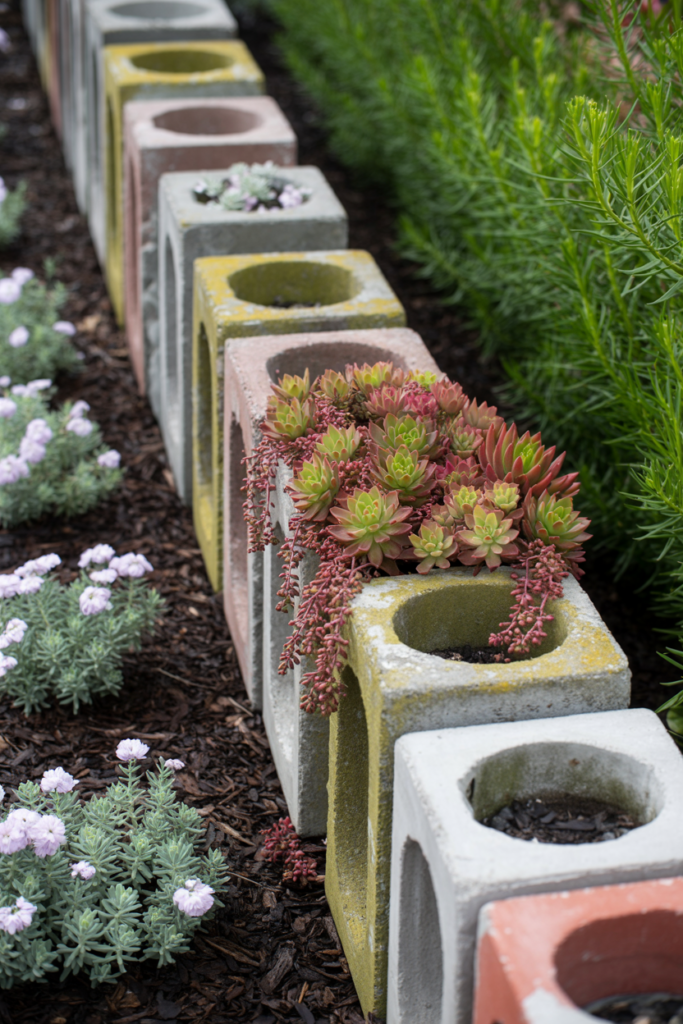
14. Cinder Block Edging
Cinder blocks are cheap, widely available, and surprisingly versatile as a garden edging material. Standing them on end along the border of a flower bed creates a chunky, textured edge with a modern industrial feel. The hollow cores can also be planted with small succulents, herbs, or trailing flowers, which turns the edging itself into a planting feature.
I love the idea of planting directly into the blocks because it adds so much interest to what would otherwise be a plain border. Imagine a line of cinder blocks with bright succulents popping out of each hollow core. It is functional edging and a planting feature at the same time, which feels like a genuinely smart use of space.
Cinder blocks are heavy, which actually works in their favor since they stay put without staking or anchoring. They handle all weather conditions well and require zero maintenance once they are placed. For a raised bed-style border with real presence, this is a great budget option.
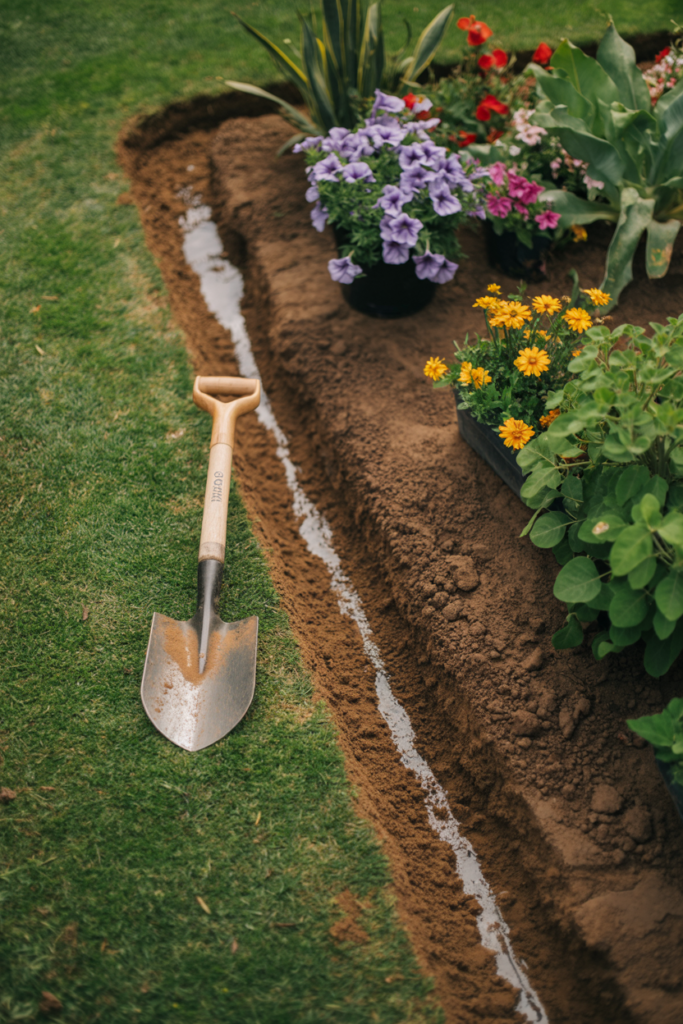
15. Shovel-Cut Trenched Edge
Sometimes the best edging is no material at all. A clean spade-cut trench along the edge of your flower bed creates a crisp, defined border using nothing but a sharp flat spade and a little elbow grease. This is the classic method gardeners have used for generations, and it still works beautifully.
The cut creates a small V-shaped channel between the lawn and the bed that stops grass from creeping in and gives a very clean visual line. Once you do it the first time, maintenance cuts are quick and easy. I re-edge my beds this way every spring, and it takes about fifteen minutes per bed.
This method costs absolutely nothing and works with any bed shape, including tight curves and irregular organic outlines. It is the most natural-looking edging option because the border is simply the soil itself, cleanly defined. If you want a neat garden without spending anything, start here.
Quick Comparison: DIY Flower Bed Edging Materials at a Glance
| Edging Type | Cost | Durability | Best For | Maintenance |
| Steel Landscape Edging | Medium | Very High | Modern/Formal | Very Low |
| Natural Stone | Free to Low | Very High | Cottage/Rustic | Very Low |
| Brick | Low to Medium | Very High | Traditional | Very Low |
| Wooden Log Rounds | Free | Medium | Woodland/Cottage | Low |
| Recycled Wine Bottles | Free | Medium | Bohemian/Creative | Low |
| Concrete | Medium | Very High | Modern/Permanent | Very Low |
| Rubber Edging | Low | High | Curved Beds | Very Low |
| Terracotta Shards | Free | Medium | Cottage/Mediterranean | Low |
| Woven Willow/Bamboo | Low | Medium | Natural/Relaxed | Low |
| Rebar/Metal Pipe | Low | Very High | Modern/Industrial | Very Low |
| Paver Edge Borders | Medium | Very High | Formal/Practical | Very Low |
| Rope or Coir | Very Low | Low | Coastal/Boho | Medium |
| Corrugated Metal | Low to Medium | High | Farmhouse/Industrial | Very Low |
| Cinder Blocks | Very Low | Very High | Industrial/Modern | Very Low |
| Shovel-Cut Trench | Free | Medium | Any Style | Medium |
Tips That Make Your Flower Bed Edging Last Longer and Look Better
The material you choose only does half the job. How you install and maintain your edging makes a real difference in how long it holds up and how good it looks through the seasons. A few simple habits go a long way toward keeping your borders sharp and clean.
Always prepare the ground properly before installing any edging. Remove grass and weeds along the border line first, then dig a trench that is deep enough to anchor your chosen material securely. Rushing this step is the number one reason edging shifts, tilts, or looks uneven after the first heavy rain.
Re-edging once or twice a year keeps things looking intentional rather than neglected. Even the most durable materials benefit from a quick check each spring to reset anything that has shifted over winter. Ten minutes of maintenance in March saves you a much bigger job come summer.
Conclusion
Clean flower bed edging is one of the simplest upgrades you can make to your garden, and the results are immediate. Whether you go with steel for a crisp modern look, natural stone for a relaxed cottage feel, or a free shovel-cut trench for a no-budget solution, the right edge transforms your entire yard. I hope these 15 ideas give you a clear starting point based on your style, budget, and how much maintenance you actually want to deal with.
The most important thing is to just start. Pick one bed, choose one edging method that excites you, and spend a Saturday afternoon on it. You will be surprised by how much of a difference a defined border makes to the overall feel of your outdoor space. A well-edged garden does not just look better; it feels more cared for, more intentional, and genuinely more enjoyable to spend time in.
From recycled wine bottles to corrugated metal to classic brick, there is an edging idea here for every gardener at every budget. Take what works for your space, make it your own, and enjoy the satisfaction of a garden that finally looks as good as the plants growing in it.
Frequently Asked Questions
What is the easiest flower bed edging for beginners? A shovel-cut trench edge is the easiest starting point because it requires no materials and no special tools. A flat spade and a steady hand are all you need. It looks clean, costs nothing, and can be done in an afternoon.
How deep should flower bed edging be installed? Most edging materials need to go at least 3 to 4 inches into the ground to stay stable. Steel and rubber edging typically require a 4 to 6 inch depth for a secure hold. Deeper installation prevents shifting during freeze-thaw cycles and heavy rain.
What is the most durable DIY flower bed edging material? Steel landscape edging, brick, and concrete are the most durable options available. Steel in particular holds its shape for decades without rusting or warping. If you want something you install once and essentially forget about, these three materials are your best options.
How do I keep grass from growing through my flower bed edging? Pair your edging with a layer of landscape fabric or thick mulch inside the bed to suppress grass and weeds. Make sure your edging sits flush with or slightly above the soil surface so grass runners cannot creep underneath. Re-edging the trench line once a season keeps the boundary clean.
Can I use flower bed edging on a curved garden border? Yes, and many edging materials are specifically designed for curves. Rubber edging, steel edging, and rope all flex easily around organic shapes without cracking or kinking. For rigid materials like brick or stone, simply adjust the angle of each piece slightly to follow the curve naturally.
How often should I re-edge my flower beds? Most garden beds benefit from a fresh edge cut once in spring and once in late summer. If you use a physical edging material like metal or stone, a quick visual check each season is usually enough. Shovel-cut trenches need refreshing more often since soil naturally fills back in over time.
Does flower bed edging help with drainage? A defined flower bed edge does help direct water into the bed rather than letting it run off across the lawn. Materials like brick and stone pavers can also slow surface runoff and give water more time to soak into the soil. For beds in low-lying areas, pairing edging with a slight inward slope on the bed surface improves drainage even further.