Rock Gardens That Work as Hard as They Look Good
A rock garden is one of the most practical and visually striking landscaping choices you can make for any outdoor space. It combines natural stone elements with drought-tolerant plants to create a landscape that looks intentional, requires very little ongoing maintenance, and actually improves with age as the plants establish and the stones develop natural weathering. If your yard currently feels like a chore rather than a retreat, a rock garden might be exactly the solution you have been looking for.
I became genuinely interested in rock garden design after spending years fighting with a steep-sloped section of my garden that defeated every lawn and border attempt I threw at it. Grass refused to establish properly, traditional borders washed out every time it rained heavily, and the whole area looked perpetually unfinished. One season after installing a layered rock garden with drought-tolerant alpines and ornamental grasses, that same slope became the most admired part of the entire property. Sometimes the landscape tells you what it needs if you are willing to listen.
The beauty of rock garden landscaping is that it suits almost every garden size, style, and climate. A tiny urban courtyard can accommodate a small alpine trough garden just as successfully as a large rural property can accommodate a full boulder landscape. The principles of good rock garden design, natural stone placement, appropriate plant selection, and good drainage scale beautifully in every direction.
Why Rock Garden Landscaping Is One of the Best Low-Maintenance Choices
Rock gardens rank among the lowest-maintenance landscaping options available for any outdoor space. Once the stones are placed and the plants are established, a well-designed rock garden needs very little intervention beyond occasional weeding and light trimming. There is no weekly mowing, no constant watering, and no seasonal replanting, which makes it an appealing option for anyone who wants a beautiful garden without dedicating every weekend to maintaining it.
The drought tolerance of most rock garden plants is one of their greatest practical advantages. Alpine plants, sedums, sempervivums, ornamental grasses, and creeping ground covers all thrive in the free-draining conditions that a rock garden naturally provides. Most of these plants actually perform better in lean, gritty soil than in rich garden compost, which means the less you fuss over them, the better they look. That is genuinely rare in the gardening world.
Rock gardens also provide outstanding ecological value in any outdoor space. The gaps between stones create nesting and overwintering habitat for beneficial insects, lizards, and small mammals. Drought-tolerant flowering plants attract pollinators throughout an extended season. A well-planted rock garden functions as a small but meaningful wildlife habitat as well as a beautiful garden feature, which makes every design decision feel doubly worthwhile.
15 Best Rock Garden Design Ideas for Every Outdoor Space
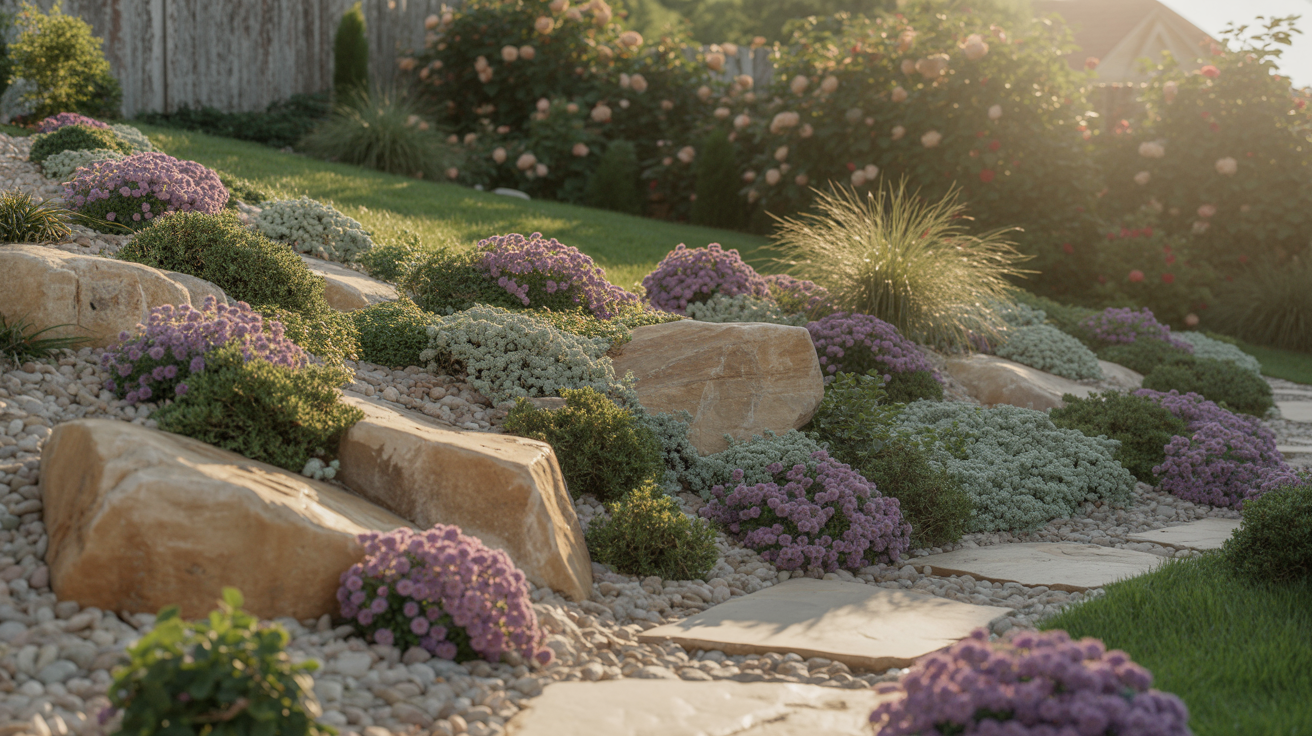
1. Sloped Hillside Rock Garden With Alpine Plants
A sloped hillside is the most natural setting for a rock garden and produces some of the most visually dramatic results in residential landscaping. Place large anchor boulders at irregular intervals across the slope and fill the spaces between with smaller rocks, gritty well-draining soil, and a mix of alpine plants that root directly into the rocky terrain. The slope provides natural drainage that alpine plants need to thrive, and the boulders prevent soil erosion during heavy rain while adding genuine visual weight to the landscape.
Choose alpine plants in a range of bloom times so the hillside rock garden produces color from early spring right through to late autumn. Aubretia and rock cress flower prolifically in spring, dianthus and alpine phlox bloom through early summer, sedums and ice plants carry color through midsummer, and ornamental grasses provide structural interest through autumn and winter. Layering the planting this way means the hillside never looks bare or uninteresting, regardless of the season.
I converted a difficult north-facing slope using this approach, and the results genuinely exceeded every expectation. The key was placing the largest boulders first and working the planting around them rather than trying to fit stones around existing plants. Large rocks set two-thirds into the ground look natural and permanent rather than placed, which makes all the difference to the overall authenticity of the finished landscape.
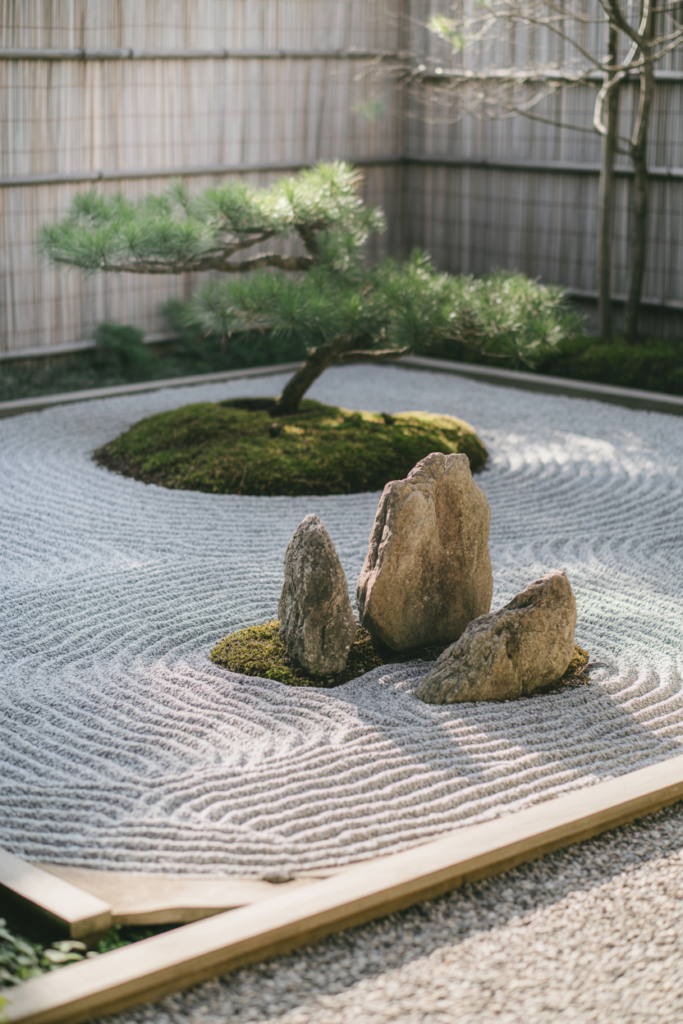
2. Japanese Zen Rock Garden With Raked Gravel
A Japanese-inspired zen rock garden uses carefully placed rocks, raked gravel or sand, and minimal planting to create a landscape that feels deeply calm and considered. The raked gravel patterns represent water in motion, the rocks represent islands or mountains, and the negative space between elements is as important as the elements themselves. This style works beautifully as a small courtyard feature, a front garden display, or a dedicated meditation garden area within a larger outdoor space.
The gravel in a zen rock garden needs regular raking to maintain its patterns, but this is genuinely a meditative rather than a laborious task. Fine decomposed granite or pale river gravel in a consistent size works best for raking. I use a simple handmade wooden rake with widely spaced tines to create wave and ripple patterns that take about fifteen minutes to refresh and look visually striking even from an upstairs window.
Plant selection in a zen rock garden should be minimal and structural. A single weathered pine, a clump of black bamboo, a spreading juniper, or a moss-covered rock grouping all suit the aesthetic far better than colorful flowering plants. The restraint is the point, and once you commit to it, the garden develops a quiet authority that more elaborate landscapes rarely achieve.
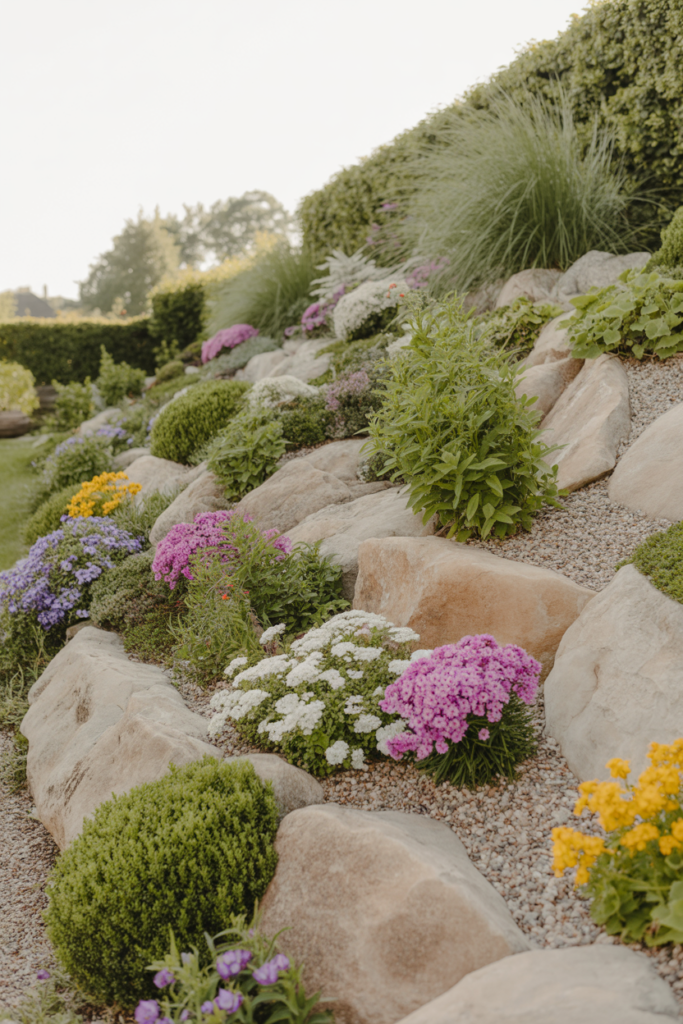
3. Cottage-Style Rock Garden With Colorful Alpines
A cottage-style rock garden combines the natural informality of a traditional English cottage garden with the structural backbone of stone. Use a mix of limestone or sandstone rocks in varying sizes, arranged in a relaxed, slightly irregular pattern, and fill the planting pockets with an abundance of colorful alpine plants. The result should feel like a naturally occurring rocky outcrop that happens to be covered in flowers rather than a carefully constructed garden feature.
Aubretia in deep purple and soft lilac, pink and white rock phlox, yellow alyssum, red and pink dianthus, and white saxifrage all produce generous seasonal color in a cottage rock garden setting. These plants tumble and spread naturally between and over the rocks in a way that softens the stone edges beautifully. Within two or three growing seasons, a well-planted cottage rock garden looks completely established and genuinely effortless.
The cottage rock garden style is one of the most forgiving design approaches for gardening beginners. The plants are tough, the style actively benefits from a relaxed approach to placement, and the overall aesthetic improves rather than suffers when plants self-seed and spread into unexpected spots. If you have never built a rock garden before, this is the style to start with.
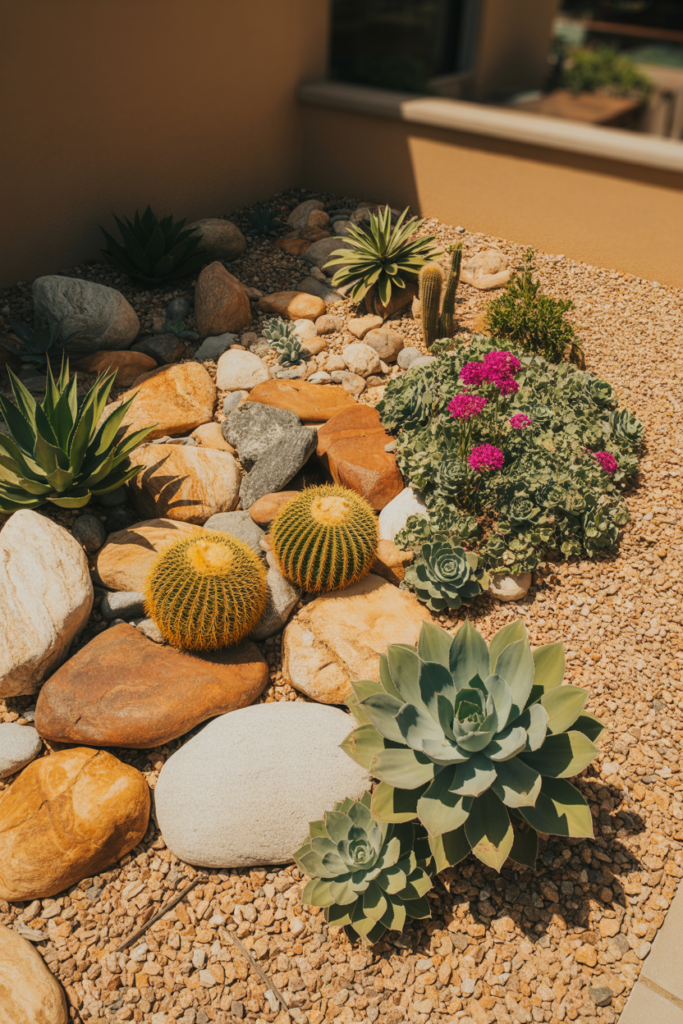
4. Desert-Style Rock Garden With Cacti and Succulents
A desert-inspired rock garden uses warm-toned rocks, gravel mulch, cacti, and drought-tolerant succulents to create a landscape that looks striking, requires almost zero watering once established, and suits sunny, exposed garden positions beautifully. Large smooth river boulders in amber, rust, and gray tones work particularly well as the structural backbone of a desert rock garden, and a mulch of matching fine gravel across the entire planting area ties all the elements together into a cohesive and polished landscape.
Hardy cacti varieties like opuntia, echinocereus, and escobaria survive outdoor winters in many temperate climates and produce spectacular flowers in late spring and early summer. Combine them with hardy agave rosettes, echeveria, sedum, and trailing ice plant for a layered desert planting that covers a range of heights and textures. I added a small desert rock garden section to a south-facing corner of my garden two years ago, and it has required exactly zero supplemental watering since the plants established in the first season.
Warm-colored decomposed granite or crushed sandstone makes the best mulch for a desert rock garden because it reflects heat, suppresses weeds effectively, and visually echoes the warm tones of the surrounding rock elements. Avoid dark or black gravel mulch in a desert garden as it absorbs rather than reflects heat and can stress shallow-rooted succulent plants during peak summer temperatures.
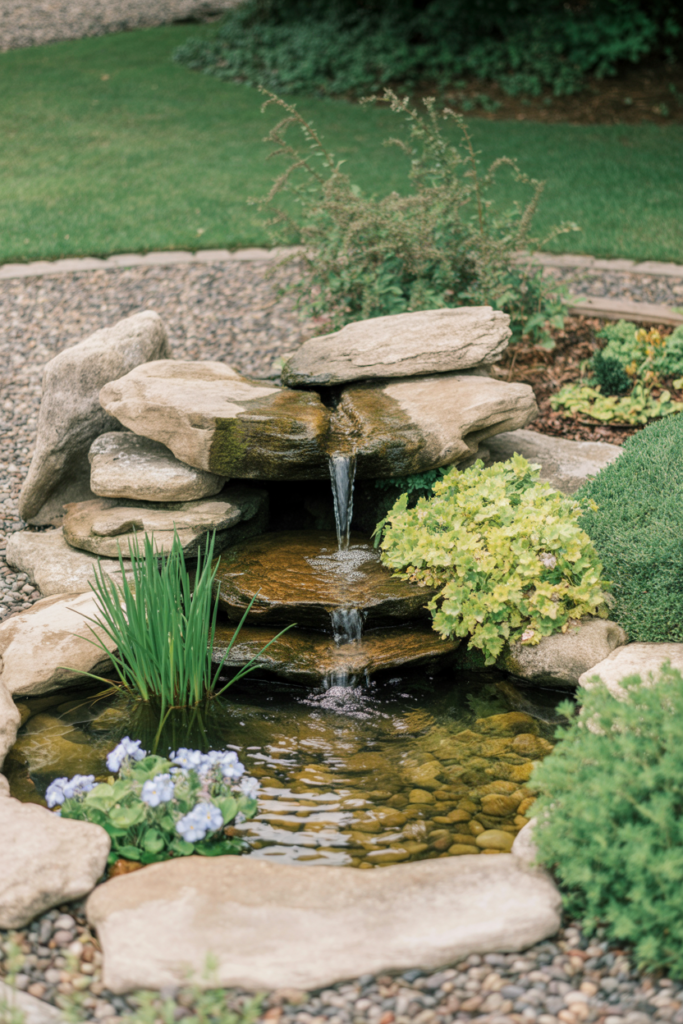
5. Rock Garden Water Feature With a Natural Stream Effect
Adding a water feature to a rock garden creates a multi-sensory landscape that combines the visual appeal of natural stone with the sound and movement of flowing water. A recirculating pump buried at the base of a rock arrangement pushes water up through a central boulder or pipe outlet and allows it to cascade naturally over and between surrounding rocks into a shallow collection pool below. The whole system runs on a small submersible pump and creates a genuinely convincing natural stream or spring effect.
The secret to making a rock garden water feature look natural rather than artificial is using rocks from the same geological source for the entire feature. Mixing rock types and colors immediately looks constructed rather than naturally occurring. Source all your rocks from a single local stone merchant and use varying sizes of the same stone type throughout the water feature and the surrounding dry rock garden planting areas for a completely unified look.
Moisture-loving plants like creeping Jenny, water forget-me-not, dwarf iris, and marsh marigold thrive in the damp conditions immediately surrounding the water feature collection pool. Surround the pool edge with these plants and transition gradually to drought-tolerant alpines and sedums as you move further away from the water source. This planting gradient from moist to dry mirrors exactly what you would find in a natural rocky landscape and makes the whole feature feel genuinely authentic.
6. Raised Rock Garden Bed for Small Spaces
A raised rock garden bed solves the problem of poor garden soil, inadequate drainage, and limited space all in one practical and attractive design solution. Build a low retaining wall from dry-stacked flat stones or reclaimed sandstone blocks, fill the interior with a gritty free-draining mix of topsoil, horticultural grit, and coarse sand, and plant the surface with a dense mix of alpine and drought-tolerant plants. The raised structure immediately draws the eye and gives even the smallest garden a genuine sense of designed intention.
Raised rock garden beds also put the planting at a more comfortable viewing and tending height than a ground-level rock garden. Compact alpines, sempervivums, and miniature conifers look spectacular viewed from slightly below rather than from directly above, which is exactly the perspective a raised bed provides. I built a low double-course sandstone raised rock garden along one side of a narrow garden path, and the plants in it get significantly more attention from visitors than anything else in the wider garden.
Fill the base of the raised bed with a deep layer of rubble, broken terracotta, or coarse gravel before adding the growing medium. This base drainage layer is the single most important factor in the long-term success of any raised rock garden planting and prevents the waterlogging that kills alpine plants faster than almost anything else.

7. Rock Garden Pathway With Creeping Ground Covers
A rock garden pathway uses flat stepping stones set into a ground-level planting of low creeping plants to create a garden path that is as decorative as it is functional. Choose large flat stones in sandstone, slate, or limestone and set them firmly into the ground at a comfortable stepping distance apart. Plant the gaps between the stones with tough creeping ground covers like thyme, chamomile, Corsican mint, or mind-your-own-business for a pathway that releases fragrance underfoot with every step.
The planting between the stepping stones softens the hard edges of the stone and creates a living pathway surface that changes with the seasons. Creeping thyme produces a flush of tiny pink and purple flowers in early summer that turns the pathway into a flowering carpet for several weeks. Chamomile produces small white daisy flowers and releases a gentle apple fragrance when brushed. These small sensory details make walking through a garden on a rock pathway a genuinely pleasurable experience rather than just a practical one.
Set each stepping stone on a bed of sharp sand and check that the surface sits level and firm before backfilling around it with gritty soil and planting. A wobbly stepping stone is a trip hazard and an annoyance, and taking an extra five minutes to bed each stone properly saves a lot of frustration later. The ground cover plants establish quickly around well-set stones and hold them firmly in place within a single growing season.

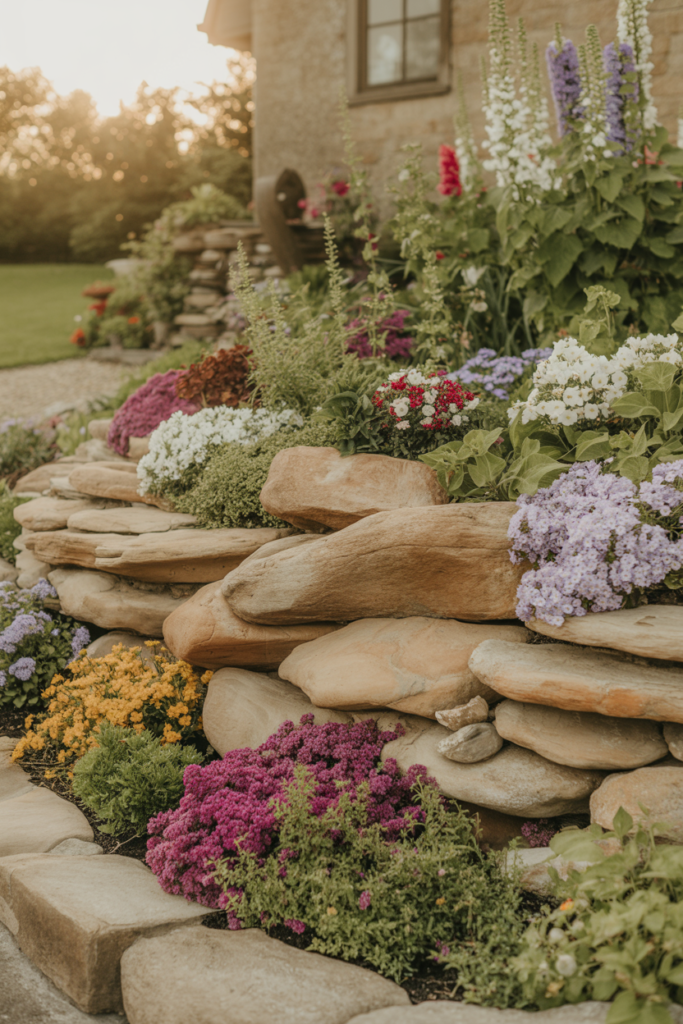
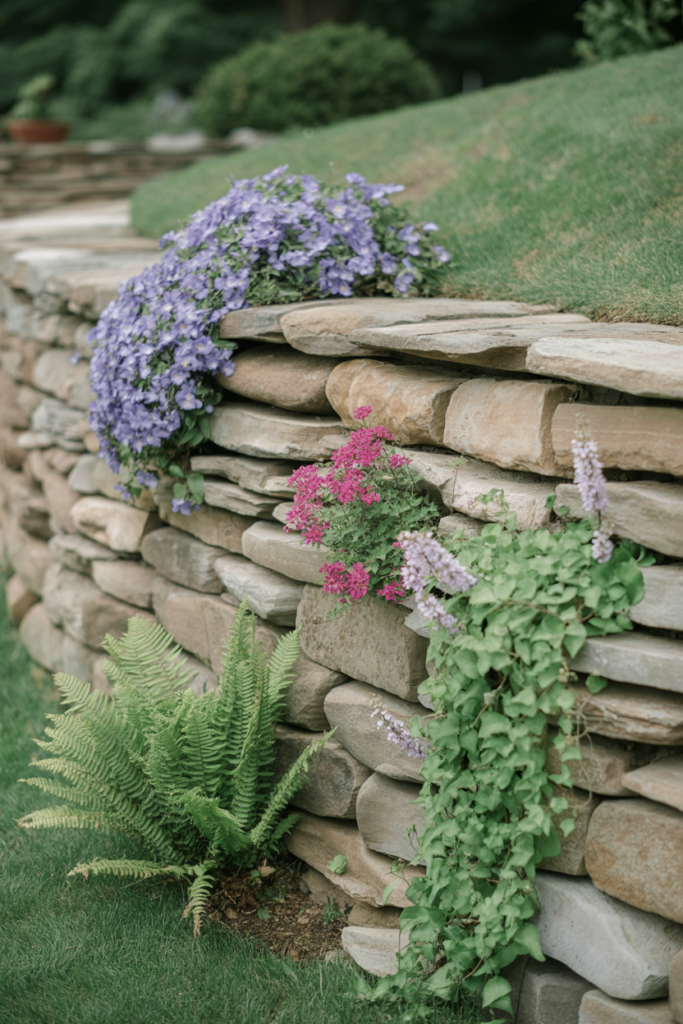
8. Rock Garden Retaining Wall With Planted Pockets
A rock garden retaining wall serves a dual structural and decorative purpose by holding back a sloped garden area while providing planting pockets between the stones for alpines, trailing plants, and small perennials. Build the wall using dry-stacked flat stones without mortar, leaving generous gaps between courses for plant roots to penetrate. Tilt each stone course very slightly backward into the slope as you build to ensure the wall leans into the bank it supports rather than away from it.
Plant the wall pockets as you build rather than trying to introduce plants after the wall is complete. Tuck small alpine plants, rooted sempervivum offsets, and trailing aubretia directly between the stone courses as you stack them and firm the surrounding gritty soil around each root ball. Within one growing season, the plants knit the wall together with their root systems, which actually strengthens the structure while covering the stone surface in foliage and flowers.
Dry stone retaining walls support an enormous variety of plant types in their crevices. Wallflowers, rock cress, ivy-leaved toadflax, ferns, and even small shrubs like cotoneaster establish readily in wall gaps and create a genuinely beautiful planted surface over time. The wall also provides an outstanding wildlife habitat with bees nesting in the deeper crevices and small lizards using the sun-warmed stone surface throughout summer.
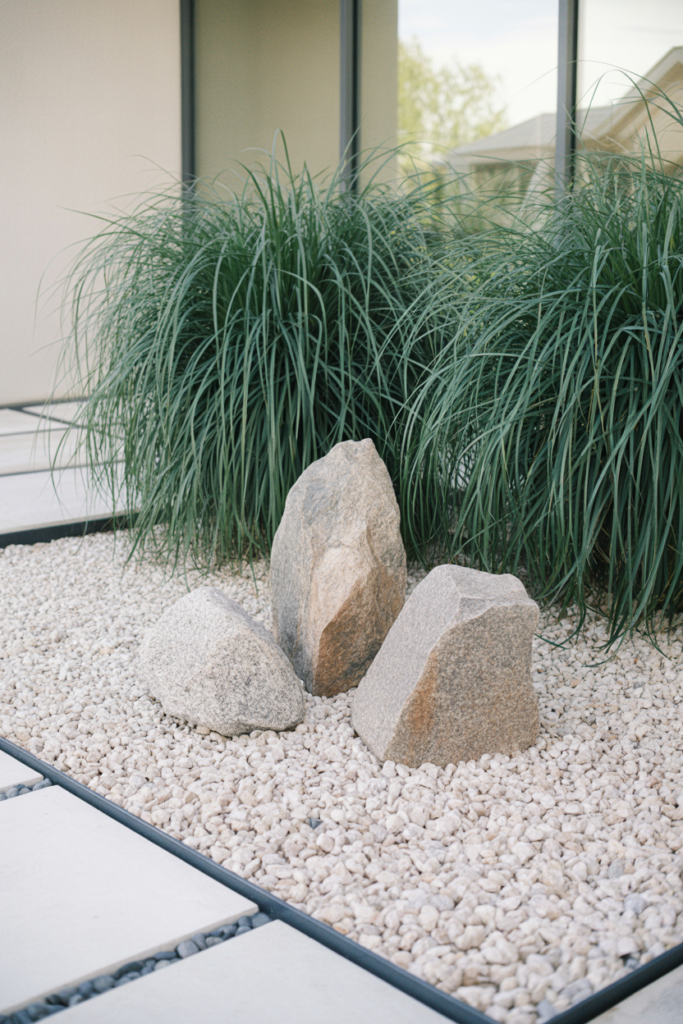
9. Modern Minimalist Rock Garden With Ornamental Grasses
A modern minimalist rock garden pairs large statement boulders with drifts of ornamental grasses and a clean gravel mulch surface to create a landscape that feels architectural, contemporary, and genuinely low maintenance. Use three to five large boulders of the same stone type in varying sizes as the primary design elements and position them in an asymmetric grouping that creates visual tension and interest without feeling cluttered. Plant generous sweeping drifts of a single ornamental grass variety around the boulder grouping for a bold, graphic planting statement.
Feather reed grass, blue oat grass, Mexican feather grass, and Karl Foerster grass all suit a minimalist rock garden aesthetic beautifully. Their upright or arching forms contrast with the horizontal solidity of the boulders in a way that feels intentional and visually sophisticated. I used a combination of large granite boulders and sweeping drifts of blue oat grass with a pale limestone gravel mulch in a front garden redesign, and the finished result drew more positive attention from passing neighbors than any other garden on the street.
Keep the plant palette deliberately limited in a minimalist rock garden. One boulder type, one grass variety, one ground cover, and one gravel mulch color is a perfectly complete plant palette for this style. The restraint is what gives the design its strength and prevents it from sliding into the kind of busy, cluttered rockery style that minimalist design actively sets out to avoid.
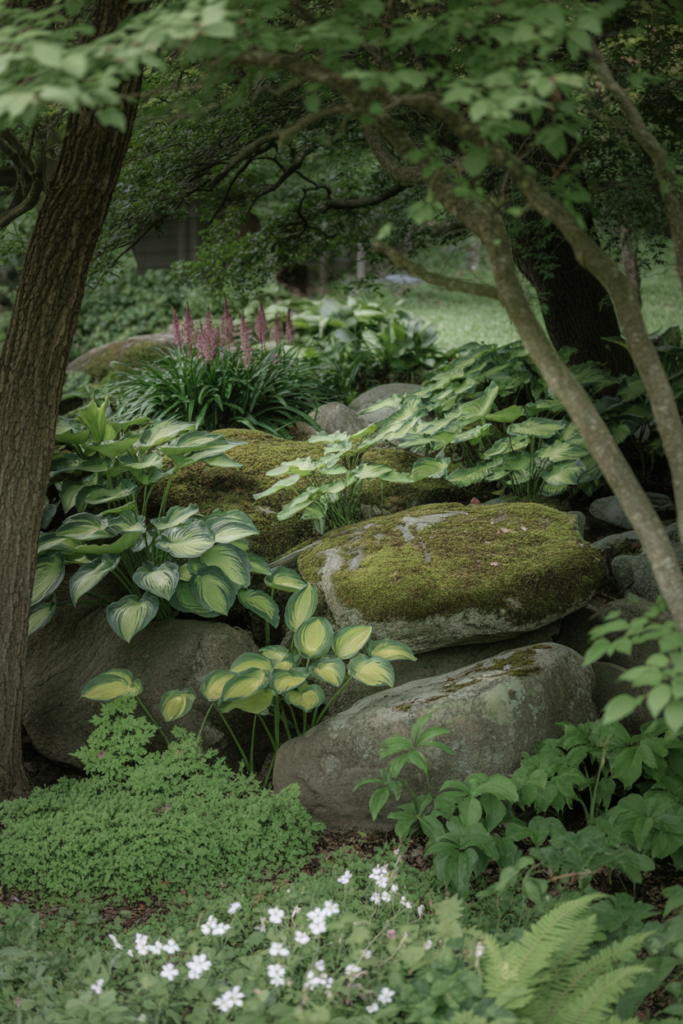
10. Woodland Rock Garden With Shade-Loving Plants
A woodland rock garden suits shaded garden areas that defeat most other planting styles and uses mossy rocks, ferns, and shade-loving perennials to create a cool, atmospheric landscape with genuine natural character. Position weathered rocks with existing moss or lichen growth as the primary structural elements and underplant them with hostas, astilbe, bleeding heart, epimedium, and wood anemone for a lush and layered shaded planting that looks completely natural in a woodland or dappled light setting.
Moss is one of the most valuable elements in a woodland rock garden because it softens rock surfaces, retains moisture, and creates that essential sense of age and permanence that makes a rock garden feel genuinely established rather than recently installed. Encourage moss growth by applying a diluted buttermilk solution to clean rock surfaces and keeping them consistently moist in a shaded position. Within one growing season, a treated rock surface develops a satisfying green moss covering that looks decades old.
Ferns are the most reliable planting choice for a deeply shaded woodland rock garden where other plants struggle to perform. Soft shield fern, Japanese painted fern, hard fern, and male fern all thrive in the moist, shaded conditions between rocks and produce beautiful arching fronds that contrast beautifully with the solid texture of stone. A woodland rock garden planted primarily with ferns and moss requires almost no maintenance once established and looks genuinely beautiful in every season, including winter.
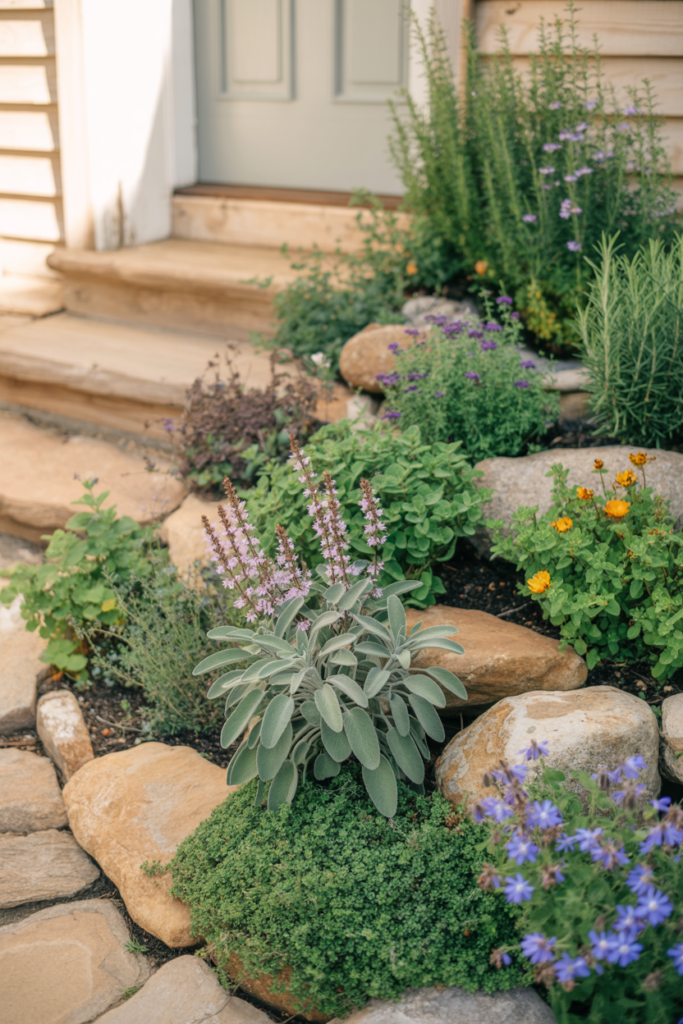
11. Rock Garden With Drought-Tolerant Herbs
A rock garden planted with drought-tolerant culinary and aromatic herbs combines outstanding practicality with genuine decorative beauty. Thyme, rosemary, oregano, sage, lavender, and marjoram all thrive in the free-draining, lean soil conditions of a rock garden and produce aromatic foliage and seasonal flowers that attract pollinators throughout the growing season. A herb rock garden positioned close to a kitchen door provides fresh ingredients within easy reach while looking considerably more attractive than a standard herb bed.
The varied foliage textures of different herb varieties create a naturally interesting and layered planting tapestry across a rock garden surface. Silver-leaved sage, purple-leaved basil, fine-leaved thyme, and needle-leaved rosemary all look beautiful growing between and over rocks, and their contrasting leaf colors and textures provide year-round visual interest even when the plants are not in active flower. I replaced a tired traditional herb bed with a sloped rock garden herb planting three seasons ago, and the difference in both appearance and productivity has been significant.
Trim herb rock garden plants lightly after each main flowering period to keep them compact and bushy rather than woody and straggly. Hard pruning into old woody stems on rosemary and lavender can kill established plants, so always cut back only into the current season’s green growth. Light regular trimming achieves the same compacting result without the risk of losing established plants that take years to reach their best size.
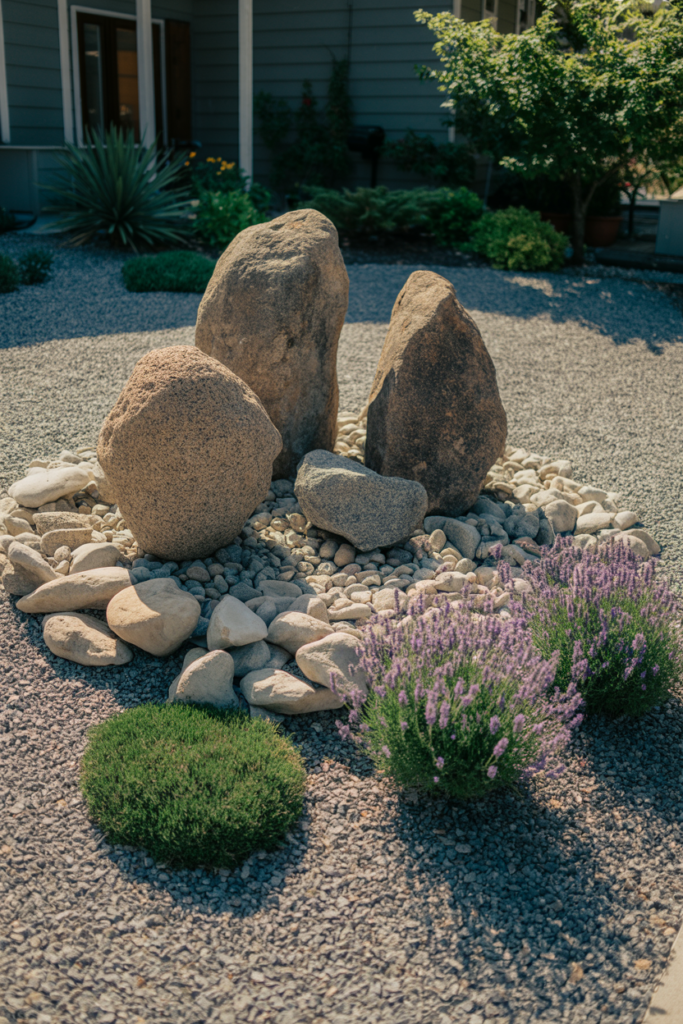
12. Boulder Rock Garden as a Front Yard Focal Point
A front yard boulder rock garden makes a bold and immediately recognizable landscaping statement that stands out from conventional lawn and border front garden designs. Use two or three very large boulders as the primary design anchors and surround them with a carefully graded mix of medium and small rocks that create a natural-looking transition from the large central stones to the surrounding garden surface. A consistent gravel mulch across the entire front yard area unifies all the rock elements and dramatically reduces ongoing maintenance compared to a traditional lawn.
Front yard rock gardens also dramatically reduce water consumption compared to lawn-based front garden designs. A well-designed boulder rock garden with drought-tolerant planting needs watering only during the most extreme dry spells once the plants establish in their first season. In water-restricted areas or regions prone to summer drought, this practical advantage is as significant as the visual one.
Choose boulders that reflect the geological character of the local area wherever possible. Local stone always looks more at home in a landscape than imported stone because it echoes the natural geology of the surrounding environment. Locally sourced stone is also considerably less expensive to transport than stone brought from distant quarries, which makes the most visually impactful element of the design one of the most budget-conscious choices at the same time.
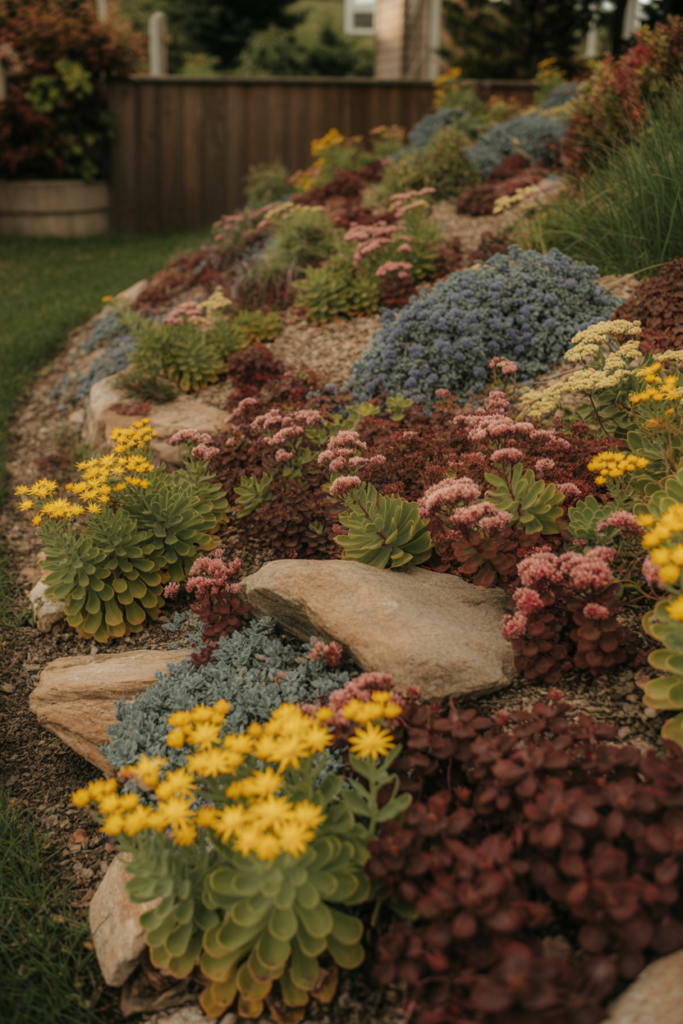
13. Rock Garden Slope With Ground Cover Sedums
A sedum-planted rock garden slope is one of the most visually rewarding and lowest-maintenance landscaping solutions available for a difficult sloped area. Sedums spread steadily across the soil surface between rocks, suppress weeds effectively, tolerate drought and poor soil beautifully, and produce a spectacular flush of star-shaped flowers in late summer and autumn when most other garden plants have finished performing. A slope covered in a mix of sedum varieties in different foliage colors provides interest from spring right through to the first hard frosts.
Mix sedum varieties in a range of foliage tones for the most visually interesting result. Golden sedum, bronze-leaved sedum spurium, blue-gray sedum reflexum, and deep burgundy sedum varieties all look beautiful growing together between rocks, and their varied foliage colors create a tapestry effect that reads well from a distance as well as close up. I planted a steep bank with a five-variety sedum mix two seasons ago, and the coverage was complete within eighteen months without any supplemental feeding or watering after the first establishment period.
Plant sedum plugs or rooted cuttings rather than large pot-grown plants for the most economical coverage of a large slope. Sedum roots easily from short stem cuttings pressed directly into gritty soil and establishes quickly when planted in early spring or early autumn. A large slope can be planted very economically by propagating from a small number of initial plants and spacing the resulting cuttings across the entire area.
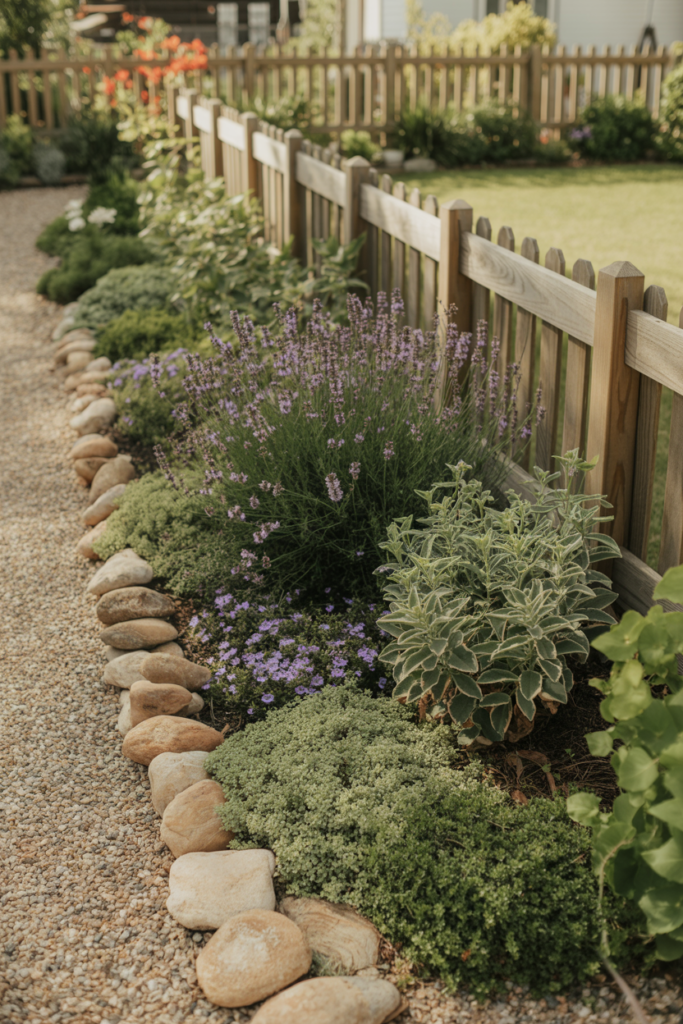
14. Rock Garden Borders Along a Fence or Wall
A rock garden border running along a fence or wall base adds a layered, naturalistic planting area to what is often the least interesting part of a garden. Use a row of medium-sized rocks along the outer edge of the border as a low structural retaining element and fill the interior with a mix of drought-tolerant plants that suit the light levels of the fence or wall position. A sunny south-facing fence suits lavender, cistus, and rosemary, while a shadier north-facing wall suits ferns, epimedium, and hellebores.
Rock garden fence borders also solve the persistent problem of soil splash on fence panels during heavy rain. The rock edging and gravel mulch surface absorbs rainfall rather than allowing it to bounce off bare soil onto surrounding structures. Fence panels that sit above a rock garden border stay significantly cleaner and last considerably longer than panels with direct soil contact at their base.
I created a long rock garden border along the full length of my garden boundary fence using locally sourced sandstone pieces and planted it with a mix of lavender, catmint, sedum, and creeping thyme. The border now requires nothing beyond an annual light trim and occasional weeding and looks better every season as the plants grow into and over the rocks with increasing confidence and generosity.
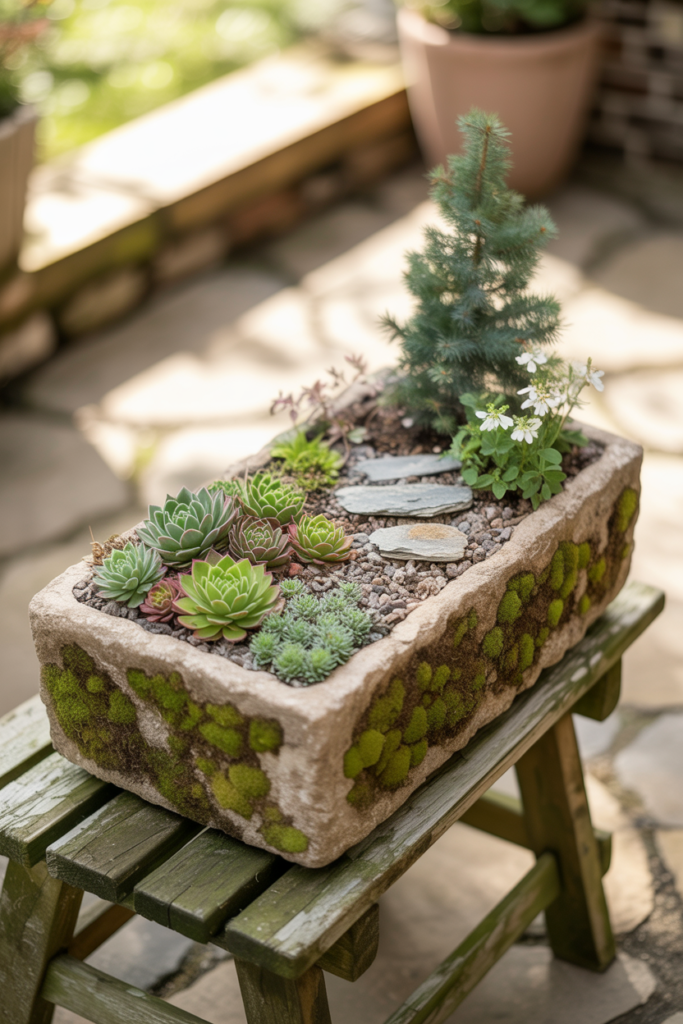
15. Rock Garden Trough Garden for Patios and Small Spaces
A stone trough garden brings the full rock garden experience to a patio, balcony, or small courtyard in a completely self-contained and moveable format. Use a genuine antique stone trough, a reclaimed Belfast sink, or a hypertufa trough you make yourself and fill it with a gritty alpine compost mix. Plant the surface with a carefully curated selection of miniature alpine plants, dwarf conifers, and small-scale rock fragments to create a complete miniature landscape in a single container.
Hypertufa troughs are one of the best DIY projects for anyone interested in rock garden gardening. Mix Portland cement, peat-free compost, and perlite in equal parts, form the mixture around a foam or cardboard mold, and leave it to cure for several weeks. The finished trough has the appearance and weight of aged stone at a fraction of the cost of a genuine antique piece and develops natural weathering and moss growth beautifully over its first few outdoor seasons.
Plant trough rock gardens with true miniature alpine species rather than standard garden plants pruned to fit. Miniature saxifrage, dwarf androsace, compact dianthus, tiny sempervivum rosettes, and miniature thyme varieties all maintain a naturally small scale that suits the trough format without regular intervention. A well-planted trough rock garden looks spectacular on a patio table or garden bench and provides a close-up view of tiny, intricate plants that a ground-level rock garden never quite achieves.
Best Rock Garden Design Ideas at a Glance
| Rock Garden Design Idea | Best For | Difficulty Level | Maintenance Level |
| Sloped Hillside With Alpines | Difficult slopes | Medium | Very Low |
| Japanese Zen With Gravel | Courtyard or meditation garden | Medium | Low |
| Cottage Style With Colorful Alpines | Traditional gardens | Easy | Very Low |
| Desert Style With Cacti and Succulents | Hot sunny positions | Easy | Very Low |
| Water Feature With Stream Effect | Feature gardens | Hard | Low |
| Raised Rock Garden Bed | Small spaces and poor soil | Medium | Very Low |
| Pathway With Creeping Ground Covers | Garden paths | Easy | Low |
| Retaining Wall With Planted Pockets | Sloped boundaries | Medium | Very Low |
| Modern Minimalist With Grasses | Contemporary gardens | Medium | Very Low |
| Woodland With Shade Lovers | Shaded areas | Easy | Very Low |
| Drought-Tolerant Herb Rock Garden | Near kitchen areas | Easy | Low |
| Boulder Front Yard Focal Point | Front garden redesign | Hard | Very Low |
| Sedum Slope Ground Cover | Steep difficult slopes | Easy | Very Low |
| Rock Border Along Fence or Wall | Boundary planting | Easy | Very Low |
| Trough Garden for Patios | Small spaces and patios | Medium | Low |
Practical Tips for Building a Rock Garden That Lasts
Good drainage is the single most important factor in any successful rock garden design. Most alpine and drought-tolerant rock garden plants will tolerate poor soil, exposure, and neglect far more readily than they tolerate waterlogged roots. Before placing a single stone, improve the drainage of the planting area by incorporating plenty of horticultural grit and coarse sand into the existing soil. On heavy clay soils, consider raising the entire rock garden area above the existing ground level to ensure water drains away freely from the root zone at all times.
Stone placement determines how natural or artificial a finished rock garden looks and deserves considerably more planning time than most gardeners give it. Study photographs of natural rocky outcrops and notice how the stone strata lines run consistently in the same direction across different-sized rocks. Replicating this consistent strata direction in your own rock placement is the single technique that most reliably produces a natural-looking result, regardless of the rock garden style you are creating.
Start with the largest rocks first and work down to the smallest, burying at least one-third of every stone below the soil surface. Rocks that sit entirely on top of the ground always look placed rather than natural, while rocks set partially into the soil look as though they have always been there. This simple placement principle costs nothing extra in materials or time and makes a more significant difference to the overall authenticity of the finished rock garden than any other single design decision.
A Rock Garden That Rewards You for Doing Less
A well-designed rock garden is one of those rare landscaping choices that genuinely gets better the less you interfere with it. The plants spread naturally between the stones, the moss develops on the rock surfaces, the self-seeded alpines pop up in unexpected gaps, and the whole landscape develops a settled, ancient quality that no amount of deliberate styling can fully replicate. Time and a little neglect are genuinely among the best tools in rock garden design.
The 15 ideas in this article cover every garden size, every budget, and every level of landscaping experience. Whether you want a dramatic boulder front yard redesign, a simple trough garden on a patio, or a sedum-covered slope that practically looks after itself, there is a rock garden design approach here that fits your specific space and your specific ambitions for it.
The most important thing is to start. A rock garden does not need to be large or elaborate to be effective and beautiful. Even a small raised bed planted with a handful of alpines and a few well-placed stones creates a genuinely lovely and low-maintenance garden feature that improves with every passing season.
Conclusion
Rock garden design offers one of the most practical, beautiful, and ecologically valuable landscaping solutions available for any outdoor space. The 15 ideas in this article demonstrate just how varied and creative rock garden landscaping can be, from a serene Japanese zen garden with raked gravel to a colorful cottage-style alpine planting, from a dramatic desert succulent landscape to a shaded woodland fern and moss garden.
The key takeaways are worth keeping close as you plan your own rock garden. Always prioritize drainage above everything else because no rock garden plant thrives in waterlogged soil. Place rocks partially buried and with consistent strata direction for the most natural result. Choose plants suited to your specific light conditions, climate, and soil type rather than simply choosing what looks attractive in a catalog photograph. And build the largest structural elements first before introducing plants, because the rocks should always set the scene that the planting fills in around.
A rock garden also gives back to the wider environment in a way that few other garden features can match. The wildlife habitat, the pollinator support, the reduced water consumption, and the elimination of chemical lawn treatments all make a rock garden one of the most responsible and rewarding landscaping investments you can make for any outdoor space.
Frequently Asked Questions
What is the best rock for a rock garden?
The best rocks for a rock garden are locally sourced natural stones that reflect the geology of your surrounding area. Limestone, sandstone, slate, and granite all work well, depending on the regional availability and the garden style you are creating. Local stone always looks more natural in a landscape than imported varieties and costs considerably less to transport. Avoid rocks with very sharp edges or artificially cut faces, as they never look convincingly natural, regardless of how well they are positioned.
What plants grow best in a rock garden?
The best plants for a rock garden are drought-tolerant, free-draining soil lovers that thrive in lean, gritty conditions. Top choices include aubretia, sedum, sempervivum, dianthus, alpine phlox, creeping thyme, saxifrage, armeria, and dwarf conifers. Match your plant selection to the light conditions of your specific rock garden position, as shade-tolerant ferns and epimedium suit a north-facing rock garden just as well as sun-loving alpines suit a south-facing one.
How do I stop weeds from growing in a rock garden?
The most effective weed control in a rock garden combines a landscape fabric membrane laid before stone and plant placement with a consistent gravel or grit mulch across all exposed soil surfaces. Plant rock garden plants densely enough that their spreading growth covers the soil surface between the rocks within two to three seasons, leaving little open ground for weed seeds to germinate. Hand weeding any breakthrough weeds promptly before they set seed prevents the problem from compounding over time.
How deep should I bury rocks in a rock garden?
Bury at least one-third of every rock below the soil surface for the most natural-looking result. Larger boulders benefit from being set even deeper, with up to half their mass below ground level. Rocks set at this depth look permanently embedded in the landscape rather than recently placed on top of it. Always check that buried rocks sit on a firm, stable base so they do not shift or settle unevenly after the garden is planted and established.
Can I build a rock garden on flat ground?
A rock garden works perfectly well on flat ground with the right design approach. Raised rock garden beds, flat ground boulder groupings with gravel mulch, trough gardens, and zen gravel gardens all suit level sites beautifully. On flat ground, focus extra attention on drainage improvement before building, as flat sites lack the natural gradient that slopes provide. Incorporating a raised planting area or a deep drainage layer of rubble beneath the growing medium solves most flat ground drainage challenges effectively.
How much does it cost to build a rock garden?
The cost of building a rock garden varies significantly depending on the size, the stone type, and whether you source materials locally or from specialist suppliers. A small raised trough garden costs very little beyond the container and a bag of alpine compost. A medium-sized hillside rock garden using locally sourced stone and plug plants can be built for a few hundred dollars or pounds. A large front yard boulder redesign with professionally sourced statement rocks represents a more significant investment but delivers outstanding long-term value through eliminated lawn maintenance costs.
How do I make a rock garden look natural?
The most important factors in making a rock garden look natural are consistent stone type throughout the entire design, partially buried rock placement with consistent strata direction, and planting that spreads and self-seeds freely between the stones over time. Avoid mixing multiple rock types, avoid placing rocks entirely on the soil surface, and avoid rigid symmetrical planting layouts. Natural rocky landscapes are always asymmetric, always use a single consistent stone type, and always show plants growing in the most unexpected and apparently random locations between the rocks.