Exposed ceiling joists in a living room can look either brilliantly intentional or like someone ran out of money mid-renovation. The good news is that finishing them properly is entirely achievable on most budgets, and the results can genuinely transform how a room feels. Whether you’re going for an industrial loft look, a rustic farmhouse vibe, or something clean and Scandinavian, there’s a finish option that fits.
Most people who end up with exposed joists either chose them deliberately or inherited them when they removed an old ceiling and liked what they found. Either way, leaving them raw and unfinished is almost never the right answer. Bare timber joists collect dust, look unfinished, and do nothing to improve the room’s acoustics or insulation. A proper finish makes them a feature rather than an oversight.
This guide covers the most practical and popular ways to finish exposed ceiling joists in a living room, including painting, staining, wrapping, and a few other approaches that work well in real homes. Each option includes realistic cost estimates so you can plan properly before buying anything.
What to Check Before You Finish Your Exposed Ceiling Joists
The condition of the joists matters enormously before you apply any finish. Older timber joists often have rough surfaces, old adhesive residue, nail holes, or slight discoloration from years of being hidden above a ceiling. Sanding them down before any finish goes on is not optional if you want a clean result. A random orbital sander with 80 grit followed by 120 grit smooths out most imperfections in a manageable amount of time.
Check for any signs of moisture damage, rot, or insect activity before finishing. Finishing over a joist with hidden rot just delays a much bigger and more expensive problem. If any joists show soft spots, dark staining, or crumbling wood, get a structural assessment done before touching anything cosmetically. This sounds overly cautious until you realise how much fixing structural timber costs compared to catching it early.
It’s also worth thinking about what sits between the joists before you decide on a finish. If there’s old insulation, pipes, or cables visible between the timbers, you’ll either need to tidy those up or incorporate them into the finished look deliberately. Industrial-style exposed ceilings can carry visible pipes and cables if they’re painted uniformly, but a rustic or natural finish looks odd with a grey plastic conduit running across it.
6 Best Ways to Finish Exposed Ceiling Joists in a Living Room
1. Paint the Joists and Ceiling Void White for a Clean Modern Look
Painting exposed joists white is the most popular finishing choice and consistently the one that makes a living room feel the largest and brightest. The trick is to paint everything in the ceiling void the same colour, including the joists, the subfloor or deck above them, any pipes, and any cables. When everything is one uniform white, the ceiling reads as a cohesive architectural feature rather than a structural mess.
Flat or matte white paint works better than a sheen finish for this application. A sheen on ceiling timbers catches light at odd angles and highlights every imperfection in the wood surface. Dulux Trade Supermatt or a similar flat emulsion gives a clean, even result that photographs well and looks genuinely considered in person.
Budget for this approach sits between $150 and $400 for an average living room, depending on ceiling height and how many coats the timber absorbs. Bare timber is thirsty and will drink paint, so a primer coat before the topcoats saves money on the overall finish quantity. Expect to use two to three topcoats for a properly solid coverage on raw timber.
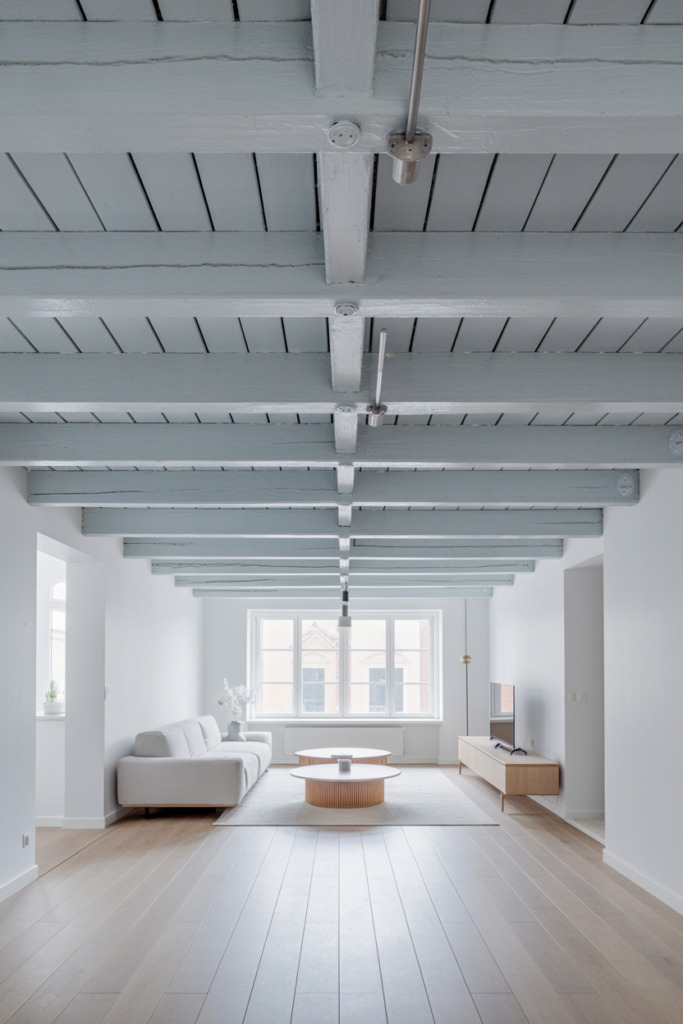
2. Paint the Joists Black or Dark Grey for an Industrial or Dramatic Look
Black painted exposed joists create one of the most striking ceiling treatments available in residential interiors right now. This approach works particularly well in living rooms with high ceilings, light-coloured walls, and plenty of natural light coming in from large windows. The contrast between a white or light-coloured room and a black ceiling zone draws the eye upward in a way that feels genuinely architectural.
The key to making black joists work is committing to the approach fully. Paint the joists, the deck above, any pipes, and any cables all in the same matte black. Half-measures look unfinished. Deep matte black like Farrow and Ball Railings, Little Greene Obsidian, or a budget equivalent from Dulux or Crown all give excellent coverage and a sophisticated finish.
Costs run similar to the white approach, between $150 and $450 depending on room size. Black paint tends to need slightly more coats on raw timber than white because the depth of colour takes time to build up evenly. Budget for three coats minimum on bare wood and use a dark grey primer to avoid pale undertones showing through the topcoats.
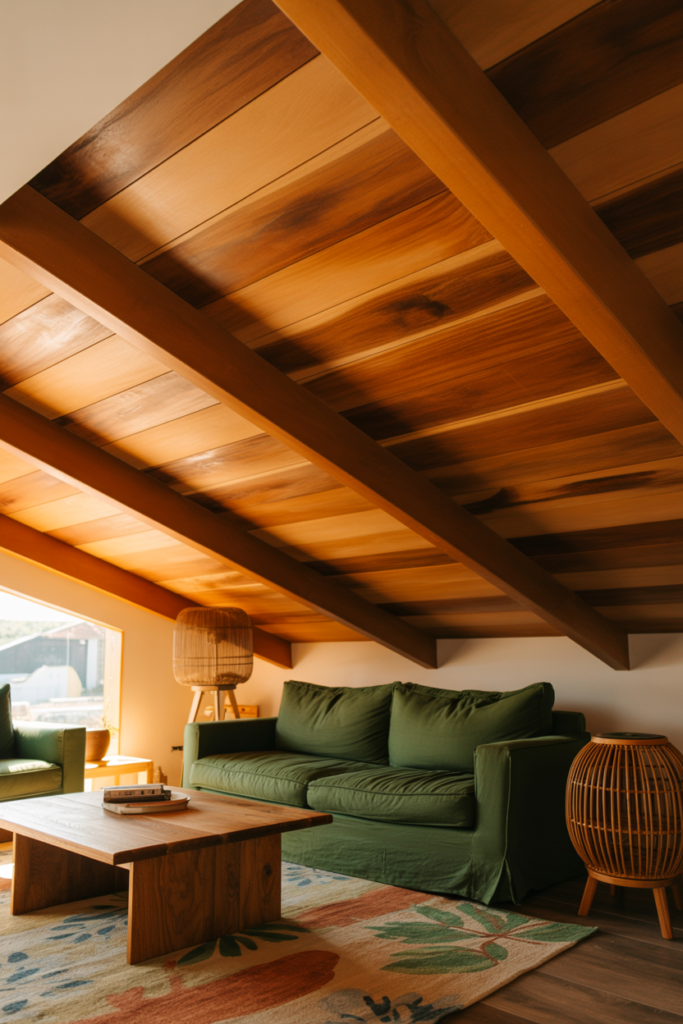
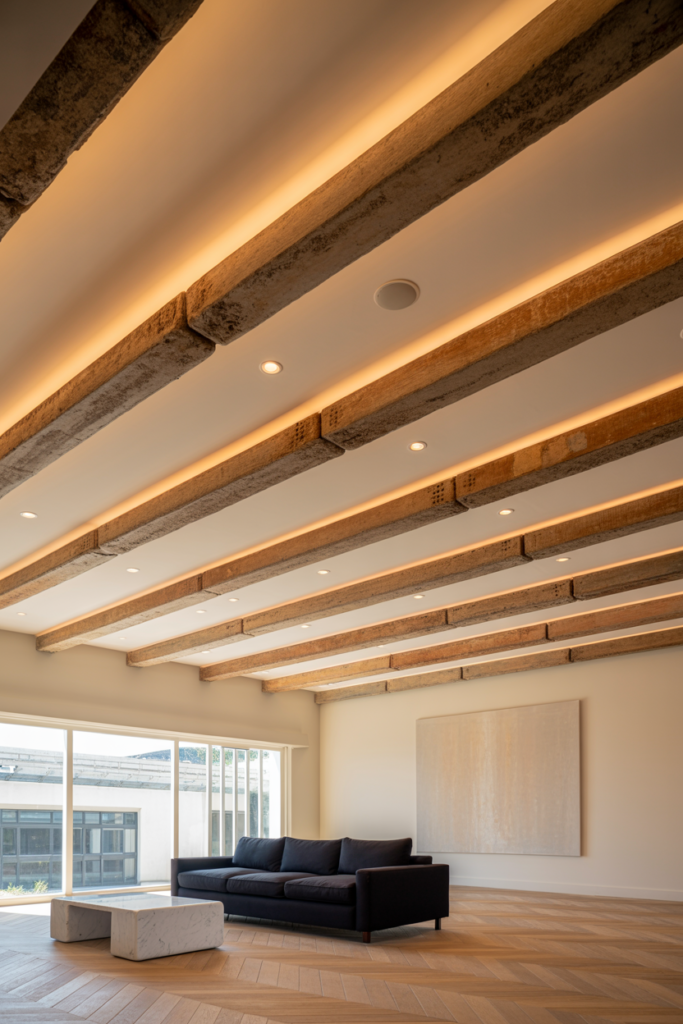
3. Stain the Joists for a Natural Wood Finish
Staining exposed joists preserves the natural character of the timber while evening out colour variations and protecting the wood surface. This approach suits farmhouse, cottagecore, and Scandinavian-inspired living rooms where the warmth of real wood grain adds to the overall aesthetic. A good wood stain lets the grain show through while giving the timber a finished, intentional appearance.
Oil-based wood stains penetrate the timber rather than sitting on the surface, which means they don’t peel or flake the way paint can over time. Popular tones for living room ceiling joists include light oak, medium walnut, and warm chestnut. Lighter stains open the ceiling up visually, while darker walnut tones create a rich, cosy atmosphere that pairs well with warm-toned furnishings below.
Staining costs a little more than painting in most cases because good quality wood stain costs more per litre than emulsion paint. Budget for $200 to $550 for an average living room ceiling, including a pre-stain wood conditioner which helps the stain absorb evenly across different grain densities. Skipping the conditioner often leads to blotchy results, especially on pine which is the most common joist timber in residential properties.
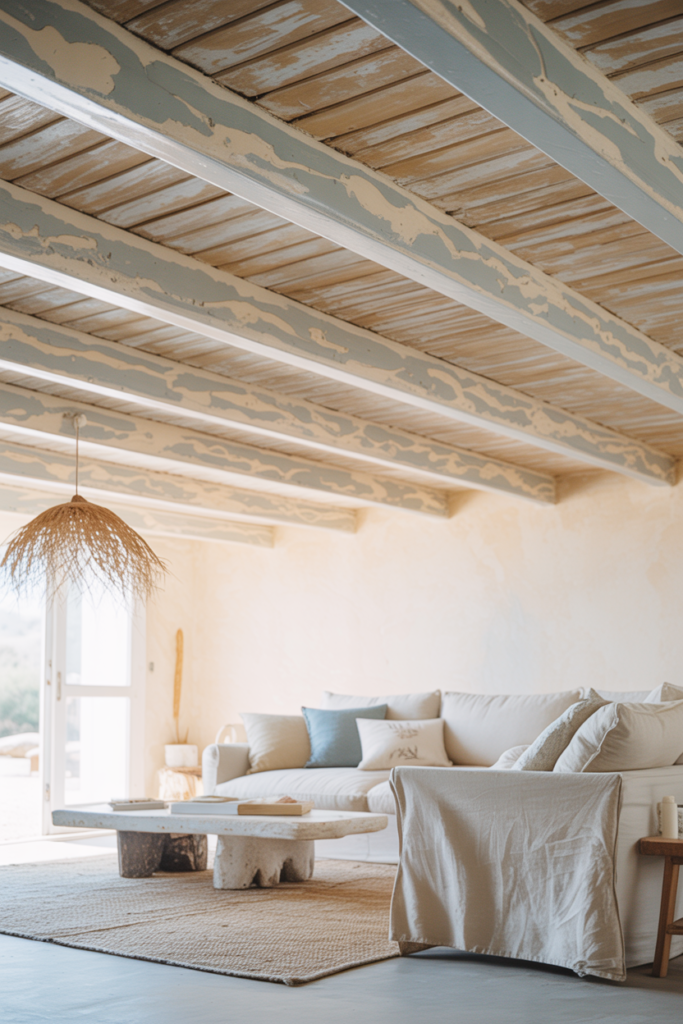
4. Whitewash or Limewash the Joists for a Soft Rustic Finish
Whitewashing or limewashing exposed timber joists creates a soft, weathered appearance that sits beautifully in relaxed, natural, or coastal-inspired living rooms. The technique involves applying a diluted white paint or actual limewash product that soaks into the grain and leaves a translucent pale finish rather than a solid coat. The wood grain stays visible, giving the result an organic quality that solid white paint can’t replicate.
Limewash products like Portola Paints Lime Wash or a DIY diluted emulsion mix both work well on ceiling timber. The DIY approach involves mixing white emulsion with water at roughly a 1:1 ratio and wiping it across the timber with a cloth, then partially wiping it back off before it dries fully. The result varies slightly with each joist depending on the wood grain, which is exactly the point.
This finish costs very little if you go the DIY route, anywhere from $50 to $180 for an average room using diluted emulsion. Proper limewash products cost more, typically $250 to $500 for the same space, but give a more consistent and durable result. Both approaches work well and the choice usually comes down to how much time versus money you want to invest.
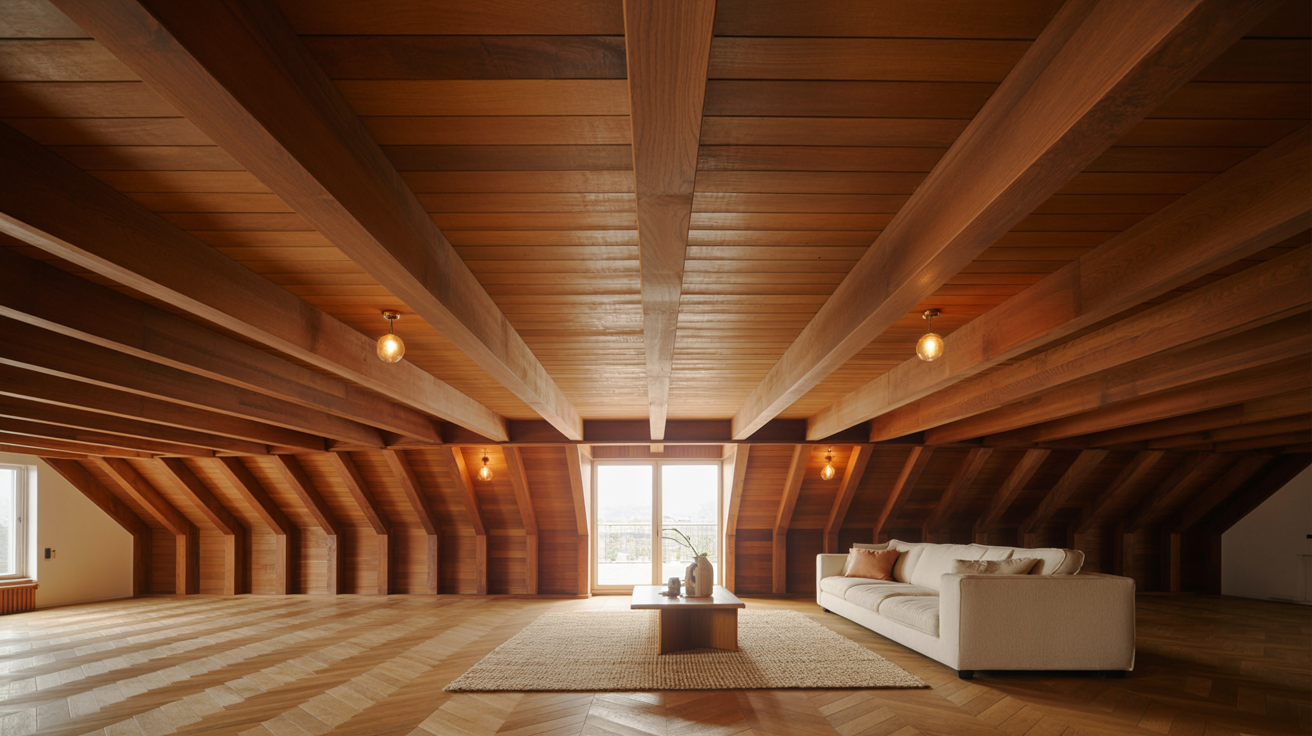
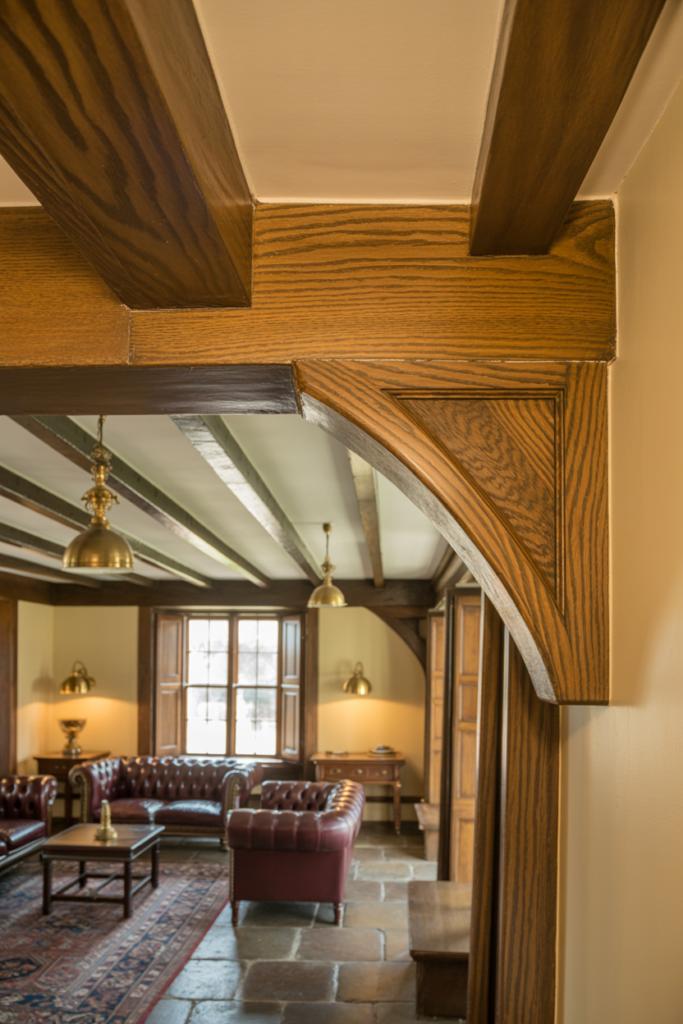
5. Wrap the Joists in Timber Cladding for a Solid Beam Look
Wrapping exposed structural joists in timber cladding gives them the appearance of solid decorative beams, which looks significantly more substantial and finished than bare structural timber. This approach suits traditional, farmhouse, and period-inspired living rooms where thick wooden beams feel architecturally appropriate. The cladding wraps around the joist on three sides and creates a smooth, clean profile that reads as a proper feature beam.
Thin timber boards or MDF panels cut to width and mitred at the corners give the best finish for this technique. Oak veneer MDF is a popular choice because it gives the look of real oak at a fraction of the cost of solid timber cladding. Real oak or pine tongue-and-groove boards work beautifully for a more authentic finish if the budget allows.
Costs for wrapping joists run higher than painted or stained finishes because of the material and labour involved. Budget for $400 to $1,200 for an average living room depending on the number of joists and the cladding material chosen. DIY installation is manageable if you’re comfortable with a mitre saw and a nail gun, and doing it yourself saves a significant portion of the total cost.
6. Box In the Joists With Plasterboard for a Smooth Finished Ceiling
Boxing in exposed joists with plasterboard creates a smooth, conventional ceiling that completely hides the structural timber. This option suits living rooms where the exposed joist look simply doesn’t fit the style of the home or where the joists themselves are too rough, too shallow, or too irregular to look good exposed. It’s also the best solution when the space between joists contains insulation or wiring that would look messy even with a uniform paint finish.
Fixing plasterboard between and around the joists rather than flat across the ceiling creates a coffered or ribbed ceiling effect that looks far more interesting than a completely flat surface. This approach keeps the structural lines of the joists visible in profile while giving the ceiling a clean, plastered finish. It’s a good middle ground between fully exposing the joists and hiding them entirely.
Full boxing in with a flat plasterboard ceiling costs between $500 and $1,500 for an average living room including plastering and first-fix decoration. The coffered effect costs slightly more due to the additional cuts and fixing required. Both approaches add genuine value to a property and suit almost any living room style from traditional to contemporary.
| Finish Method | Best Style Fit | DIY Friendly | Estimated Cost |
|---|---|---|---|
| White paint | Modern, Scandi, eclectic | Yes | $150 to $400 |
| Black or dark paint | Industrial, dramatic | Yes | $150 to $450 |
| Wood stain | Farmhouse, rustic, natural | Yes | $200 to $550 |
| Whitewash or limewash | Coastal, cottagecore, relaxed | Yes | $50 to $500 |
| Timber cladding wrap | Traditional, farmhouse, period | Partly | $400 to $1,200 |
| Plasterboard boxing | Any style, neat finish | No | $500 to $1,500 |
Practical Tips for Getting the Best Finish on Exposed Joists
Preparation makes more difference than the finish product itself. Sanding, cleaning, and priming the joists before any paint, stain, or wash goes on determines how good the final result looks. Rushing the preparation stage is the most common reason a DIY exposed joist ceiling looks amateur rather than intentional.
Work from the back of the room toward the exit so you’re never painting yourself into a corner, literally. Using a good quality angled brush for the joist edges and a short-nap roller for the flat faces speeds up the process significantly and gives a more even finish than a brush alone on the flat surfaces. An extension pole for the roller saves a significant amount of time and back strain on ceiling work.
Lighting the ceiling well during and after finishing is as important as the finish itself. Pendant lights or track lighting hung between the joists at different heights creates a layered, intentional look that makes any of the above finishes look twice as good in the finished room. The lighting design should be planned before any electrical work is closed up, so think about fitting positions early in the process.
Conclusion
Finishing exposed ceiling joists in a living room is one of those projects that delivers a significant visual payoff relative to the cost and effort involved. White paint gives the cleanest, most versatile result and suits almost any style. Black or dark paint creates drama in rooms with enough natural light to handle it. Wood stain preserves the natural character of the timber beautifully. Whitewashing gives a soft, organic finish that suits relaxed and coastal spaces. Timber wrapping transforms structural joists into proper architectural beams. Plasterboard boxing creates a neat, conventional finish when exposed timber simply isn’t the right look.
The key across all of these approaches is preparation first, quality materials second, and patience with the coats. Bare timber absorbs far more product than painted surfaces, so budgeting for extra primer and finish coats upfront avoids frustrating mid-project supply runs. Plan the lighting at the same time as the ceiling finish and the two elements will work together beautifully rather than feeling like separate afterthoughts.
Start with a clear style direction before choosing a finish, because the right choice depends almost entirely on what kind of living room you’re creating around it. Get that right and the ceiling becomes one of the most talked-about features in the room.
Frequently Asked Questions
What is the cheapest way to finish exposed ceiling joists in a living room? Whitewashing with diluted emulsion paint is the most affordable option, costing as little as $50 to $180 for an average room. White or dark emulsion paint is the next most budget-friendly approach at $150 to $450 depending on room size.
Do I need to prime exposed timber joists before painting? Yes, priming bare timber before painting is important because raw wood absorbs paint heavily and unevenly. A good primer coat seals the surface, reduces the number of topcoats needed, and gives a more even final finish.
Can I stain ceiling joists that have already been painted? No, wood stain needs to penetrate bare timber to work properly and won’t absorb through existing paint. You would need to sand or strip the paint back to bare wood before applying any stain product.
What paint finish works best on exposed ceiling joists? Flat or matte finishes work best on ceiling timber because they don’t reflect light at odd angles or highlight surface imperfections. Avoid eggshell or satin finishes on rough or uneven timber surfaces.
How do I make exposed ceiling joists look like solid beams? Wrapping the joists in timber cladding or oak veneer MDF panels on three sides creates the appearance of solid decorative beams. Mitring the corners of the cladding boards gives a clean, professional finish that reads as genuine solid timber from below.
Does finishing exposed joists help with sound insulation? Paint and stain finishes do very little for sound insulation on their own. Adding acoustic insulation material between the joists before finishing makes a meaningful difference to how sound travels between floors in a property.
Is it better to paint exposed joists white or leave them natural? White paint suits modern, Scandinavian, and eclectic living rooms and makes the ceiling feel higher and brighter. A natural wood stain suits farmhouse and rustic spaces better. The right choice depends entirely on the style of the room around the ceiling.